
How to Fix Tube Puncture Near Seam: Easy Repair!
Quick Summary: Fixing a tube puncture near the seam requires extra care. First, locate the puncture. Lightly roughen the tube surface around the hole, avoiding the seam itself. Apply a thin, even layer of vulcanizing glue, let it dry until tacky, and firmly apply the patch. Ensure the patch edges are well-sealed. Let it cure fully before reinflating the tube to prevent further issues near the seam.
Finding a flat tire is never fun, especially when the puncture is right next to the tube’s seam. It might seem like a tricky spot to repair, but don’t worry! Fixing a puncture near the seam is totally doable with a bit of patience and the right technique. This area can be a bit weaker, so a careful approach is key. We’ll guide you through each step, so you can get back on your bike with confidence. Ready to learn how? Let’s get started!
Understanding Tube Punctures Near the Seam

A puncture near the seam of a bike tube can be more challenging to repair than one in the middle. The seam area often has variations in thickness and flexibility, which can affect how well a patch adheres. Here’s why it’s important to address these punctures correctly:
- Weaker Material: The seam area can sometimes be a bit weaker due to the manufacturing process.
- Flexibility: The seam area often experiences more flexing and movement.
- Adhesion Issues: Patches might not stick as well due to uneven surfaces or the seam material.
Tools and Materials You’ll Need

Before you start, gather all the necessary tools and materials. Having everything within reach will make the repair process smoother and more efficient.
- Bike Tire Levers: For removing the tire from the rim.
- Sandpaper or Tube Scuffer: To roughen the tube surface for better adhesion.
- Vulcanizing Glue: To create a strong bond between the tube and the patch.
- Tube Patch Kit: Including various sizes of patches.
- Inflation Pump: To inflate the tube after the repair.
- Bowl of Water: To help locate the puncture (optional).
- Rag or Paper Towel: To clean the area.
Step-by-Step Guide to Fixing a Tube Puncture Near the Seam

Follow these steps carefully to ensure a successful repair. Each step is crucial for creating a strong, lasting patch.
Step 1: Remove the Wheel and Tube
Start by removing the wheel from your bike. Depending on your bike, this might involve releasing the brakes and using a quick-release lever or tools to loosen the axle. Once the wheel is off, use tire levers to carefully remove one side of the tire from the rim. Insert one lever under the tire bead and hook it onto a spoke. Insert the second lever a few inches away and pry that section of the tire off as well. You should now be able to pull the tire off the rim.
Step 2: Locate the Puncture
Inflate the tube slightly and listen for a hissing sound to locate the puncture. If you can’t hear it, submerge the tube in a bowl of water and look for bubbles. Mark the location of the puncture with a pen or your finger. Once you find the puncture, inspect the tire for any sharp objects that may have caused it, such as glass or thorns. Remove any debris from the tire to prevent future flats. Running your finger carefully along the inside of the tire will help you find these.
Step 3: Prepare the Tube Surface
Use sandpaper or a tube scuffer to gently roughen the surface around the puncture. This step is essential for creating a good bond between the tube and the patch. Make sure the area is clean and dry before proceeding. Be extra cautious when scuffing near the seam to avoid damaging it further. The goal is to create a slightly rough surface without weakening the tube.
Step 4: Apply Vulcanizing Glue
Apply a thin, even layer of vulcanizing glue to the prepared area. Make sure the glue covers an area slightly larger than the patch you plan to use. Let the glue dry for a few minutes until it becomes tacky. This is crucial for proper adhesion. The glue should look dull and feel sticky to the touch. Vulcanizing glue works by chemically bonding the patch to the tube, creating a strong and permanent repair.
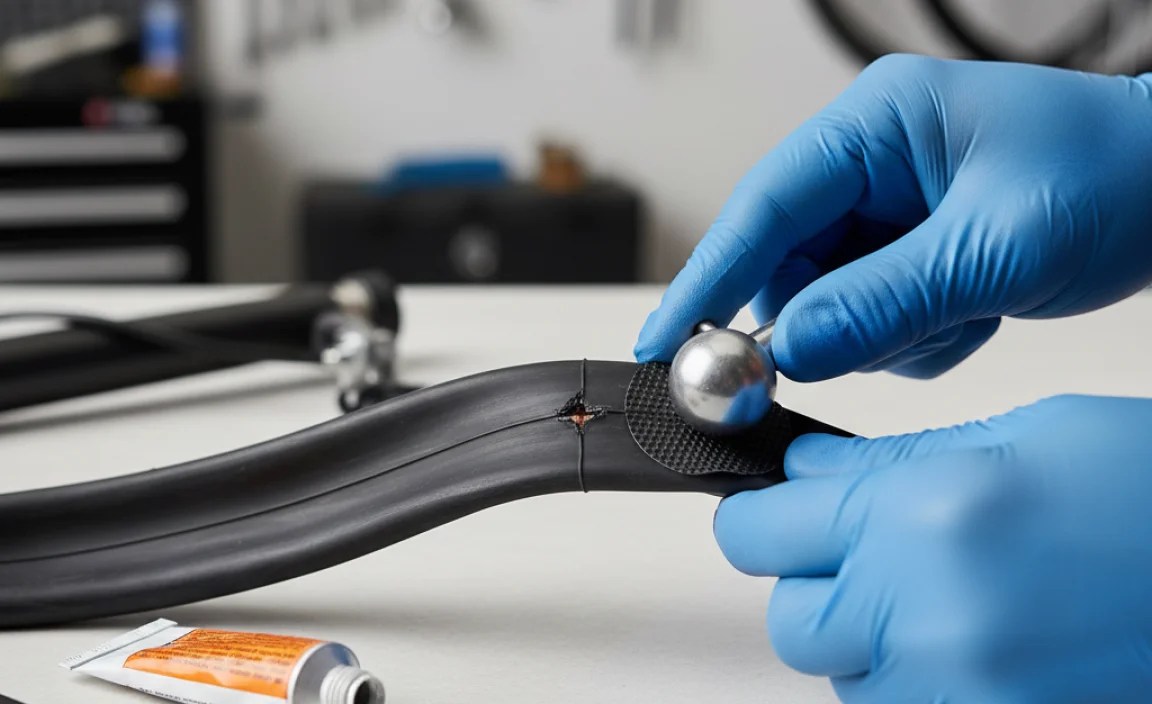
Step 5: Apply the Patch
Remove the backing from the patch and carefully center it over the glued area. Press down firmly, starting from the center and working your way out to the edges. This will help eliminate any air bubbles and ensure a good seal. Hold the patch in place for a minute or two to allow the glue to bond properly. Some patch kits include a metal plate or a piece of paper to place over the patch while it cures. This helps apply even pressure and ensures a strong bond.
Step 6: Wait for the Glue to Cure
Allow the glue to cure completely before reinflating the tube. The curing time can vary depending on the type of glue and the environmental conditions, but typically, 5-10 minutes is sufficient. Avoid rushing this step, as it’s crucial for a lasting repair. Once the glue is fully cured, the patch should be firmly bonded to the tube.
Step 7: Reinstall the Tube and Tire
Carefully insert the tube back into the tire, making sure it’s not twisted or pinched. Start by inserting the valve stem into the hole in the rim, then work the tube into the tire. Once the tube is in place, use your thumbs to push the tire back onto the rim. Start opposite the valve stem and work your way around the tire. If you have difficulty, use tire levers to gently pry the last section of the tire onto the rim. Be careful not to pinch the tube with the levers.
Step 8: Inflate the Tire
Inflate the tire to the recommended pressure, as indicated on the sidewall of the tire. Check the tire to make sure it’s seated properly on the rim. Look for a consistent gap between the tire and the rim all the way around. If you notice any bulges or uneven spots, deflate the tire and readjust it. Once you’re satisfied that the tire is seated correctly, inflate it to the recommended pressure and you’re ready to ride.
Tips for Ensuring a Lasting Repair Near the Seam

Repairing a tube near the seam requires extra attention to detail. Here are some tips to ensure your repair lasts:
- Use a High-Quality Patch Kit: Invest in a reliable patch kit with good quality glue and patches.
- Clean the Area Thoroughly: Make sure the tube surface is clean and dry before applying glue.
- Apply Even Pressure: When applying the patch, press down firmly and evenly to ensure a good seal.
- Allow Sufficient Curing Time: Don’t rush the curing process. Give the glue enough time to bond properly.
- Inspect the Tire: Always check the inside of the tire for sharp objects that may cause future punctures.
Troubleshooting Common Issues
Sometimes, even with the best efforts, issues can arise during the repair process. Here are some common problems and how to address them:
- Patch Not Sticking: If the patch isn’t sticking, make sure you’ve roughened the tube surface adequately and applied enough glue. Also, ensure the glue is tacky before applying the patch.
- Air Leaking from the Patch: If you notice air leaking from the patch, it could be due to a poor seal. Try applying more pressure to the patch and allowing more curing time. If the leak persists, you may need to remove the patch and start over.
- Tube Pinching: When reinstalling the tube and tire, be careful not to pinch the tube between the tire and the rim. This can cause a new puncture. Use your thumbs to carefully work the tire onto the rim, and avoid using tire levers unless absolutely necessary.
Alternatives to Patching: Tube Replacement
While patching is a cost-effective and environmentally friendly solution, sometimes a tube is beyond repair. If the puncture is too large, or if the tube has multiple punctures, it may be best to replace it. Here’s a comparison of patching versus replacing:
| Factor | Patching | Replacing |
|---|---|---|
| Cost | Low | Moderate |
| Time | Moderate | Quick |
| Durability | Can be durable if done correctly | New tube reliability |
| Complexity | Requires some skill | Simple |
| Environmental Impact | Lower | Higher |
If you choose to replace the tube, make sure to select the correct size for your tire. The tire size is usually printed on the sidewall of the tire. When installing the new tube, follow the same steps as reinstalling a patched tube, being careful not to pinch it.
Preventing Future Punctures
Prevention is always better than cure. Here are some tips to help prevent future punctures:
- Maintain Proper Tire Pressure: Underinflated tires are more prone to pinch flats. Check your tire pressure regularly and inflate to the recommended level.
- Inspect Your Tires Regularly: Look for cuts, embedded objects, or signs of wear. Replace your tires when they start to show signs of damage.
- Use Tire Liners: Tire liners are strips of material that fit between the tire and the tube, providing an extra layer of protection against punctures.
- Ride Smart: Avoid riding through areas with broken glass, debris, or other hazards.
- Consider Tubeless Tires: Tubeless tires use a sealant to automatically seal small punctures, reducing the risk of flats.
Choosing the Right Patch Kit
With so many patch kits on the market, it can be difficult to choose the right one. Here are some factors to consider when selecting a patch kit:
- Quality of Glue: Look for vulcanizing glue that provides a strong, lasting bond.
- Patch Material: Patches made from high-quality rubber are more durable and flexible.
- Variety of Sizes: Choose a kit with a variety of patch sizes to accommodate different types of punctures.
- Ease of Use: Some patch kits are easier to use than others. Look for kits with clear instructions and user-friendly tools.
- Customer Reviews: Read customer reviews to get an idea of the quality and reliability of the patch kit.
Additional Tools for Bike Maintenance
Besides the tools needed for fixing a flat tire, there are several other tools that are essential for basic bike maintenance. Having these tools on hand will help you keep your bike in good working condition and prevent more serious problems.
- Bike Pump: For maintaining proper tire pressure.
- Multi-Tool: A compact tool with various Allen wrenches, screwdrivers, and other useful tools.
- Chain Lube: To keep your chain running smoothly and prevent rust.
- Chain Cleaner: To remove dirt and grime from your chain.
- Adjustable Wrench: For tightening and loosening bolts.
- Cable Cutters: For cutting brake and derailleur cables.
FAQ: Fixing Tube Punctures Near the Seam
Q1: Why is a puncture near the seam harder to fix?
A1: The seam area can be weaker and less uniform, making it harder for patches to adhere properly due to differences in thickness and flexibility.
Q2: Can I use any type of glue for the patch?
A2: No, you should only use vulcanizing glue. It chemically bonds the patch to the tube for a strong, lasting repair. Other glues may not hold up under pressure.
Q3: How long should I let the glue dry before applying the patch?
A3: Let the glue dry until it becomes tacky, usually a few minutes. It should look dull and feel sticky to the touch. This ensures a good bond.
Q4: What if the patch keeps peeling off?
A4: Make sure you’re roughening the tube surface enough and applying a thin, even layer of vulcanizing glue. Also, ensure the glue is tacky before applying the patch and apply firm, even pressure.
Q5: Can I reuse a tube with multiple punctures?
A5: It’s generally best to replace a tube with multiple punctures, especially if they are close together. Too many patches can weaken the tube and increase the risk of future flats.
Q6: How can I prevent future punctures near the seam?
A6: Maintain proper tire pressure, inspect your tires regularly for damage, and avoid riding through areas with debris. Consider using tire liners for added protection.
Q7: Is it worth it to patch a tube near the seam, or should I just replace it?
A7: If the puncture is small and you follow the repair steps carefully, patching can be a good option. However, if the puncture is large or the seam is damaged, replacing the tube is a more reliable solution.
Conclusion
Fixing a tube puncture near the seam might seem daunting at first, but with the right tools, a bit of patience, and these step-by-step instructions, you can confidently repair your tube and get back on the road. Remember, preparation and attention to detail are key to a lasting repair. By following these guidelines, you’ll not only save money but also gain valuable bike maintenance skills. So, next time you find yourself with a flat near the seam, don’t panic – you’ve got this! Happy cycling!


