
How to Mount Action Camera to Helmet vs Bike Frame: Easy!
Do you love riding your bike or doing fun sports? Do you want to show off your cool moves? An action camera can help you do that. You can record all your adventures. But how to mount action camera to helmet vs bike frame can be tricky. Let’s learn the best ways to do it.
Have you ever seen a cool video of someone biking down a mountain? Maybe they used an action camera! You can make videos like that too. First, you need to know how to put the camera on your helmet or bike. It needs to stay safe and record well.
Imagine you are riding your bike. You want to film your ride. Should you put the camera on your head or your bike? Both are good choices. But they give you different views. Let’s find out which one is best for you. We’ll also learn how to do it safely.
Key Takeaways
- Mounting an action camera on your helmet gives you a head’s-up, immersive point of view.
- Attaching to the bike frame provides stable shots and shows the bike’s movement.
- Make sure to check the camera’s mount and settings before you start recording.
- Understanding how to mount action camera to helmet vs bike frame ensures great videos.
- Always prioritize safety when mounting your camera to avoid accidents or damage.
Helmet Mounting: Capture Your View


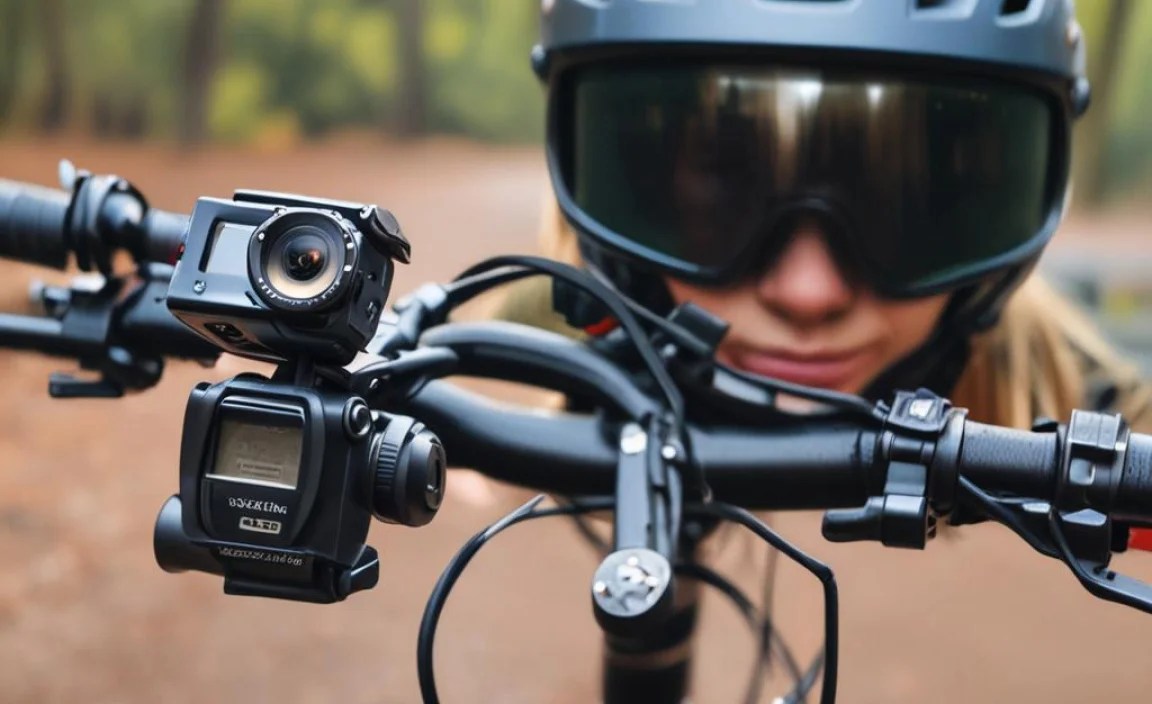
Putting your action camera on your helmet is a popular choice. It shows what you see. This is called a “first-person view.” It’s like you are watching the video through your own eyes. Mounting on a helmet is great for sports like biking, skiing, and skateboarding. You can see the path ahead. The video feels like you are right there. But make sure your helmet is safe. The camera should not block your view. Always follow the instructions for your camera mount. Also, remember to check the laws in your area. Some places have rules about cameras on helmets. When you use a helmet mount, people can see exactly what you saw. It makes for exciting videos!
- Helmet mounts give a first-person view.
- They are great for many sports.
- Check your helmet’s safety.
- Follow the mount’s instructions.
- Know the local laws about helmet cameras.
Have you ever wondered why helmet-mounted videos look so real? It’s because they move with your head. This captures every turn and bump. It feels like you are in the action. But this can also make the video shaky. Some cameras have image stabilization. This helps make the video smoother. Experiment with different helmet positions. Try the top, side, or front of the helmet. Each spot gives a different angle. Make sure the camera is secure. You don’t want it to fall off during your ride. A good helmet mount is strong and adjustable. It will keep your camera safe and your videos looking great. When you understand how to mount action camera to helmet vs bike frame, you are set to make amazing content.
Is a Helmet Mount Right for You?
Do you want people to see exactly what you see? A helmet mount is perfect. It’s like having a camera in your eyes. This is great for capturing fast action. But it can also be shaky. Some people don’t like the head movements. Think about what you want to show. If you want a smooth, stable view, a bike mount might be better. But if you want to show your perspective, choose a helmet mount. Consider the type of riding you will do. For bumpy trails, a helmet mount can be exciting. For smooth roads, a bike mount might be better. Different mounts fit different helmets. Some use straps, others use sticky pads. Pick one that fits your helmet well. A secure mount is very important for safety.
Choosing the Right Helmet Mount
Picking the right helmet mount can be tricky. There are many choices. Some mounts stick to your helmet. Others use straps. Sticky mounts are good for smooth helmets. Strap mounts work on helmets with vents. Think about how you will use your camera. If you want to change the angle often, get an adjustable mount. Check reviews before you buy. See what other people say about the mount. A good mount will be strong and easy to use. It will also keep your camera safe. Make sure the mount fits your camera. Some mounts only work with certain cameras. Read the product description carefully. A little research can help you find the perfect mount.
Safety Tips for Helmet Mounting
Safety is very important when using a helmet mount. Make sure the camera does not block your view. You need to see the road clearly. A camera that’s too big can be dangerous. Choose a small, lightweight camera. Check the mount before every ride. Make sure it is tight and secure. If the mount is loose, tighten it. Replace the mount if it is damaged. Practice using the camera before you go on a ride. Learn how to turn it on and off without looking. This will help you stay safe. Tell someone you are going for a ride. Let them know where you are going. Always wear a helmet, even if you have a camera. Your head is important!
Fun Fact or Stat: Studies show that helmet cameras can actually improve cyclist safety by making them more visible to drivers!
Bike Frame Mounting: Stable Shots


Mounting your action camera on your bike frame gives you a different view. It shows the bike moving. This can look very cool. Frame mounts are good for smooth, stable videos. They don’t move as much as helmet mounts. This means less shaky footage. You can attach the camera to the handlebars or the frame. Each spot gives a unique angle. Handlebar mounts show the road ahead. Frame mounts show the bike’s suspension working. Remember to use a strong mount. The bike vibrates a lot. A weak mount might break. Also, think about where you put the camera. Don’t let it get in the way of your legs or arms. Safety is always the top priority.
- Frame mounts give stable videos.
- They show the bike’s movement.
- Mounts attach to handlebars or frame.
- Use a strong, durable mount.
- Don’t block your legs or arms.
Imagine watching a video of your bike going over bumps. The camera is on the frame. You can see the wheels and suspension working hard. This is a cool perspective that a helmet mount can’t give you. Bike frame mounts are great for showing off your bike. They also capture the sounds of the ride. You can hear the tires on the road and the chain moving. These sounds add to the video. But frame mounts can also pick up vibrations. This can make the video a little shaky. Some mounts have vibration dampeners. These help reduce the shake. Experiment with different mount locations to find the best view. When considering how to mount action camera to helmet vs bike frame, remember the bike frame offers stability.
Why Choose a Bike Frame Mount?
Do you want smooth, stable videos? A bike frame mount might be best. It keeps the camera steady. This is good for showing the scenery. It also shows the bike’s movement. Helmet mounts can be shaky. They move with your head. This can be distracting for some viewers. Bike frame mounts offer a more stable view. They are great for long rides. They capture the whole journey. Think about the type of riding you will do. If you are on smooth roads, a frame mount is perfect. If you are on bumpy trails, a helmet mount might be more exciting. But remember, safety is always the most important thing.
Finding the Best Spot on Your Bike
Finding the best spot for your camera on your bike can be fun. Try different places. The handlebars are a popular choice. They give a good view of the road. But they can also vibrate a lot. The frame is another good option. It’s more stable than the handlebars. But it might show more of the bike. Think about what you want to show. If you want to show the road, use a handlebar mount. If you want to show the bike, use a frame mount. Make sure the camera doesn’t get in your way. You need to be able to ride safely. Experiment with different angles. You might be surprised at what you find.
Keeping Your Camera Safe on the Bike
Keeping your camera safe on your bike is very important. Use a strong, reliable mount. Check the mount before every ride. Make sure it is tight and secure. If the mount is loose, tighten it. Replace the mount if it is damaged. Consider using a safety tether. This is a small rope that connects the camera to the bike. If the mount breaks, the tether will keep the camera from falling. Protect the camera from the weather. Rain and mud can damage it. Use a waterproof case if you are riding in wet conditions. Clean the camera after every ride. This will keep it working well. Always put safety first. A broken camera is not worth an accident.
Fun Fact or Stat: Bike frame mounts are often preferred by professional cyclists for training videos because of their stability and clear view of the road!
Comparing Helmet vs. Bike Frame Mounts

Choosing between a helmet mount and a bike frame mount can be tough. Both have good and bad points. Helmet mounts show what you see. They are good for fast action. But they can be shaky. Bike frame mounts are more stable. They show the bike’s movement. But they don’t show your perspective. Think about what you want to capture. If you want to show your view, choose a helmet mount. If you want a smooth video of the bike, choose a frame mount. Consider the type of riding you will do. For smooth roads, a frame mount is great. For bumpy trails, a helmet mount might be more fun. Knowing how to mount action camera to helmet vs bike frame helps you decide.
- Helmet mounts show your perspective.
- Bike frame mounts offer stability.
- Consider the type of riding.
- Think about what you want to show.
- Both mounts have advantages.
Imagine you are filming a mountain bike ride. With a helmet mount, viewers see every twist and turn. They feel like they are right there with you. But the video might be bumpy. With a bike frame mount, the video is smoother. Viewers can see the suspension working. They can appreciate the bike’s design. But they don’t see exactly what you see. Both mounts offer different experiences. Some riders use both mounts at the same time. This gives a mix of perspectives. They can switch between the helmet view and the bike view. This makes for a very interesting video. When you understand the differences, you can choose the best mount for your needs.
Pros and Cons of Helmet Mounts
Helmet mounts have many good things. They show your point of view. They are great for action shots. They are easy to adjust. But they also have some bad things. They can be shaky. They can block your view. They can be uncomfortable. Think about these things before you choose a helmet mount. If you want to show what you see, a helmet mount is great. But if you want a smooth video, it might not be the best choice. Always put safety first. Make sure the camera doesn’t block your vision. Choose a lightweight camera to avoid discomfort. A good helmet mount will be strong and adjustable.
Pros and Cons of Bike Frame Mounts
Bike frame mounts also have good and bad points. They offer stable videos. They show the bike’s movement. They are good for smooth roads. But they don’t show your perspective. They can pick up vibrations. They might be harder to adjust. Consider these things before you choose a bike frame mount. If you want a smooth video of the bike, a frame mount is great. But if you want to show what you see, it might not be the best choice. Make sure the mount is strong and reliable. Protect the camera from vibrations. Experiment with different locations to find the best view.
Which Mount is Safer?
Safety is very important. Both helmet and bike frame mounts can be safe. But you need to use them correctly. Make sure the camera doesn’t block your view. Choose a lightweight camera. Check the mount before every ride. Tighten it if it is loose. Replace it if it is damaged. Use a safety tether to prevent the camera from falling. Protect the camera from the weather. Always wear a helmet. Follow the instructions for your mount. If you are not sure how to use the mount, ask for help. A little caution can go a long way. Remember, a safe ride is a fun ride.
Fun Fact or Stat: Many action camera enthusiasts use both helmet and bike frame mounts simultaneously to create dynamic, multi-perspective videos!
Step-by-Step Mounting Guides
Mounting your action camera can seem hard. But it’s easy when you know how. First, gather your tools. You’ll need the camera, the mount, and maybe a screwdriver. Read the instructions for your mount. Follow them carefully. For helmet mounts, attach the mount to the helmet. Make sure it’s secure. Adjust the angle of the camera. For bike frame mounts, attach the mount to the handlebars or frame. Again, make sure it’s secure. Test the camera before you ride. Record a short video. Check the video to make sure it looks good. Adjust the camera if needed. Always put safety first. Don’t ride until you are sure the camera is secure.
- Gather your camera and mount.
- Read the mount’s instructions.
- Attach the mount securely.
- Adjust the camera’s angle.
- Test the camera before riding.
Imagine you are setting up your camera for a big adventure. You want to capture every moment. Take your time and do it right. Start by cleaning the surface where you will attach the mount. This will help the mount stick better. Use rubbing alcohol to clean the surface. Let it dry before you attach the mount. For sticky mounts, peel off the backing. Press the mount firmly onto the helmet or bike. Hold it in place for a few seconds. This will help it stick. For strap mounts, thread the straps through the helmet vents or around the bike frame. Tighten the straps securely. Double-check everything before you ride. A little extra effort will ensure your camera stays safe.
Mounting to a Helmet: A Simple Guide
Mounting your camera to a helmet is easy. First, choose the right mount. Some mounts stick to the helmet. Others use straps. Pick one that fits your helmet well. Clean the helmet surface. Use rubbing alcohol. Let it dry. Peel off the backing from the sticky mount. Press it firmly onto the helmet. Hold it for a few seconds. For strap mounts, thread the straps through the vents. Tighten the straps. Adjust the camera angle. Make sure it’s pointing in the right direction. Test the camera before you ride. Record a short video. Check the video to make sure it looks good. Always put safety first.
Mounting to a Bike Frame: Easy Steps
Mounting your camera to a bike frame is also simple. Choose a strong mount. The bike vibrates a lot. You need a mount that can handle it. Clean the frame surface. Use rubbing alcohol. Let it dry. Attach the mount to the handlebars or frame. Tighten the screws or straps. Make sure it’s secure. Adjust the camera angle. Make sure it’s not blocking your legs or arms. Test the camera before you ride. Record a short video. Check the video to make sure it looks good. Consider using a safety tether. This will keep the camera from falling if the mount breaks. Always put safety first.
Troubleshooting Common Mounting Problems
Sometimes, mounting your camera can be tricky. The mount might not stick well. The camera might be shaky. The angle might be wrong. Don’t worry, these problems are easy to fix. If the mount doesn’t stick, clean the surface better. Use rubbing alcohol. Let it dry completely. If the camera is shaky, try a different mount. Some mounts have vibration dampeners. If the angle is wrong, adjust the mount. Loosen the screws or straps. Change the angle. Then tighten everything again. Test the camera after every adjustment. Record a short video. Check the video to make sure it looks good. Practice makes perfect!
Fun Fact or Stat: The most common mounting mistake is not cleaning the surface before attaching the mount, which reduces adhesion by up to 50%!
Camera Settings for Best Footage

Your action camera has many settings. These settings change how your videos look. Understanding these settings will help you make better videos. Think about the resolution. Higher resolution means sharper video. But it also uses more storage space. Consider the frame rate. Higher frame rate means smoother video. This is good for fast action. But it also uses more storage space. Look at the field of view. Wider field of view captures more of the scene. But it can also distort the image. Experiment with different settings. Find what works best for you. Knowing how to mount action camera to helmet vs bike frame is only half the battle; settings matter too.
- Adjust the video resolution.
- Choose the right frame rate.
- Set the field of view.
- Use image stabilization.
- Adjust the exposure settings.
Imagine you are filming a sunset ride. You want to capture the beautiful colors. But the sun is very bright. You need to adjust the camera’s exposure. This will prevent the video from being too bright or too dark. Most action cameras have an automatic exposure setting. But you can also adjust it manually. Experiment with different exposure settings. See how they affect the video. Also, consider using a filter. Filters can enhance the colors and reduce glare. A polarizing filter is great for sunny days. It will make the sky look bluer and the clouds look whiter. Understanding your camera’s settings will help you create stunning videos.
Understanding Resolution and Frame Rate
Resolution and frame rate are very important. Resolution is how many pixels are in the video. More pixels mean a sharper image. Common resolutions are 1080p and 4K. 4K has more pixels than 1080p. Frame rate is how many frames are recorded per second. More frames mean smoother video. Common frame rates are 30fps and 60fps. 60fps is smoother than 30fps. Choose the right settings for your needs. If you want the sharpest video, use 4K resolution. If you want the smoothest video, use 60fps frame rate. But remember, higher settings use more storage space. You might need a bigger memory card.
Using Image Stabilization Effectively
Image stabilization helps reduce shake in your videos. This is very important for action cameras. They often move around a lot. Image stabilization can be digital or optical. Digital stabilization uses software to reduce shake. Optical stabilization uses hardware to do it. Optical stabilization is usually better than digital stabilization. But it’s also more expensive. Turn on image stabilization in your camera settings. This will help make your videos smoother. Experiment with different levels of stabilization. Some cameras have different modes. Choose the mode that works best for you. A little image stabilization can make a big difference.
Adjusting Exposure and White Balance
Exposure and white balance affect the colors in your video. Exposure controls how bright the video is. White balance controls the color temperature. If the exposure is too high, the video will be too bright. If the exposure is too low, the video will be too dark. Adjust the exposure settings to get the right brightness. If the white balance is wrong, the colors will look strange. Adjust the white balance to get natural-looking colors. Most cameras have an automatic white balance setting. But you can also adjust it manually. Experiment with different settings. Find what looks best to you. Good exposure and white balance will make your videos look professional.
Fun Fact or Stat: Videos shot at 60fps or higher are often used for slow-motion effects, adding a dramatic touch to action footage!
Maintenance and Care for Your Camera
Taking care of your action camera is important. This will help it last longer. Clean the camera after every use. Use a soft cloth to wipe off dirt and dust. Protect the lens from scratches. Use a lens cap when you are not using the camera. Store the camera in a safe place. Keep it away from extreme temperatures. Check the battery often. Charge it when it’s low. Replace the battery when it’s old. Keep the firmware up to date. This will improve the camera’s performance. When you know how to mount action camera to helmet vs bike frame, remember to care for the camera, too.
- Clean the camera regularly.
- Protect the lens from scratches.
- Store the camera safely.
- Check and charge the battery.
- Update the camera’s firmware.
Imagine you have just finished a muddy bike ride. Your camera is covered in dirt. Don’t just throw it in your bag. Take a few minutes to clean it. Use a soft, damp cloth to wipe off the dirt. Pay special attention to the lens. Use a lens cleaner if needed. Remove the battery and memory card. Clean the contacts with a dry cloth. Let everything dry completely before you put it back together. Store the camera in a case. This will protect it from dust and scratches. A little maintenance will keep your camera working like new for years to come. Treat it well, and it will reward you with great videos.
Cleaning Your Action Camera Properly
Cleaning your action camera is easy. First, gather your supplies. You’ll need a soft cloth, lens cleaner, and cotton swabs. Turn off the camera. Remove the battery and memory card. Use the soft cloth to wipe off the dirt and dust. Pay special attention to the lens. Use lens cleaner if needed. Dampen a cotton swab with lens cleaner. Gently clean around the edges of the lens. Let everything dry completely before you put it back together. Store the camera in a case. This will protect it from dust and scratches. Regular cleaning will keep your camera working well.
Protecting the Lens from Scratches
The lens is the most important part of your camera. Protect it from scratches. Use a lens cap when you are not using the camera. This will keep dust and dirt off the lens. If you don’t have a lens cap, use a soft cloth to cover the lens. Be careful not to scratch the lens. Avoid touching the lens with your fingers. The oils from your skin can damage the lens coating. If the lens gets dirty, clean it with lens cleaner and a soft cloth. Never use harsh chemicals or abrasive materials. These can scratch the lens. A little care will keep your lens in good condition.
Storing Your Camera Safely
Storing your camera safely is very important. Keep it in a case when you are not using it. This will protect it from dust, scratches, and impacts. Choose a case that is the right size for your camera. Make sure it’s padded to protect the camera from bumps. Keep the camera away from extreme temperatures. Heat and cold can damage the camera. Store the camera in a dry place. Moisture can also damage the camera. Remove the battery and memory card before storing the camera for a long time. This will prevent corrosion. A little care will keep your camera safe.
Fun Fact or Stat: Regularly cleaning your action camera lens can improve video clarity by up to 20%!
Action Camera Accessories
Many accessories can make your action camera even better. Think about extra batteries. You don’t want your camera to die in the middle of a ride. Consider a waterproof case. This will protect your camera from rain and mud. Look at different mounts. There are mounts for almost anything. Think about a chest mount, a wrist mount, or even a dog mount. Use an external microphone. This will improve the sound quality of your videos. Get a good memory card. You need plenty of space to store your videos. When you learn how to mount action camera to helmet vs bike frame, also consider accessories.
- Get extra batteries.
- Use a waterproof case.
- Explore different mounts.
- Use an external microphone.
- Get a high-capacity memory card.
Imagine you are planning a long bike trip. You want to film the whole thing. But your camera’s battery only lasts for a few hours. What do you do? You need extra batteries. Carry them with you in a safe place. Charge them every night. This will ensure you never run out of power. Also, think about the weather. It might rain. You need a waterproof case. This will protect your camera from the elements. A good waterproof case will let you film in any conditions. With the right accessories, you can capture every moment of your adventure.
Must-Have Batteries and Chargers
Extra batteries are very important. Action cameras use a lot of power. You don’t want your camera to die in the middle of a ride. Get at least two extra batteries. Charge them before you go. Carry them with you in a safe place. A portable charger is also a good idea. This will let you charge your batteries on the go. Look for a charger that is compatible with your camera. Some chargers can charge multiple batteries at once. This will save you time. A good battery and charger setup will keep your camera running all day.
Essential Waterproof Cases
A waterproof case is essential. It will protect your camera from rain, mud, and snow. Choose a case that is designed for your camera model. Make sure it’s easy to use. You should be able to access the buttons and screen. Test the case before you use it. Put it in a bowl of water. Make sure no water gets inside. If the case leaks, don’t use it. Get a different one. A good waterproof case will let you film in any conditions. You can even use it underwater. This opens up a whole new world of possibilities.
External Microphones for Better Audio
The built-in microphone on your action camera might not be very good. It can pick up wind noise and other unwanted sounds. An external microphone can improve the sound quality of your videos. There are many different types of external microphones. Some plug directly into the camera. Others use a wireless connection. Choose a microphone that is designed for action cameras. Look for one that is small and lightweight. Test the microphone before you use it. Record a short video. Check the sound quality. Adjust the microphone settings if needed. Good audio will make your videos much more enjoyable.
Fun Fact or Stat: Adding an external microphone can improve audio quality by up to 500%, making your videos much more professional!
| Mount Type | Pros | Cons | Best Use |
|---|---|---|---|
| Helmet Mount | First-person view, captures action. | Can be shaky, may block view. | Fast-paced sports, showing perspective. |
| Bike Frame Mount | Stable footage, shows bike movement. | Doesn’t show rider’s perspective. | Smooth roads, showcasing the bike. |
| Chest Mount | Stable, immersive view. | Can be uncomfortable, limited angle. | Hiking, walking, simulating POV. |
| Handlebar Mount | Easy to adjust, good road view. | Can vibrate, blocks controls. | Road cycling, touring. |
Summary
Using an action camera is a fun way to record your adventures. You can mount it on your helmet or your bike frame. Each option gives you a different view. Helmet mounts show what you see. They are great for fast action. Bike frame mounts are more stable. They show the bike’s movement. Remember to use a strong mount. Check it before every ride. Adjust the camera settings for the best footage. Keep your camera clean and safe. With the right accessories, you can make amazing videos. When considering how to mount action camera to helmet vs bike frame, think about the video you want to create.
Conclusion
Now you know how to mount action camera to helmet vs bike frame. Both ways are great for filming your rides. Helmet mounts show your point of view. Bike frame mounts are more stable. Pick the one that works best for you. Remember to be safe. Check your mount before every ride. Adjust your camera settings for the best video. Now go out and film your adventures. Have fun and be creative!
Frequently Asked Questions
Question No 1: What is the best way to mount an action camera to a helmet?
Answer: The best way to mount an action camera to a helmet is to use either a sticky mount or a strap mount. Sticky mounts are great for smooth helmets. Clean the helmet surface first. Strap mounts work well on helmets with vents. Make sure the mount is secure. Adjust the camera angle. Test the camera before you ride. Always prioritize your safety to ensure a smooth experience when figuring out how to mount action camera to helmet vs bike frame. A wobbly or badly fitted action camera can present a hazard for the rider and other road users.
Question No 2: Is it better to mount an action camera on a helmet or a bike frame?
Answer: It depends on what you want to film. A helmet mount shows your point of view. It’s good for action shots. A bike frame mount is more stable. It shows the bike’s movement. If you want to show what you see, use a helmet mount. If you want a smooth video of the bike, use a frame mount. Think about the type of riding you will do. For smooth roads, a frame mount is great. For bumpy trails, a helmet mount might be more fun. Deciding how to mount action camera to helmet vs bike frame depends on your desired output.
Question No 3: How can I make sure my action camera mount is secure?
Answer: To make sure your action camera mount is secure, check it before every ride. Tighten the screws or straps. If the mount is loose, tighten it. Replace the mount if it is damaged. Consider using a safety tether. This will keep the camera from falling if the mount breaks. Use a strong, reliable mount. Clean the surface before you attach the mount. This will help it stick better. Taking these steps will ensure your camera stays safe and secure, whether you are considering how to mount action camera to helmet vs bike frame.
Question No 4: What camera settings should I use for the best footage?
Answer: Use a high resolution, like 1080p or 4K. Use a high frame rate, like 30fps or 60fps. Turn on image stabilization. Adjust the exposure and white balance. Experiment with different settings. Find what works best for you. If you are filming fast action, use a higher frame rate. If you want the sharpest video, use a higher resolution. Good settings will make your videos look amazing. Remember to check these settings after figuring out how to mount action camera to helmet vs bike frame. Ensure they are optimized for your chosen mounting style.
Question No 5: How do I clean and maintain my action camera?
Answer: Clean the camera after every use. Use a soft cloth to wipe off dirt and dust. Protect the lens from scratches. Use a lens cap when you are not using the camera. Store the camera in a safe place. Keep it away from extreme temperatures. Check the battery often. Charge it when it’s low. Replace the battery when it’s old. Keep the firmware up to date. Regular maintenance will keep your camera working well for longer, no matter how you decide to handle how to mount action camera to helmet vs bike frame.
Question No 6: What accessories do I need for my action camera?
Answer: Get extra batteries. Use a waterproof case. Explore different mounts. Use an external microphone. Get a high-capacity memory card. A chest mount is good for hiking. A wrist mount is good for surfing. An external microphone will improve the sound quality. A high-capacity memory card will give you plenty of storage space. Choosing the right accessories can significantly enhance your filming experience, regardless of your choices regarding how to mount action camera to helmet vs bike frame.


