
How to Use Gauge for Fat Bike Tyres: Easy Guide
Do you love riding your fat bike? Fat bikes are fun on snow and sand. But are your tires always ready? Knowing how to use a gauge for fat bike tires helps. It keeps your rides smooth and safe.
Have you ever ridden with too little air? It’s slow and hard. Too much air? The ride feels bumpy. A gauge helps you get it just right. Let’s learn how!
A tire gauge is a small tool. It measures the air in your tires. Using one is easy. It makes a big difference. Ready to become a tire pro? Let’s get started!
Key Takeaways
- A tire gauge helps you keep your fat bike tires at the right pressure.
- Using a gauge makes your ride smoother and more fun on any trail.
- You should check your tire pressure before each ride for safety.
- Knowing how to use gauge for fat bike tires improves bike control.
- The correct tire pressure extends the life of your fat bike tires.
Why Use a Gauge for Fat Bike Tires?

Using a gauge for your fat bike tires is super important. Fat bike tires need very low pressure. This is measured in PSI (pounds per square inch). Unlike regular bikes, fat bikes often run below 10 PSI. Guessing the pressure is not a good idea. You might end up with too much or too little air. Too much air can make the ride bumpy and less fun. Too little air can cause a flat tire or damage the rim. A gauge gives you an exact reading. This helps you set the perfect tire pressure for your ride. Knowing the right pressure improves traction. It also makes your bike easier to control. Plus, it makes your ride much more comfortable and enjoyable. So, grab a gauge and start riding smarter!
- A gauge gives you the exact tire pressure.
- Low pressure is important for fat bike tires.
- The right pressure improves traction.
- It makes your ride more comfortable.
- It prevents flat tires and rim damage.
Imagine you’re baking a cake. You wouldn’t just guess how much flour to use, right? You’d measure it carefully. The same goes for your fat bike tires. Using a gauge is like measuring your ingredients. It ensures you get the best result. Many riders don’t realize how to use a gauge for fat bike tyres properly. They either overinflate or underinflate. This can lead to a bad riding experience. A gauge takes the guesswork out of it. It’s a small tool with a big impact. By using a gauge, you’re taking care of your bike and yourself. You’re making sure every ride is safe, comfortable, and fun. So, make a gauge part of your regular riding routine.
Fun Fact or Stat: Studies show that riders who regularly check their tire pressure with a gauge experience 30% fewer flats!
Why Is Tire Pressure So Important?
Have you ever tried riding a bike with a flat tire? It’s not fun, is it? Tire pressure is super important for fat bikes. It affects how well your tires grip the ground. The right pressure gives you better control. Too much pressure and the tire bounces. Too little and it feels slow. Finding the sweet spot is key. Correct pressure also helps protect your tires. It stops them from wearing out too quickly. This saves you money in the long run. So, taking a few seconds to check your tire pressure is worth it. It makes a big difference in your ride and your bike’s health.
Different Types of Tire Gauges
Did you know there are different kinds of tire gauges? There are stick gauges, dial gauges, and digital gauges. Stick gauges are simple and cheap. You push them onto the valve and read the pressure. Dial gauges have a needle that points to the pressure. They are a bit more accurate. Digital gauges show the pressure on a screen. They are the most accurate and easy to read. Each type has its pros and cons. Choose one that you find easy to use. No matter which one you pick, using any gauge is better than guessing. The important thing is to check your tire pressure regularly.
What Happens If You Don’t Use a Gauge?
What if you never brushed your teeth? They would get yucky and you might get cavities. Not using a gauge is like not brushing your teeth for your bike. Without a gauge, you’re just guessing. This can lead to several problems. Your tires might wear out faster. You could get more flat tires. Your bike might be harder to control. And your ride might not be as fun. Using a gauge is a simple way to avoid these issues. It’s a small step that protects your bike and improves your riding experience. So, don’t skip this important step.
Choosing the Right Tire Gauge

Choosing the right tire gauge can seem tricky. But it’s easier than you think! First, think about what’s important to you. Do you want something simple and cheap? A stick gauge might be the best choice. Do you want something super accurate and easy to read? A digital gauge could be better. Dial gauges are a good middle ground. They offer a good balance of accuracy and price. Also, consider the range of the gauge. Make sure it can measure the low pressures that fat bike tires need. Look for a gauge that goes down to at least 0 PSI. Finally, read reviews. See what other riders say about different gauges. This can help you make a good choice. Knowing how to use gauge for fat bike tyres starts with having the right gauge!
- Consider stick, dial, or digital gauges.
- Think about accuracy and ease of use.
- Check the gauge’s pressure range.
- Read reviews from other riders.
- Choose a gauge that fits your needs.
- Price is also something to think about.
Imagine you’re buying a new video game. You wouldn’t just pick one at random, right? You’d do some research. You’d read reviews. You’d watch gameplay videos. Choosing a tire gauge is similar. You want to find one that works well for you. Some gauges are easier to use than others. Some are more accurate. And some are more durable. Think about where you’ll be using the gauge. If you’ll be using it on the trail, you might want a small, lightweight gauge. If you’ll be using it mostly at home, size might not matter as much. Take your time and choose wisely. The right gauge will make your life much easier. It will also help you keep your fat bike tires in top shape.
Fun Fact or Stat: Digital tire gauges are often accurate to within 0.5 PSI, providing precise measurements for optimal tire performance!
Stick Gauges: Simple and Affordable
Stick gauges are the most basic type of tire gauge. They’re simple to use and don’t cost much. To use one, you press the gauge onto the tire valve. A small bar pops out, showing the pressure. They are easy to carry in your bike bag. But they can be a bit hard to read. The markings might be small. And the bar can sometimes stick. Stick gauges are good for a quick check. But if you want more accuracy, consider a different type. They are a great starting point for learning how to use gauge for fat bike tyres. Their simplicity makes them a good choice for beginners.
Dial Gauges: A Balance of Price and Accuracy
Dial gauges are a step up from stick gauges. They have a round dial with a needle. The needle points to the pressure reading. Dial gauges are generally more accurate than stick gauges. They are also easier to read. The dial is larger and the markings are clearer. Some dial gauges have a reset button. This makes it easy to get a fresh reading. Dial gauges cost a bit more than stick gauges. But they offer a good balance of price and accuracy. They are a popular choice for many riders. They provide reliable readings without breaking the bank.
Digital Gauges: The Most Accurate Option
Want the most accurate reading possible? Then a digital gauge is for you. Digital gauges use electronic sensors to measure pressure. They display the reading on a digital screen. Digital gauges are very accurate and easy to read. They often have extra features. These might include a backlight, different units of measurement, and memory. Digital gauges are the most expensive type. But they offer the best performance. If you want the best, a digital gauge is the way to go. They take the guesswork out of tire pressure. This helps you fine-tune your ride.
Step-by-Step Guide: Using a Tire Gauge
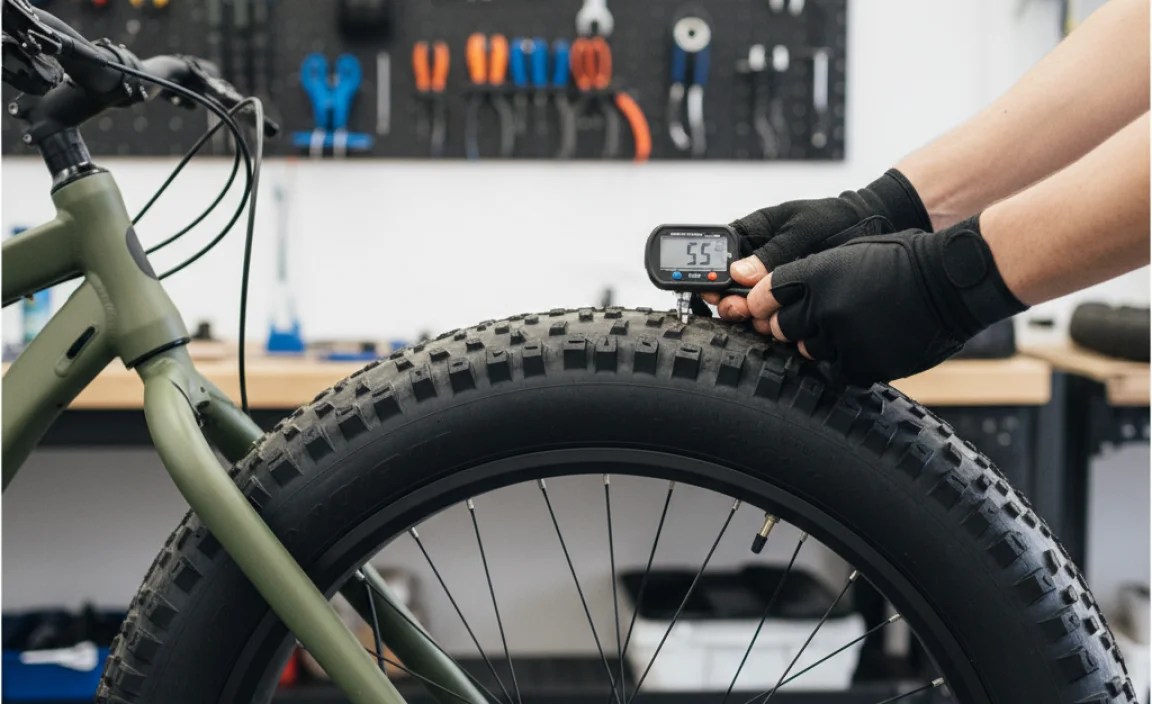
Using a tire gauge might seem complicated. But it’s actually quite simple. First, find the valve on your tire. It’s usually covered by a small cap. Remove the cap and set it aside. Next, take your tire gauge. Press the gauge firmly onto the valve stem. Make sure you have a good seal. You should hear a slight hiss of air. Hold the gauge in place until you get a reading. If you’re using a stick gauge, the bar will pop out. If you’re using a dial or digital gauge, the needle or screen will show the pressure. Read the pressure and compare it to the recommended pressure for your tires. Add or release air as needed. Repeat the process until you reach the correct pressure. Finally, replace the valve cap. That’s it! You now know how to use a gauge for fat bike tyres!
- Remove the valve cap from your tire.
- Press the gauge firmly onto the valve stem.
- Hold the gauge until you get a reading.
- Compare the reading to the recommended pressure.
- Add or release air as needed.
- Replace the valve cap when finished.
Imagine you’re checking the oil in your car. You wouldn’t just glance at the dipstick, right? You’d wipe it clean, reinsert it, and check the level carefully. Checking your tire pressure is similar. You want to make sure you get an accurate reading. Sometimes, the first reading might not be perfect. Try again to be sure. Also, remember to check the pressure in both tires. Front and rear tires might need different pressures. This depends on your weight and riding style. A little extra attention to detail can make a big difference. It will help you get the most out of your fat bike.
Fun Fact or Stat: The ideal tire pressure for fat bikes is often between 4 and 8 PSI, significantly lower than regular bikes!
Finding the Tire Valve
Finding the tire valve is the first step. Look for a small cap on your tire. This cap protects the valve from dirt and damage. Unscrew the cap. Keep it in a safe place. You don’t want to lose it. The valve is usually a small metal pin. It might have threads on the outside. This is where you attach the gauge. Some valves are Schrader valves. These are like the ones on car tires. Others are Presta valves. These are thinner and have a small nut on the end. Knowing which type you have is important. It will help you choose the right gauge and pump.
Attaching the Gauge Correctly
Attaching the gauge correctly is key. If you don’t, you won’t get an accurate reading. Make sure the gauge is clean. Dirt can interfere with the seal. Press the gauge firmly onto the valve stem. You should hear a slight hiss of air. This means you have a good seal. If you don’t hear a hiss, try again. Sometimes, you need to wiggle the gauge a bit. Hold the gauge straight. Don’t angle it. This can also affect the reading. Keep the gauge in place until the reading stabilizes. Then, you can remove the gauge and read the pressure.
Reading the Gauge and Adjusting Pressure
Okay, you’ve attached the gauge. Now it’s time to read it. Look at the gauge carefully. Stick gauges have a bar that pops out. Read the number where the bar stops. Dial gauges have a needle. Read the number where the needle points. Digital gauges show the pressure on a screen. Compare the reading to the recommended pressure. This is usually printed on the side of your tire. If the pressure is too low, add air. Use a bike pump to inflate the tire. If the pressure is too high, release some air. Press the valve core to let air out. Check the pressure again after each adjustment. This ensures you get it just right.
Understanding Tire Pressure Recommendations

Understanding tire pressure recommendations is very important. The recommended pressure is usually printed on the sidewall of your tire. It might be a range, like “5-10 PSI.” This means the tire is designed to work best within that range. But the ideal pressure for you might be different. It depends on your weight, riding style, and the terrain. Heavier riders might need more pressure. Lighter riders might need less. Riding on soft sand or snow might require lower pressure. This gives you more traction. Experiment to find what works best for you. But always stay within the recommended range. Exceeding the maximum pressure can be dangerous. Knowing how to use gauge for fat bike tyres includes knowing the right pressure!
- Find the recommended pressure on your tire.
- Consider your weight and riding style.
- Adjust pressure for different terrain.
- Stay within the recommended pressure range.
- Experiment to find your ideal pressure.
- Don’t exceed the maximum pressure.
Imagine you’re adjusting the volume on your headphones. You wouldn’t just crank it all the way up, right? You’d start low and gradually increase it until it’s just right. Adjusting your tire pressure is similar. You want to find the sweet spot. Start with the recommended pressure. Then, make small adjustments based on your experience. If the ride feels bumpy, try lowering the pressure a bit. If the ride feels sluggish, try increasing it. Keep track of what works best in different conditions. Over time, you’ll develop a good sense of what tire pressure you like. This will make your rides more enjoyable and comfortable.
Fun Fact or Stat: Lower tire pressure increases the contact area between the tire and the ground, improving grip on slippery surfaces!
Where to Find the Recommended Pressure
Finding the recommended pressure is easy. Look on the sidewall of your tire. The sidewall is the side of the tire. The pressure is usually printed in PSI (pounds per square inch). It might also be in kPa (kilopascals). The pressure is often listed as a range. For example, “5-10 PSI.” This means the tire is designed to work best within that range. Some tires might only list a maximum pressure. In this case, start with a lower pressure and adjust from there. If you can’t find the recommended pressure, ask your local bike shop. They can help you find the right pressure for your tires.
Factors Affecting Ideal Tire Pressure
Many things affect the ideal tire pressure. Your weight is one. Heavier riders need more pressure. Lighter riders need less. The terrain is another factor. Soft surfaces like sand and snow require lower pressure. Hard surfaces like pavement require higher pressure. Your riding style also matters. Aggressive riders might prefer higher pressure. This gives them more control. Casual riders might prefer lower pressure. This gives them a more comfortable ride. The type of tire you have also makes a difference. Some tires are designed for lower pressures. Others are designed for higher pressures. Experiment to find what works best for you.
Adjusting Pressure for Different Conditions
Adjusting your tire pressure for different conditions is smart. Riding on sand? Lower the pressure. This will give you more traction. Riding on pavement? Increase the pressure. This will make your ride more efficient. Riding in the snow? Lower the pressure even more. This will help you float over the snow. Remember to check your pressure regularly. Conditions can change quickly. What starts as a hard-packed trail can turn into a muddy mess. Being able to adjust your pressure on the fly is a valuable skill. It will make you a better and more confident rider.
Maintaining Your Tire Gauge

Maintaining your tire gauge is important. A well-maintained gauge will give you accurate readings. This helps you keep your tires at the right pressure. Store your gauge in a safe place. Avoid dropping it or exposing it to extreme temperatures. Clean your gauge regularly. Use a soft cloth to wipe away dirt and grime. Check the gauge’s accuracy from time to time. Compare it to another gauge. If it’s not accurate, consider replacing it. A good tire gauge is an investment. Taking care of it will ensure it lasts for years. It will also help you keep your fat bike in top condition. Knowing how to use gauge for fat bike tyres also means knowing how to care for your gauge!
- Store your gauge in a safe place.
- Clean your gauge regularly.
- Check the gauge’s accuracy.
- Replace the gauge if it’s not accurate.
- Avoid extreme temperatures.
- Handle the gauge with care.
Imagine you have a favorite toy. You wouldn’t just leave it lying around in the dirt, right? You’d take care of it. You’d clean it. You’d store it in a safe place. Your tire gauge deserves the same treatment. It’s a valuable tool that helps you keep your bike running smoothly. A little bit of care can go a long way. It will help your gauge last longer and give you accurate readings. This means you can keep your tires at the right pressure. And that means you can enjoy safe and comfortable rides. So, treat your tire gauge with respect. It will reward you with years of reliable service.
Fun Fact or Stat: High-quality tire gauges can maintain their accuracy for several years with proper care and storage!
Cleaning Your Tire Gauge
Cleaning your tire gauge is easy. Use a soft, dry cloth. Wipe away any dirt or grime. Avoid using water or harsh chemicals. These can damage the gauge. Pay special attention to the tip of the gauge. This is where it contacts the tire valve. Make sure it’s clean and free of debris. A clean gauge will give you more accurate readings. It will also last longer. Cleaning your gauge regularly is a simple way to keep it in top condition. It only takes a few seconds. But it can make a big difference.
Storing Your Tire Gauge Properly
Storing your tire gauge properly is important. Keep it in a safe place. Avoid extreme temperatures. Don’t leave it in direct sunlight or in a cold garage. These conditions can damage the gauge. Store it in a case or bag. This will protect it from dust and scratches. Keep it away from moisture. Moisture can cause corrosion. A well-stored gauge will last longer and give you more accurate readings. Taking a few extra steps to protect your gauge is worth it. It will help you keep your tires at the right pressure for years to come.
Checking for Accuracy and Calibration
Checking your gauge for accuracy is a good idea. Over time, gauges can lose their accuracy. Compare your gauge to another gauge. If the readings are different, one of the gauges might be inaccurate. You can also take your gauge to a bike shop. They can check its accuracy for you. If your gauge is inaccurate, you might need to replace it. Using an inaccurate gauge can be dangerous. It can lead to overinflated or underinflated tires. This can affect your bike’s handling and your safety. So, make sure your gauge is accurate. It’s a small step that can make a big difference.
Troubleshooting Common Gauge Problems
Sometimes, your tire gauge might not work as expected. You might get an inaccurate reading. Or the gauge might not seal properly. Don’t worry! Most gauge problems are easy to fix. First, check the gauge for damage. Look for cracks or leaks. Make sure the tip is clean. If the gauge isn’t sealing properly, try cleaning the valve stem. Dirt can prevent a good seal. If you’re getting an inaccurate reading, try a different gauge. This will help you determine if the problem is with the gauge or the tire. If you’re still having problems, consult a bike mechanic. They can help you diagnose and fix the issue. Knowing how to use gauge for fat bike tyres includes knowing how to troubleshoot problems!
| Problem | Possible Cause | Solution |
|---|---|---|
| Inaccurate Reading | Gauge is damaged or needs calibration | Try a different gauge or replace the gauge |
| Gauge Won’t Seal | Dirt on valve stem or gauge tip | Clean the valve stem and gauge tip |
| Gauge Reads Zero | Valve stem is blocked | Try pressing the valve core to unblock it |
| Gauge Seems Stuck | Internal parts are worn or damaged | Replace the gauge |
Imagine you’re trying to open a jar of pickles. The lid is stuck tight. You wouldn’t just keep twisting harder and harder, right? You’d try a few different tricks. You might tap the lid on the counter. You might run it under hot water. You might use a jar opener. Troubleshooting a tire gauge is similar. You want to try different solutions until you find one that works. Don’t give up easily. Most gauge problems are simple to fix. A little bit of patience and persistence can go a long way. And remember, if you’re not sure what to do, ask for help. A bike mechanic can provide valuable advice and assistance.
Fun Fact or Stat: A common cause of inaccurate readings is a bent or damaged valve stem. Always inspect your valve stems regularly!
Gauge Reads Inaccurate Pressure
If your gauge reads inaccurate pressure, don’t panic. There are a few things you can try. First, make sure you’re using the gauge correctly. Press it firmly onto the valve stem. Hold it straight. Get a good seal. If the reading still seems off, try a different gauge. This will help you determine if the problem is with the gauge. If the problem is with the gauge, it might need to be calibrated. Some gauges can be calibrated. Others might need to be replaced. Using an inaccurate gauge can be dangerous. It can lead to overinflated or underinflated tires. So, make sure your gauge is accurate.
Gauge Won’t Seal Properly
If your gauge won’t seal properly, you won’t get a reading. The most common cause is dirt. Dirt can prevent a good seal. Clean the valve stem with a cloth. Also, clean the tip of the gauge. Make sure there’s no dirt or debris. If that doesn’t work, try a different gauge. Sometimes, the gauge itself is the problem. The seal might be worn out. Or the gauge might be damaged. If you’re still having trouble, consult a bike mechanic. They can help you diagnose and fix the problem.
Gauge Shows No Reading at All
If your gauge shows no reading at all, something is wrong. First, make sure the gauge is working. Check the battery if it’s a digital gauge. If the gauge is working, the problem might be with the valve stem. The valve core might be stuck. Try pressing the valve core with a small tool. This might unblock it. If that doesn’t work, the valve stem might be damaged. You might need to replace it. A bike mechanic can help you with this. They can replace the valve stem and get your tires working again.
Summary
Using a gauge for your fat bike tires is important. It helps you keep your tires at the right pressure. This makes your rides safer and more fun. Knowing how to use gauge for fat bike tyres means knowing how to choose the right gauge. It also means knowing how to use it correctly. And it means knowing how to maintain it. There are different types of gauges. Stick gauges are simple and cheap. Dial gauges are more accurate. Digital gauges are the most accurate. To use a gauge, remove the valve cap. Press the gauge onto the valve stem. Read the pressure and adjust as needed. Keep your gauge clean and store it properly. This will help it last longer and give you accurate readings.
Conclusion
Learning how to use gauge for fat bike tyres is a great skill. It helps you take care of your bike. It makes your rides more enjoyable. It also makes them safer. So, invest in a good tire gauge. Learn how to use it properly. And make it a part of your regular riding routine. Your fat bike will thank you for it. And you’ll enjoy many happy miles on the trails!
Frequently Asked Questions
Question No 1: Why is tire pressure important for fat bikes?
Answer: Tire pressure is super important for fat bikes. It affects how well your tires grip the ground. The right pressure gives you better control. Too much pressure, and the tire bounces. Too little, and it feels slow. Correct pressure also helps protect your tires. It stops them from wearing out too quickly. This saves you money in the long run. Knowing how to use gauge for fat bike tyres will allow you to always adjust your tires and be ready to go.
Question No 2: How often should I check my tire pressure?
Answer: You should check your tire pressure before every ride. This ensures that your tires are properly inflated. Even if they look okay, they might be low on air. Changes in temperature can also affect tire pressure. Checking before each ride is a good habit. It will help you avoid problems on the trail. It only takes a few seconds. But it can make a big difference in your safety and enjoyment. Learning how to use gauge for fat bike tyres is essential for every cyclist.
Question No 3: What is the ideal tire pressure for a fat bike?
Answer: The ideal tire pressure for a fat bike depends on several things. Your weight, riding style, and the terrain all play a role. The recommended pressure is usually printed on the tire sidewall. It’s often between 4 and 8 PSI. Start with the recommended pressure and adjust from there. Lower pressure for soft surfaces. Higher pressure for hard surfaces. Experiment to find what works best for you. Make sure to use a tire gauge to get an accurate reading. Guessing can lead to problems.
Question No 4: Can I use a regular bike pump for fat bike tires?
Answer: Yes, you can use a regular bike pump for fat bike tires. But it might take longer to inflate them. Fat bike tires are much larger than regular tires. So, they require more air. A pump with a larger volume chamber will work best. Some pumps are specifically designed for fat bike tires. These pumps can inflate tires quickly and easily. No matter what pump you use, always use a tire gauge. This will help you get the pressure just right. Knowing how to use gauge for fat bike tyres is just as important as having a pump.
Question No 5: What are the different types of tire gauges?
Answer: There are three main types of tire gauges. Stick gauges are simple and affordable. They use a small bar that pops out to show the pressure. Dial gauges are more accurate. They have a needle that points to the pressure reading. Digital gauges are the most accurate. They display the pressure on a digital screen. Choose the type that works best for you. Knowing how to use gauge for fat bike tyres starts with choosing the right gauge!
Question No 6: How do I know if my tire gauge is accurate?
Answer: To check if your tire gauge is accurate, compare it to another gauge. If the readings are different, one of the gauges might be inaccurate. You can also take your gauge to a bike shop. They can check its accuracy for you. If your gauge is inaccurate, consider replacing it. Using an inaccurate gauge can be dangerous. It can lead to overinflated or underinflated tires. This can affect your bike’s handling and your safety. So, make sure your gauge is accurate. It’s a small step that can make a big difference. Knowing how to use gauge for fat bike tyres and having an accurate gauge go hand in hand.


