
Easy: How to Use Dual Scale (PSI/BAR) Bike Gauge
Have you ever seen a bike tire that looked flat? Do you know why it is important to have the right amount of air? It makes riding easier and safer! A dual scale bike gauge can help. It measures air pressure in two ways: PSI and BAR. But how do you use a dual scale (psi/bar) bike gauge? Let’s find out!
Key Takeaways
- Using a dual scale (psi/bar) bike gauge ensures proper tire inflation for safe riding.
- PSI (pounds per square inch) and BAR are both units to measure tire pressure.
- Find the recommended PSI on your bike tire’s sidewall before inflating it.
- A bike pump with a gauge helps you add air and check the pressure at the same time.
- Regularly check your bike tires to avoid flats and enjoy smoother rides.
Understanding PSI and BAR on Your Gauge

When you look at your dual scale bike gauge, you’ll see two sets of numbers. One set is labeled “PSI,” which stands for pounds per square inch. This is a common way to measure air pressure in the United States. The other set is labeled “BAR.” BAR is another unit of pressure, often used in Europe and other parts of the world. Both PSI and BAR tell you how much air is inside your bike tire. It’s like using inches and centimeters to measure how tall you are. They both measure height, but use different numbers. Knowing both PSI and BAR lets you understand air pressure no matter where you are or what kind of pump you use.
- PSI is pounds per square inch.
- BAR is another unit for air pressure.
- Both measure the same thing: air in your tire.
- Different pumps might show PSI or BAR.
- Knowing both helps you everywhere.
Think of your bike tire like a balloon. If you don’t put enough air in a balloon, it will be floppy. If you put too much air, it might pop! Bike tires are the same. Too little air makes it hard to pedal and can damage the tire. Too much air can make the tire explode. A dual scale bike gauge helps you get it just right. It tells you the exact amount of air inside. This keeps you safe and makes your bike ride smooth and fun. Checking your tires before each ride is a great habit.
Why Do Bikes Use PSI and BAR?
Have you ever wondered why bikes use both PSI and BAR? It’s because different countries and manufacturers use different units. PSI is common in America. BAR is common in Europe. Bike companies sell their bikes all over the world. So, they use dual scale gauges to make things easier. This way, anyone can read the gauge, no matter where they live. Imagine if speedometers only showed kilometers per hour in America! It would be hard for people who are used to miles per hour. Dual scale gauges prevent confusion.
Converting Between PSI and BAR
Sometimes, you might need to change PSI to BAR or BAR to PSI. This is called converting. It’s like changing dollars to euros when you travel. The good news is, it’s easy! One BAR is about 14.5 PSI. So, if your tire needs 4 BAR, that’s about 58 PSI. You don’t have to do the math every time. Many pumps and gauges have both scales. Some even have converters built in. But knowing the basic idea helps you understand the numbers better.
What Happens If You Use the Wrong Pressure?
Using the wrong air pressure can cause problems. Too little air can lead to a flat tire. It also makes it harder to pedal. Too much air can make the tire explode! This is why a dual scale bike gauge is so important. It helps you get the pressure just right. The correct pressure makes your ride safer and more comfortable. Always check the recommended PSI or BAR on your tire. This will help you avoid problems and have more fun.
Fun Fact or Stat: The ideal tire pressure can change depending on the weather! Colder temperatures can lower tire pressure, so you might need to add a bit more air.
Finding the Right Pressure for Your Tires

Before you start pumping, you need to know the right pressure for your tires. Look at the side of your bike tire. You will see numbers printed there. These numbers tell you the recommended PSI. It might say something like “40-65 PSI.” This means your tire should have between 40 and 65 PSI. Some tires might also show the BAR range. Always stay within the recommended range. If you’re not sure, ask a grown-up or someone at a bike shop to help you find the right numbers. This step is super important for a safe and smooth ride.
- Look for PSI or BAR numbers on your tire’s side.
- These numbers show the recommended pressure range.
- Stay within that range when you add air.
- Ask for help if you can’t find the numbers.
- The right pressure makes your ride better.
Imagine you are baking a cake. You need to follow the recipe to make it taste good. If you use too much sugar or not enough flour, the cake won’t turn out right. Your bike tires are the same. The numbers on the tire are like a recipe. They tell you how much air to put in. Following these numbers makes your bike work its best. It also keeps you safe. Always check the numbers before you pump. This simple step can make a big difference.
Why Does Tire Pressure Matter?
Tire pressure is super important for a few reasons. First, it affects how easily you can pedal. When tires have enough air, they roll smoothly. If they are flat, it’s like trying to run in sand! Second, correct pressure helps you stay in control. Overinflated tires can be slippery. Underinflated tires can be hard to steer. Third, the right pressure helps your tires last longer. Too much or too little air can wear them out faster.
What If My Tire Doesn’t Have Numbers?
Sometimes, the numbers on your tire might be hard to read. Or, they might have worn off. Don’t worry! You can still find the right pressure. Ask a grown-up or someone at a bike shop. They can help you find the information. They might check the bike maker’s website. Or, they might use a general rule for your tire type. It’s always better to ask for help than to guess.
Do Front and Rear Tires Need the Same Pressure?
Good question! Sometimes, the front and rear tires need different pressures. This depends on the bike and how much weight is on each tire. Mountain bikes often have lower pressure in the front tire for better grip. Road bikes might have higher pressure in the rear tire to carry more weight. Check your bike’s manual or ask a bike expert. They can tell you the best pressure for each tire.
Fun Fact or Stat: Wider tires generally need lower pressure than narrow tires. This is because they have more contact with the ground.
Connecting the Gauge to Your Bike Tire Valve

Now that you know the right pressure, it’s time to connect the gauge. First, find the valve on your bike tire. There are two main types of valves: Schrader and Presta. Schrader valves are like the ones on car tires. They are wider and have a spring-loaded pin in the center. Presta valves are thinner and have a small nut you need to unscrew. Your bike pump and gauge need to match the type of valve you have. Most pumps have adapters for both types. Make sure the pump head is securely on the valve before you start pumping.
- Find the valve on your bike tire.
- Schrader valves are wide, like car tires.
- Presta valves are thin with a small nut.
- Match your pump head to the valve type.
- Make sure it’s on tight before pumping.
Imagine you are trying to plug in a phone charger. If you don’t plug it in correctly, it won’t charge. Connecting the gauge to your bike tire valve is similar. If the pump head isn’t on tight, air will leak out. You won’t get an accurate reading. And, you’ll waste energy. Take a moment to make sure the connection is secure. You should hear a click or feel a snug fit. This will ensure you get the right pressure in your tire.
What Are Schrader Valves?
Schrader valves are very common. You see them on car tires, scooters, and many bikes. They are easy to use. Just push the pump head onto the valve. Make sure it’s straight. Then, lock the lever on the pump head. This creates a tight seal. When you’re done, unlock the lever and pull the pump head off.
What Are Presta Valves?
Presta valves are often found on road bikes. They are thinner and lighter than Schrader valves. Before you attach the pump, you need to unscrew the small nut on the valve. Then, push the valve in a little to loosen it. This lets air flow in. After pumping, screw the nut back on.
What If My Pump Doesn’t Fit My Valve?
Sometimes, your pump might not fit your valve. Don’t worry! Most pumps come with adapters. These adapters let you use the pump on different types of valves. Look for the adapter that matches your valve type. Screw it onto the valve first. Then, attach the pump to the adapter.
Fun Fact or Stat: Presta valves can hold higher pressures than Schrader valves, which is why they’re popular on road bikes.
Reading the PSI/BAR Scale While Pumping

Now comes the fun part: pumping! As you pump air into the tire, watch the gauge. The needle will move, showing the pressure in PSI and BAR. Pump until the needle reaches the recommended range you found on your tire. It’s better to pump in short bursts. This helps you avoid over-inflating the tire. Keep an eye on the gauge the whole time. If you go over the recommended pressure, let some air out. You can do this by pressing the valve with a small tool or your finger.
- Watch the gauge as you pump.
- The needle shows the PSI and BAR.
- Pump until you reach the right range.
- Pump in short bursts to avoid over-inflation.
- Let air out if you pump too much.
Imagine you are filling a glass of water. You don’t want to fill it too fast, or it will spill. Pumping your bike tire is the same. If you pump too quickly, you might over-inflate it. This can damage the tire. Pump slowly and steadily. Watch the gauge carefully. This will help you get the pressure just right. It’s like adding ingredients to a recipe one at a time. Each step is important.
What If the Needle Doesn’t Move?
If the needle on the gauge doesn’t move, something might be wrong. First, make sure the pump head is securely attached to the valve. If it’s loose, air will leak out. Second, check the pump itself. Make sure it’s working properly. Third, the valve on your tire might be stuck. Try pushing it in a little to loosen it. If you still can’t get the needle to move, ask a grown-up or bike expert for help.
What If I Pump Too Much Air?
It’s easy to pump too much air by accident. Don’t worry! You can let some air out. Most pump heads have a small button or lever to release air. Press it gently. Watch the gauge as air comes out. Stop when you reach the right pressure. If your pump doesn’t have a release button, you can use a small tool to press the valve.
How Do I Know When to Stop Pumping?
The best way to know when to stop pumping is to watch the gauge. Stop when the needle reaches the recommended range on your tire. It’s better to be slightly under-inflated than over-inflated. You can always add more air later if needed. Also, listen to the sound of the pump. It will sound different when the tire is getting full.
| Tire Pressure Issue | Possible Cause | Solution |
|---|---|---|
| Needle doesn’t move | Loose pump head | Secure the pump head |
| Needle doesn’t move | Stuck valve | Push the valve to loosen |
| Over-inflated tire | Pumped too much air | Release air using the pump or a tool |
| Under-inflated tire | Not enough air | Continue pumping slowly |
Fun Fact or Stat: Some high-end bike pumps have digital gauges that show the pressure very precisely!
Checking the Pressure After Pumping
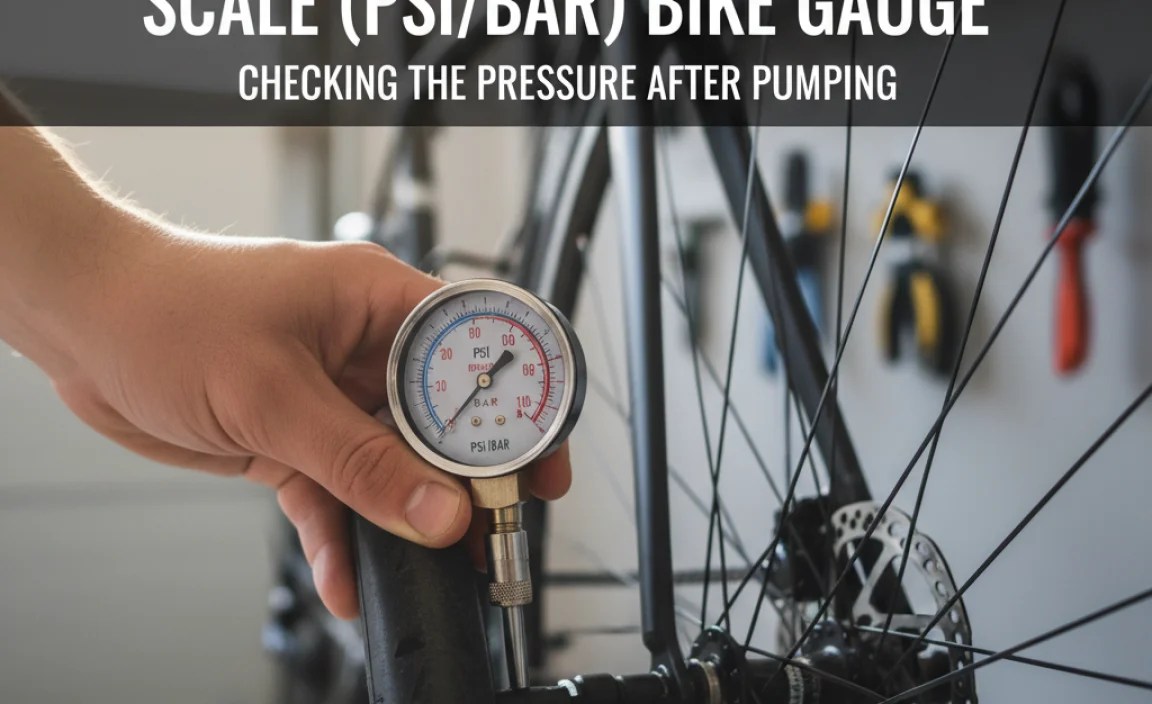
After you finish pumping, it’s important to check the pressure again. Remove the pump head from the valve. Look at the gauge one last time. Make sure the needle is still in the recommended range. If the pressure dropped a little when you removed the pump, that’s okay. It’s normal for a small amount of air to escape. If the pressure is too low, add a little more air. If it’s too high, let some air out. Double-checking ensures your tires are perfectly inflated.
- Remove the pump head carefully.
- Check the gauge one last time.
- Make sure the needle is in the right range.
- Add or release air if needed.
- Double-checking ensures perfect inflation.
Imagine you are wrapping a present. You want to make sure the wrapping paper is smooth and neat. You check it from all angles to make sure it looks perfect. Checking the tire pressure after pumping is similar. You want to make sure the pressure is just right. This makes your ride safer and more comfortable. It only takes a few seconds to double-check. It’s worth the effort.
Why Does the Pressure Drop When I Remove the Pump?
When you remove the pump head, some air escapes quickly. This is because the valve needs to close. The pressure drop is usually very small. It shouldn’t change the overall pressure much. If the pressure drops a lot, your valve might be leaking. Check the valve for damage. You might need to replace it.
How Often Should I Check My Tire Pressure?
You should check your tire pressure before every ride. This is especially important if you haven’t ridden your bike in a while. Tires slowly lose air over time. Checking regularly ensures your tires are always properly inflated. It also helps you spot any problems early.
What If I Don’t Have a Gauge on My Pump?
If your pump doesn’t have a gauge, you can buy a separate gauge. These gauges attach to the valve and show the pressure. They are inexpensive and easy to use. You can also ask a bike shop to check your pressure for you. It’s important to know the pressure, even if your pump doesn’t show it.
Fun Fact or Stat: Some bike shops offer free tire pressure checks!
Maintaining Your Bike Gauge for Accuracy
Your dual scale bike gauge is a helpful tool. To keep it working well, you need to take care of it. Store it in a safe place where it won’t get damaged. Avoid dropping it or getting it wet. Check the gauge regularly to make sure it’s accurate. You can compare it to another gauge to see if the readings match. If your gauge isn’t accurate, you might need to replace it. A well-maintained gauge gives you reliable readings.
- Store your gauge in a safe place.
- Avoid dropping or getting it wet.
- Check the gauge for accuracy regularly.
- Compare it to another gauge if possible.
- Replace the gauge if it’s not accurate.
Imagine your bike gauge is like a musical instrument. If you don’t take care of your instrument, it won’t sound good. Your bike gauge is similar. If you don’t maintain it, it won’t give you accurate readings. This can lead to problems with your tires. Take a few minutes to care for your gauge. This will help you keep your bike in top condition.
How Do I Know If My Gauge Is Accurate?
The best way to check your gauge’s accuracy is to compare it to another gauge. If you have a friend with a bike, compare your readings. You can also ask a bike shop to check your gauge. If the readings are very different, your gauge might be broken.
What Can Damage a Bike Gauge?
Dropping your bike gauge can damage it. Getting it wet can also cause problems. Extreme temperatures can affect the readings. Avoid leaving your gauge in direct sunlight or freezing temperatures. Store it in a cool, dry place.
How Long Should a Bike Gauge Last?
A good quality bike gauge should last for many years. If you take care of it, it can last even longer. If you notice any problems with the readings, it’s time to replace it. A new gauge is a small price to pay for accurate tire pressure.
Fun Fact or Stat: Some bike gauges come with a calibration certificate, which shows how accurate they are when new!
Summary
Using a dual scale (psi/bar) bike gauge is easy. First, find the recommended pressure on your tire. Next, connect the gauge to the valve. Then, pump air while watching the gauge. Stop when you reach the right pressure. Finally, check the pressure one last time. Remember to maintain your gauge for accurate readings. Keeping your tires properly inflated makes riding safer and more fun. With a little practice, you’ll become a tire-pumping pro!
Understanding PSI and BAR is also important. PSI is pounds per square inch. BAR is another unit of pressure. Your dual scale bike gauge shows both. This helps you no matter where you are. Knowing how to read and use your gauge is a valuable skill. It helps you take care of your bike and enjoy every ride.
Conclusion
Now you know how to use a dual scale (psi/bar) bike gauge! It’s a simple tool that makes a big difference. Checking your tire pressure regularly keeps you safe. It also makes your bike easier to ride. Remember to find the right pressure for your tires. Connect the gauge carefully. Pump slowly and watch the numbers. With a little practice, you’ll be a bike maintenance expert! So, grab your gauge and get ready to ride!
Frequently Asked Questions
Question No 1: Why is it important to check my bike tire pressure?
Answer: Checking your bike tire pressure is very important for your safety and comfort. When your tires have the right amount of air, it’s easier to pedal and control your bike. Underinflated tires can make it hard to ride. They can also cause flat tires. Overinflated tires can be dangerous. They can make the bike slippery. Using a dual scale (psi/bar) bike gauge helps you keep your tires at the right pressure. This makes your rides safer and more enjoyable. It also helps your tires last longer.
Question No 2: What does PSI and BAR mean on my bike gauge?
Answer: PSI and BAR are both ways to measure air pressure in your bike tires. PSI stands for pounds per square inch. It’s a common way to measure pressure in the United States. BAR is another unit of pressure, often used in Europe and other countries. Your dual scale bike gauge shows both PSI and BAR. This allows you to easily read the pressure no matter where you are. One BAR is about 14.5 PSI. Knowing both units helps you understand the pressure better. It’s like knowing how to measure in both inches and centimeters.
Question No 3: How do I find the right tire pressure for my bike?
Answer: Finding the right tire pressure is easy. Look at the side of your bike tire. You’ll see numbers printed there. These numbers show the recommended PSI or BAR range. For example, it might say “40-65 PSI.” This means your tire should have between 40 and 65 PSI. Always stay within the recommended range. Using a dual scale (psi/bar) bike gauge helps you get the pressure just right. If you can’t find the numbers, ask a grown-up or someone at a bike shop for help. The correct pressure makes your ride safer and smoother.
Question No 4: What happens if I put too much air in my bike tires?
Answer: Putting too much air in your bike tires can be dangerous. Overinflated tires can be hard and slippery. They can also explode if they get too hot. This is why it’s important to use a dual scale bike gauge. The gauge helps you avoid over-inflation. If you accidentally pump too much air, release some of it. Most pump heads have a button or lever to release air. You can also use a small tool to press the valve. Watch the gauge as you let air out. Stop when you reach the recommended pressure.
Question No 5: How often should I check the pressure in my bike tires?
Answer: You should check the pressure in your bike tires before every ride. Tires slowly lose air over time. Checking regularly ensures your tires are always properly inflated. This makes your rides safer and more enjoyable. It also helps you spot any problems early. If you haven’t ridden your bike in a while, be sure to check the pressure. Using a dual scale (psi/bar) bike gauge takes only a few minutes. It’s a simple way to keep your bike in top condition.
Question No 6: My bike pump doesn’t have a gauge. Can I still check my tire pressure?
Answer: Yes, you can still check your tire pressure. Even if your pump doesn’t have a gauge, you can use a separate gauge. These gauges attach to the valve and show the pressure in PSI and BAR. They are inexpensive and easy to use. You can buy them at most bike shops. You can also ask a bike shop to check your pressure for you. Knowing the pressure is important, even if your pump doesn’t show it. A dual scale bike gauge is a valuable tool for every cyclist.


