
Easy: How to Fit Universal Gauge to Bicycle Inflator
Did you ever pump up your bike tires and wonder if they had enough air? It can be tricky to know! Using a gauge helps. A gauge tells you the air pressure. But how to fit universal gauge to bicycle inflator? It might seem hard. Don’t worry. It’s easier than you think. This guide will show you how.
Imagine you’re getting ready for a big bike race. You need your tires to be perfect. Too little air, and you’ll be slow. Too much air, and your tires could pop! A gauge helps you get it just right. This makes biking safer and more fun. Let’s learn how to fit universal gauge to bicycle inflator.
Many bike pumps do not have any gauge. Other gauges are not very good. You might want to upgrade your pump. A universal gauge can help. It works with many different pumps. It gives you a better reading. Are you ready to learn how?
Key Takeaways
- Fitting a universal gauge makes inflating your tires more precise and safer.
- A universal gauge provides more accurate pressure readings than basic gauges.
- Make sure the gauge is compatible with both your pump and your tire valves.
- The right tools can simplify the process of how to fit universal gauge to bicycle inflator.
- Always double-check the pressure after fitting the gauge for accuracy.
How To Choose a Universal Gauge

Choosing the right universal gauge is important. You want one that works well. You also want one that lasts. First, check the gauge’s range. Make sure it matches your tire pressure needs. Some gauges measure in PSI. Others measure in BAR. Some measure both! Look for a gauge that is easy to read. A big display is helpful. Consider a digital gauge. Digital gauges are often more accurate. Check the compatibility. Does it fit your pump? Does it fit your tire valves? Most universal gauges fit both Presta and Schrader valves. Read reviews before you buy. See what other people say about the gauge. A good gauge will make pumping your tires much easier. It will also help you ride safely. Think about how often you pump your tires. If you ride a lot, invest in a good gauge.
- Check the pressure range of the gauge.
- Make sure the gauge is easy to read.
- Consider a digital gauge for accuracy.
- Check for compatibility with your pump and valves.
- Read reviews from other cyclists.
Think about the size of the gauge too. A smaller gauge might be easier to store. But a bigger gauge might be easier to read. Some gauges have extra features. Some have a bleeder valve. This lets you release air if you over-inflate. Some have a rotating head. This makes it easier to see the display. Think about what features are important to you. The best gauge is the one that meets your needs. It should be easy to use. It should be accurate. And it should last a long time. By choosing carefully, you can find the perfect universal gauge for your bike.
Why is Gauge Range Important?
Why does the gauge range matter? It’s all about accuracy. If your tires need 50 PSI, a gauge that only goes to 60 PSI will be more accurate than one that goes to 200 PSI. Think of it like measuring sugar. Would you use a giant scale made for weighing trucks? No! You would use a small kitchen scale. The same idea applies to tire gauges. A smaller range means more precise readings. This helps you get the perfect tire pressure. This makes your ride smoother and safer. It also helps your tires last longer. So, always check the gauge range before you buy. Make sure it fits your needs. This small step can make a big difference in your biking experience. It helps to keep safe when you ride a bike.
Digital vs. Analog Gauges
What’s the difference between digital and analog gauges? Analog gauges have a needle. The needle points to the pressure. Digital gauges show the pressure as a number. Digital gauges are often more accurate. They are also easier to read. But they need batteries. Analog gauges don’t need batteries. They are simpler. Some people like the look of analog gauges. Others prefer the accuracy of digital gauges. It’s all about what you like best. Both types of gauges can help you get the right tire pressure. The most important thing is to use a gauge. This will help you ride safely and enjoy your bike.
Valve Compatibility Explained
What are Presta and Schrader valves? Schrader valves are like the ones on car tires. They are wider. Presta valves are thinner. They are common on road bikes. Most universal gauges work with both types. But it’s always good to check. Some gauges have two separate heads. One for each type of valve. Others have a single head that works with both. To use a Presta valve, you need to unscrew the tip. Then you can attach the gauge. Schrader valves are simpler. You just push the gauge onto the valve. Make sure the gauge fits snugly. This will give you an accurate reading. Knowing your valve type is the first step. Then, make sure your gauge is compatible.
Fun Fact or Stat: Did you know that proper tire pressure can improve your cycling speed by up to 10%? That’s like getting a free boost!
Tools Needed To Fit the Gauge

Before you learn how to fit universal gauge to bicycle inflator, gather your tools. You’ll need a few things. First, get your new universal gauge. Make sure it’s the right type for your pump. You might need a wrench. A wrench helps tighten connections. You might also need a screwdriver. A screwdriver can help with small adjustments. Teflon tape is useful. Wrap Teflon tape around the threads. This helps prevent air leaks. Safety glasses are a good idea. They protect your eyes. A clean rag can help wipe up any messes. Having the right tools makes the job easier. It also makes it safer. Take your time and be careful. If you’re not sure about something, ask for help. A friend or a bike shop can assist you.
- Universal gauge (compatible with your pump).
- Wrench (for tightening connections).
- Screwdriver (for adjustments).
- Teflon tape (to prevent air leaks).
- Safety glasses (to protect your eyes).
Think about where you will work. Choose a clean, well-lit area. This will help you see what you’re doing. It will also prevent you from losing small parts. Put down a mat or some paper. This will protect your work surface. Keep your tools organized. This will make it easier to find what you need. Read the instructions that came with your gauge. This will give you specific information. Every gauge is a little different. Following the instructions will help you avoid mistakes. And remember, safety first! Always wear safety glasses. And be careful when using tools. With the right tools and preparation, you can easily fit a universal gauge to your bike inflator.
Choosing the Right Wrench Size
Why is the right wrench size important? Using the wrong size can damage the nuts and bolts. It can also make the job harder. If the wrench is too big, it will slip. This can round off the edges of the nut. If the wrench is too small, it won’t grip properly. This can also damage the nut. A good set of wrenches is a great investment. Make sure you have a variety of sizes. This will help you with many different jobs. Adjustable wrenches are also useful. They can fit different sizes of nuts and bolts. But they are not as strong as fixed wrenches. Always use the right tool for the job. This will save you time and frustration.
The Importance of Teflon Tape
What is Teflon tape and why do we use it? Teflon tape is a thin, white tape. It’s also called plumber’s tape. You wrap it around the threads of pipes and fittings. This creates a tight seal. It prevents leaks. When you screw the parts together, the tape fills the gaps. This makes a waterproof connection. Teflon tape is easy to use. Just wrap it around the threads a few times. Make sure to wrap it in the right direction. You want the tape to tighten as you screw the parts together. Teflon tape is a cheap and easy way to prevent leaks. It’s an essential tool for many DIY projects.
Safety First: Eye Protection
Why wear safety glasses? Small parts can fly off when you’re working. These parts can hurt your eyes. Safety glasses protect your eyes from these dangers. They also protect your eyes from dust and debris. It’s always better to be safe than sorry. Safety glasses are cheap and easy to use. Just put them on before you start working. Make sure they fit properly. They should cover your eyes completely. Even if you’re only doing a small job, wear safety glasses. It’s a simple way to protect your vision. Your eyes are important. Take care of them.
Fun Fact or Stat: Teflon tape was invented in 1969 by DuPont. It’s used in everything from plumbing to bicycle repairs!
Prepare the Bicycle Inflator

Before you start, you must prepare your bicycle inflator. This means getting it ready for the new gauge. First, disconnect the old gauge. If there is one, unscrew it carefully. Use a wrench if needed. Clean the threads. Use a clean rag to wipe away any dirt or grime. This will help the new gauge fit properly. Check the threads for damage. If they are damaged, you might need a new inflator head. Make sure the inflator is clean. Dirt can damage the new gauge. Now, you are ready to install the universal gauge. Take your time. Be careful. Following these steps will help you succeed. Preparing the inflator is a key part of how to fit universal gauge to bicycle inflator.
- Disconnect the old gauge (if there is one).
- Clean the threads on the inflator.
- Check for any damage to the threads.
- Ensure the inflator is clean and free of debris.
- Gather all necessary tools for the installation.
- Read the instructions for your new gauge.
Think about the type of inflator you have. Some inflators have a screw-on gauge. Others have a push-fit gauge. The method for removing the old gauge will depend on the type. If you have a screw-on gauge, use a wrench to loosen it. Turn the wrench counterclockwise. If you have a push-fit gauge, you might need to use a small screwdriver to release it. Be careful not to damage the inflator. Once the old gauge is removed, inspect the threads. Make sure they are clean and undamaged. If the threads are damaged, you might need to replace the entire inflator head. This is a more complicated repair. If you are not comfortable doing it yourself, take it to a bike shop.
Removing the Old Gauge Safely
How do you remove the old gauge safely? First, make sure the inflator is not pressurized. Release any air that is in the inflator. This will prevent air from rushing out when you remove the gauge. Use the right size wrench. This will prevent you from damaging the nuts and bolts. Turn the wrench slowly and carefully. If the gauge is stuck, don’t force it. Try using some penetrating oil. Let the oil soak in for a few minutes. Then try again. If the gauge still won’t come off, take it to a bike shop. They have the tools and experience to remove it safely.
Cleaning Threads for a Good Seal
Why is it important to clean the threads? Dirt and grime can prevent a good seal. This can cause air leaks. A good seal is essential for accurate pressure readings. Use a clean rag to wipe the threads. You can also use a small brush. A toothbrush works well. Dip the brush in some rubbing alcohol. This will help remove stubborn dirt. Make sure the threads are completely dry before you install the new gauge. A clean, dry surface will ensure a tight seal. This will help you get the most accurate pressure readings from your new gauge.
Inspecting for Damage
What kind of damage should you look for? Check for stripped threads. Stripped threads are smooth and shiny. They won’t grip the new gauge properly. Check for cracks. Cracks can cause air leaks. Check for rust. Rust can weaken the metal. If you find any damage, you might need to replace the inflator head. It’s better to replace it than to risk an air leak or a faulty gauge. A damaged inflator can also be dangerous. It could break while you’re using it. This could cause injury. So, take the time to inspect the inflator carefully. If you see any damage, replace it.
Fun Fact or Stat: Bike inflators have been around since the late 1800s. Early models were often foot-operated!
Install the Universal Gauge
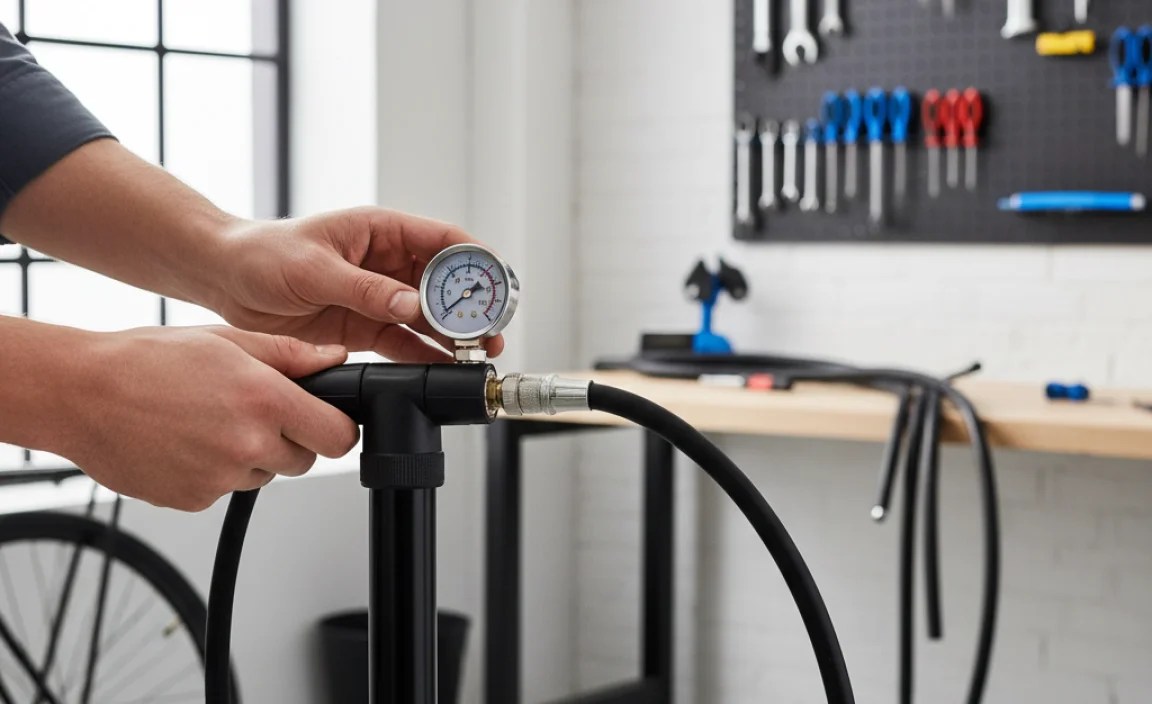
Now it’s time to install the universal gauge. First, wrap Teflon tape around the threads. Wrap it clockwise. This will help create a tight seal. Next, screw the gauge onto the inflator. Turn it clockwise. Tighten it with a wrench. Be careful not to over-tighten. Over-tightening can damage the threads. Make sure the gauge is facing the right way. You want to be able to read it easily. Test the connection. Inflate a tire. Check for air leaks. If you see any leaks, tighten the connection. You might need to add more Teflon tape. Once you have a good seal, you’re done! You have successfully installed your universal gauge. Now you can inflate your tires with confidence. You know how to fit universal gauge to bicycle inflator.
- Wrap Teflon tape around the threads clockwise.
- Screw the gauge onto the inflator clockwise.
- Tighten with a wrench, but don’t over-tighten.
- Ensure the gauge is facing the correct direction.
- Test for air leaks by inflating a tire.
Think about the angle of the gauge. You want it to be easy to read while you’re pumping. Some gauges have adjustable heads. This allows you to angle the gauge for better visibility. If your gauge doesn’t have an adjustable head, you might need to use a small spacer. This will lift the gauge up slightly. This can make it easier to read. Pay attention to the position of the gauge. You want it to be in a place where it won’t get bumped or damaged. Also, make sure it’s not blocking any other parts of the inflator. A little bit of planning can make a big difference in how easy it is to use your new gauge.
Applying Teflon Tape Correctly
How do you apply Teflon tape correctly? Start by cleaning the threads. Make sure they are dry. Hold the end of the tape against the threads. Wrap the tape clockwise. Overlap each layer slightly. This will create a thicker seal. Wrap the tape around the threads two or three times. Tear the tape off. Press the end of the tape against the threads. This will keep it from unraveling. Don’t use too much tape. Too much tape can make it hard to screw the parts together. Just a few layers are enough. Applying Teflon tape correctly is essential for a good seal.
Tightening the Connection
How tight should you tighten the connection? Tighten it until it’s snug. You don’t want it to be too loose. But you also don’t want it to be too tight. Over-tightening can damage the threads. Use a wrench to tighten the connection. Turn the wrench slowly and carefully. If you feel resistance, stop. You don’t want to force it. Test the connection for leaks. If you see any leaks, tighten it a little more. But be careful not to over-tighten. A little bit of practice will help you get the feel for how tight is just right.
Checking for Air Leaks
How do you check for air leaks? Inflate a tire. Listen for hissing sounds. This is a sign of an air leak. You can also use soapy water. Mix some soap with water. Brush the soapy water onto the connection. If you see bubbles, there’s a leak. Tighten the connection. Add more Teflon tape if needed. Test again. Keep testing until there are no leaks. A good seal is essential for accurate pressure readings. It also prevents you from wasting energy. So, take the time to check for leaks. It’s worth the effort.
Fun Fact or Stat: Teflon is so slippery, it’s used to coat non-stick frying pans!
Calibrate the New Gauge

After installing your universal gauge, calibrate it. Calibration makes sure the gauge is accurate. Compare its readings to another gauge. A digital gauge is a good choice. If the readings are different, adjust the new gauge. Some gauges have an adjustment screw. Turn the screw until the readings match. If your gauge doesn’t have an adjustment, you might need to replace it. An accurate gauge is important for safe riding. It helps you inflate your tires to the right pressure. Calibrating your gauge is a simple step. But it can make a big difference. Now you know how to fit universal gauge to bicycle inflator accurately.
- Compare readings to a known accurate gauge.
- Adjust the new gauge if readings differ.
- Check for an adjustment screw on the gauge.
- Replace the gauge if it cannot be calibrated.
- Re-check calibration periodically.
Think about how often you use your gauge. If you use it a lot, you should calibrate it more often. Gauges can lose accuracy over time. Temperature can also affect accuracy. Cold weather can make the readings lower. Hot weather can make the readings higher. It’s a good idea to check your gauge in different conditions. This will help you get the most accurate readings. Also, be careful not to drop your gauge. Dropping it can damage the internal components. This can make it inaccurate. Store your gauge in a safe place. This will help it last longer. And remember, an accurate gauge is essential for safe riding.
Using a Reference Gauge
Why use a reference gauge? A reference gauge is a gauge that you know is accurate. You can use it to check the accuracy of other gauges. Digital gauges are often used as reference gauges. They are usually more accurate than analog gauges. You can also take your gauge to a bike shop. They can check it for you. A reference gauge is a valuable tool. It helps you make sure your gauges are accurate. This is important for safe riding.
Adjusting the Gauge
How do you adjust the gauge? Some gauges have an adjustment screw. The screw is usually located on the back of the gauge. Turn the screw with a small screwdriver. Watch the gauge reading. Turn the screw until the reading matches the reference gauge. If your gauge doesn’t have an adjustment screw, you can’t adjust it. You’ll need to replace it. Adjusting the gauge is a simple process. But it requires a steady hand. Take your time and be careful. You don’t want to damage the gauge.
Frequency of Calibration
How often should you calibrate your gauge? It depends on how often you use it. If you use it every day, you should calibrate it every month. If you only use it occasionally, you can calibrate it every few months. It’s also a good idea to calibrate it after you drop it. Dropping it can damage the internal components. This can make it inaccurate. Regular calibration will help you ensure your gauge is accurate. This is important for safe riding.
Fun Fact or Stat: The first accurate pressure gauges were invented in the mid-1800s for steam engines!
Understanding Pressure Readings
To use your new gauge, you need to understand pressure readings. Tire pressure is measured in PSI or BAR. PSI stands for pounds per square inch. BAR is another unit of pressure. Your tires have a recommended pressure range. This range is printed on the sidewall of the tire. Don’t inflate your tires above or below this range. Too much pressure can cause a blowout. Too little pressure can cause a flat tire. Use your gauge to check the pressure before each ride. This will help you ride safely and efficiently. Knowing how to fit universal gauge to bicycle inflator is only useful if you understand its readings.
- Understand PSI (pounds per square inch) and BAR.
- Find the recommended pressure range on your tire.
- Don’t exceed the maximum pressure listed on the tire.
- Check pressure before each ride.
- Adjust pressure based on riding conditions.
Think about the type of riding you will be doing. If you are riding on smooth roads, you can use a higher pressure. This will make you faster. If you are riding on rough roads, you should use a lower pressure. This will make the ride more comfortable. Also, consider your weight. If you are heavier, you will need to use a higher pressure. If you are lighter, you can use a lower pressure. Experiment with different pressures. Find what works best for you. The right tire pressure can make a big difference in your riding experience.
| Pressure Unit | Description | Common Use |
|---|---|---|
| PSI | Pounds per Square Inch | Most common in the USA |
| BAR | Metric unit of pressure | Common in Europe and elsewhere |
| kPa | Kilopascal, another metric unit | Sometimes used, equivalent to 0.01 BAR |
| Atm | Atmosphere, roughly equal to BAR | Used to express very high pressures |
PSI vs. BAR
What’s the difference between PSI and BAR? PSI is the unit of pressure used in the United States. BAR is the unit of pressure used in most other countries. 1 BAR is equal to 14.5 PSI. Most gauges show both PSI and BAR. This makes it easy to read the pressure in either unit. Knowing the difference between PSI and BAR is important. This will help you avoid confusion. It will also help you make sure you are inflating your tires to the right pressure.
Finding the Recommended Pressure
Where can you find the recommended pressure? The recommended pressure is printed on the sidewall of the tire. It’s usually a range. For example, it might say “60-80 PSI”. This means you should inflate the tire to somewhere between 60 and 80 PSI. Don’t inflate the tire below 60 PSI. Don’t inflate it above 80 PSI. Staying within the recommended range is important for safe riding. It will also help your tires last longer.
Adjusting for Riding Conditions
How do you adjust for riding conditions? If you are riding on smooth roads, you can use a higher pressure. This will make you faster. If you are riding on rough roads, you should use a lower pressure. This will make the ride more comfortable. Also, consider the weather. In cold weather, the pressure in your tires will decrease. You might need to add a little air. In hot weather, the pressure will increase. You might need to release some air. Adjusting for riding conditions will help you ride more comfortably and safely.
Fun Fact or Stat: Tire pressure changes by about 1 PSI for every 10 degrees Fahrenheit change in temperature!
Maintenance and Care
To keep your universal gauge working well, you need to maintain it. Store it in a dry place. This prevents rust. Clean it regularly. Use a soft cloth. Don’t use harsh chemicals. Check the connections. Make sure they are tight. Replace the batteries if it’s a digital gauge. Handle the gauge carefully. Dropping it can damage it. With proper care, your gauge will last a long time. It will also give you accurate readings. This is important for safe riding. Taking care of your gauge is part of how to fit universal gauge to bicycle inflator and keep it working well.
- Store the gauge in a dry place.
- Clean the gauge regularly with a soft cloth.
- Check the connections for tightness.
- Replace batteries in digital gauges.
- Handle the gauge carefully to avoid damage.
Think about how you store your bike pump. If you store it outside, the gauge will be exposed to the elements. This can damage it. It’s better to store your pump inside. This will protect the gauge from rust and corrosion. Also, be careful not to kink the hose. A kinked hose can damage the gauge. Hang the hose up when you’re not using it. This will prevent it from kinking. A little bit of care will help your gauge last longer. It will also help you get accurate readings for years to come.
Proper Storage Techniques
How should you store your gauge properly? Store it in a dry place. Avoid storing it in direct sunlight. Sunlight can damage the plastic components. Keep it away from chemicals. Chemicals can corrode the metal parts. Store it in a case or bag. This will protect it from dust and scratches. Don’t store it with heavy objects. This can damage the gauge. Proper storage will help your gauge last longer. It will also help you get accurate readings.
Cleaning Instructions
How do you clean your gauge? Use a soft cloth. Dampen the cloth with water. Don’t use soap or chemicals. These can damage the gauge. Wipe the gauge gently. Remove any dirt or grime. Dry the gauge with a clean cloth. Don’t use a hairdryer. Heat can damage the gauge. Clean the gauge regularly. This will help it stay accurate. It will also help it last longer.
Battery Replacement (If Applicable)
How do you replace the batteries in a digital gauge? First, find the battery compartment. It’s usually on the back of the gauge. Open the battery compartment. You might need a small screwdriver. Remove the old batteries. Insert the new batteries. Make sure the polarity is correct. The polarity is marked on the battery compartment. Close the battery compartment. Make sure it’s closed tightly. Test the gauge. Make sure it’s working properly. Replacing the batteries is a simple process. But it’s important to do it correctly. This will help your gauge stay accurate.
Fun Fact or Stat: Some high-end digital gauges use solar power to recharge their batteries!
Summary
In this article, we explored how to fit universal gauge to bicycle inflator. We learned why a good gauge is important. It helps you get the right tire pressure. This makes your ride safer and more fun. We discussed how to choose the right gauge. Consider the pressure range and the type of valve. We also talked about the tools you’ll need. A wrench, screwdriver, and Teflon tape are helpful. Prepare the inflator by cleaning it. Then, install the gauge carefully. Calibrate the gauge to make sure it’s accurate. Finally, maintain the gauge by storing it properly. With these steps, you can easily fit a universal gauge to your bike inflator.
Conclusion
Fitting a universal gauge to your bicycle inflator is easier than you think. It improves accuracy. It makes inflating your tires safer. Choose the right gauge. Use the right tools. Follow the steps in this guide. Now you know how to fit universal gauge to bicycle inflator. Enjoy your safer, more comfortable rides.
Frequently Asked Questions
Question No 1: Why should I fit a universal gauge to my bicycle inflator?
Answer: A universal gauge gives you more accurate pressure readings. Many built-in gauges on bike pumps are not very precise. An accurate gauge helps you inflate your tires to the correct pressure. This improves your bike’s performance. It also makes your ride safer and more comfortable. Correct tire pressure reduces the risk of flats. It also helps you roll faster. Learning how to fit universal gauge to bicycle inflator is a worthwhile upgrade for any cyclist.
Question No 2: What tools do I need to fit a universal gauge?
Answer: You’ll need a few basic tools. A wrench is helpful for tightening connections. A screwdriver might be needed for small adjustments. Teflon tape is essential to prevent air leaks. Safety glasses protect your eyes from debris. A clean rag helps wipe away dirt. Having these tools makes the job easier and safer. Depending on your specific pump and gauge, you might also need pliers. Check the instructions that came with your gauge for a complete list of tools.
Question No 3: How do I know if my universal gauge is compatible with my bicycle inflator?
Answer: Check the gauge’s specifications. Make sure it fits your inflator’s connection type. Most universal gauges are designed to fit standard inflator heads. Look for gauges that specify compatibility with both Presta and Schrader valves. These are the two most common types of bike tire valves. If you’re unsure, read reviews online. See what other cyclists say about compatibility. You can also ask a bike shop for advice. They can help you choose a compatible gauge.
Question No 4: How do I calibrate my new universal gauge after fitting it?
Answer: Calibration is important for accurate readings. Use a reference gauge that you know is accurate. Compare the readings of your new gauge to the reference gauge. If the readings are different, adjust the new gauge. Some gauges have an adjustment screw. Turn the screw until the readings match. If your gauge doesn’t have an adjustment, you might need to replace it. Regular calibration ensures your gauge remains accurate over time. This is a key step after learning how to fit universal gauge to bicycle inflator.
Question No 5: What should I do if I experience air leaks after fitting the universal gauge?
Answer: Air leaks can happen. First, tighten the connection between the gauge and the inflator. Use a wrench, but don’t over-tighten. Check the Teflon tape. Make sure it’s wrapped properly around the threads. If the leak persists, add more Teflon tape. You can also use soapy water to find the leak. Brush soapy water onto the connection. If you see bubbles, that’s where the air is leaking. If you still can’t stop the leak, take it to a bike shop. They can help you troubleshoot the problem.
Question No 6: How often should I check my tire pressure?
Answer: It’s a good idea to check your tire pressure before every ride. Tires lose air over time. Checking before each ride ensures you’re at the correct pressure. This improves performance and safety. Even if you haven’t ridden your bike in a few days, check the pressure. Temperature changes can also affect tire pressure. So, regular checks are always a good idea. After learning how to fit universal gauge to bicycle inflator, make checking your tire pressure a routine.


