
How to Pressurize a Short Cycling Well Pump
Quick Summary: To pressurize a short cycling well pump, first turn off the power. Check the air pressure in the pressure tank using a tire gauge; it should be 2 PSI below the pump’s cut-in pressure. If it’s low, use a compressor to add air through the Schrader valve. Inspect for leaks in the pipes and connections. If problems persist, consider replacing the pressure switch or tank. Always consult a professional if unsure.
Is your well pump turning on and off too frequently? This is called “short cycling,” and it can damage your pump and waste energy. It’s a common problem that many homeowners face, often caused by a loss of air pressure in the well’s pressure tank. Don’t worry; you can often fix this yourself! This guide will walk you through the steps to repressurize your well pump system, saving you money and extending the life of your equipment. We’ll cover everything from checking the air pressure to troubleshooting common issues. Let’s get started!
Understanding Short Cycling

Before we dive into the “how-to,” let’s understand why short cycling happens. Your well pump pushes water into a pressure tank. This tank has a cushion of air that compresses as water fills it. When you open a faucet, the pressurized water flows out. The pump only kicks on when the pressure drops to a certain level (the cut-in pressure). Short cycling occurs when the air cushion is lost, causing the pump to turn on and off rapidly because it can’t maintain consistent pressure.
Causes of Short Cycling
Several factors can lead to short cycling. Identifying the cause is the first step in fixing the problem. Here are some common culprits:
- Loss of Air Pressure in the Tank: This is the most frequent cause. Over time, air leaks out of the tank, reducing the air cushion.
- Waterlogged Tank: If the air cushion is completely gone, the tank becomes waterlogged, and the pump cycles rapidly.
- Leaks in the Plumbing: Leaks in pipes or fittings cause pressure to drop quickly, triggering the pump to turn on more often.
- Faulty Pressure Switch: The pressure switch senses the water pressure and tells the pump when to turn on and off. If it’s defective, it might cause erratic cycling.
- Incorrect Pressure Settings: If the cut-in and cut-out pressure settings on the switch are too close together, the pump will cycle more frequently.
Tools and Materials You’ll Need

Before you start, gather these essential tools and materials:
- Screwdrivers: Both flathead and Phillips head screwdrivers may be needed.
- Tire Pressure Gauge: To check the air pressure in the tank. A digital gauge is more accurate but an analog will work.
- Air Compressor: To add air to the tank if needed. A small portable compressor will work.
- Wrench: For tightening fittings or replacing the pressure switch.
- Teflon Tape: For sealing threaded connections.
- Bucket: To catch any water that may spill.
- Safety Glasses: To protect your eyes.
- Work Gloves: To protect your hands.
Step-by-Step Guide to Pressurizing Your Well Pump System

Follow these steps to repressurize your short cycling well pump system:
Step 1: Turn Off the Power
Safety first! Locate the circuit breaker for your well pump and turn it off. This prevents any accidental electrocution while you’re working on the system. Double-check that the pump is indeed off before proceeding.
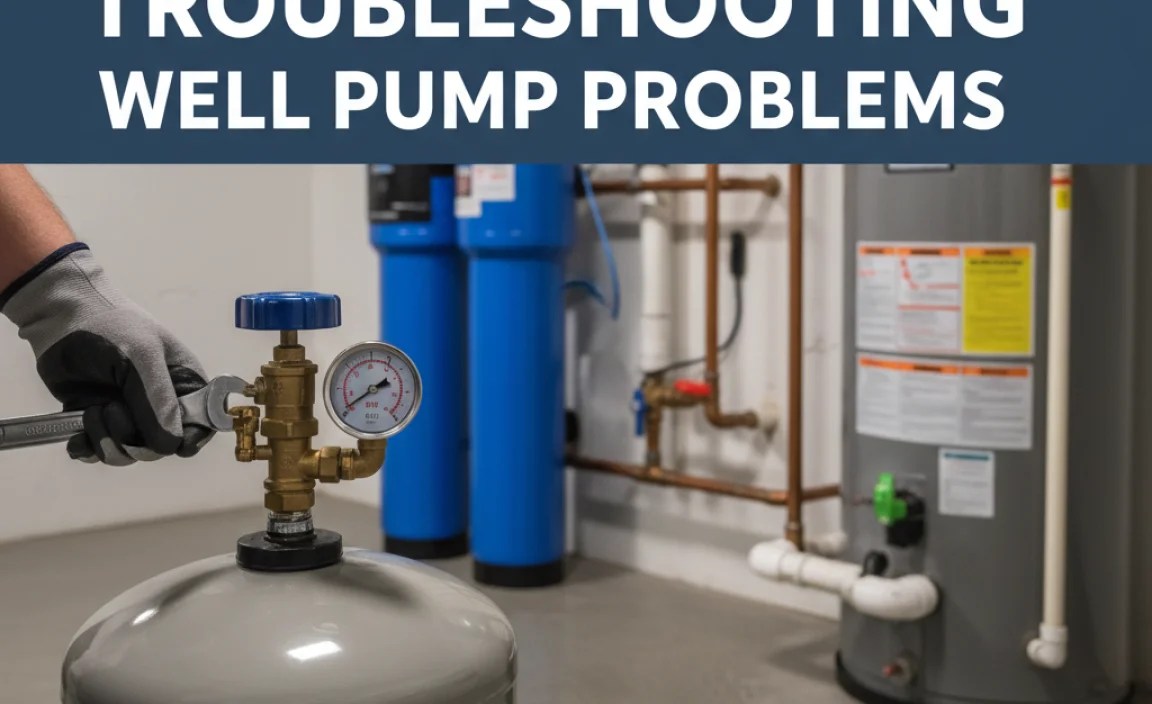
Step 2: Locate the Pressure Tank and Schrader Valve
Find the pressure tank, usually a blue or gray tank near your well pump. Look for the Schrader valve (like the one on your car tire) on top or on the side of the tank. This is where you’ll add air.
Step 3: Check the Air Pressure
Remove the cap from the Schrader valve and use your tire pressure gauge to check the air pressure in the tank. It’s crucial to know the correct pressure for your system. The ideal pressure is typically 2 PSI below the pump’s cut-in pressure (the pressure at which the pump turns on). For example, if your pump’s cut-in pressure is 30 PSI, the air pressure in the tank should be 28 PSI. This information is often printed on the pump or tank.
What if you can’t find the cut-in pressure? A common setting is 30/50. This means the pump turns on at 30 PSI and off at 50 PSI. In this case, you’d want 28 PSI in the tank.
Step 4: Drain the Tank (If Needed)
If water comes out when you check the air pressure, it means the tank is waterlogged and has lost its air cushion. In this case, you need to drain the tank completely. Here’s how:
- Turn off the water supply to your house (usually a valve near the tank).
- Open a faucet at the lowest point in your house (like an outdoor spigot or a basement sink). This will help drain the water from the tank.
- Open the drain valve at the bottom of the pressure tank (if it has one). If there’s no drain valve, you might need to disconnect the pipe at the bottom of the tank. Be prepared for a lot of water!
- Let the tank drain completely. This might take some time.
Step 5: Add Air to the Tank
Once the tank is drained (or if it wasn’t waterlogged to begin with), use your air compressor to add air through the Schrader valve. Add air slowly, checking the pressure with your tire gauge frequently. Aim for the target pressure (2 PSI below the cut-in pressure).
Step 6: Check for Leaks
After pressurizing the tank, inspect all the pipes, fittings, and connections for leaks. Even a small leak can cause the system to lose pressure and short cycle. Tighten any loose connections with a wrench. If you find a leaking pipe, you may need to repair or replace it.
Step 7: Turn the Power and Water Back On
Once you’re confident that there are no leaks, turn the circuit breaker back on to restore power to the pump. Then, slowly turn the water supply back on. Monitor the pump to see if it’s cycling correctly. It should turn on when the pressure drops to the cut-in pressure and off when it reaches the cut-out pressure.
Step 8: Monitor and Adjust
Keep an eye on your well pump system for the next few days to make sure it’s working correctly. If you notice any short cycling, repeat these steps or consider other potential issues discussed below.
Troubleshooting Common Problems
If you’ve followed the steps above and your well pump is still short cycling, here are some other potential issues to investigate:
- Faulty Pressure Switch: The pressure switch could be malfunctioning. You can test it with a multimeter or simply replace it. They are relatively inexpensive and easy to replace.
- Blocked or Clogged Well Screen: A clogged well screen can restrict water flow, causing the pump to work harder and cycle more frequently. A professional well service company can clean or replace the screen.
- Incorrect Pressure Switch Settings: Double-check that the cut-in and cut-out pressure settings on the pressure switch are correct. Adjust them if necessary, but be careful not to set them too high or too low.
- Bad Check Valve: The check valve prevents water from flowing back into the well. If it’s faulty, it can cause pressure fluctuations and short cycling.
When to Call a Professional

While many short cycling issues can be resolved with these steps, some problems require professional help. Call a qualified well service technician if:
- You’re uncomfortable working with electrical components or plumbing.
- You suspect a problem with the well itself (e.g., low water level).
- You’ve tried these steps and the problem persists.
- You notice any unusual noises or smells coming from the well pump or tank.
Pressure Tank Types and Considerations
There are two main types of pressure tanks: galvanized steel tanks and bladder tanks. Each has its pros and cons:
| Type | Pros | Cons |
|---|---|---|
| Galvanized Steel Tank | Lower initial cost, simple design. | Prone to waterlogging, requires regular draining and air charging, shorter lifespan. |
| Bladder Tank | More efficient, less prone to waterlogging, longer lifespan, requires less maintenance. | Higher initial cost, bladder can rupture over time. |
If you’re replacing your pressure tank, consider upgrading to a bladder tank for improved performance and less maintenance.
Maintaining Your Well Pump System
Regular maintenance can prevent short cycling and extend the life of your well pump system. Here are some tips:
- Check the air pressure in the tank every few months. Adjust as needed.
- Inspect pipes and fittings for leaks regularly.
- Consider installing a whole-house water filter to protect your pump from sediment and debris.
- Have your well professionally inspected every few years.
Cost Considerations
Addressing short cycling early can save you money in the long run. Here’s a breakdown of potential costs:
| Item/Service | Estimated Cost |
|---|---|
| Pressure Switch Replacement | $20 – $50 |
| Pressure Tank Replacement | $150 – $500 (plus installation) |
| Professional Well Inspection | $150 – $300 |
| Well Pump Replacement | $500 – $2000 (plus installation) |
As you can see, preventative maintenance and simple repairs are much more cost-effective than replacing major components like the well pump.
FAQ About Pressurizing Well Pumps
Here are some frequently asked questions about pressurizing well pumps:
- Why is my well pump short cycling even after I added air to the tank?
- There could be a leak in the system, a faulty pressure switch, or a problem with the well itself. Double-check for leaks and consider replacing the pressure switch. If the problem persists, consult a professional.
- How often should I check the air pressure in my pressure tank?
- It’s a good idea to check the air pressure every 2-3 months, especially if you’ve had short cycling issues in the past. Regular monitoring can help you catch problems early.
- Can I use a bicycle pump to add air to the pressure tank?
- While technically possible, it’s not recommended. A bicycle pump is designed for high pressure, low volume, while you need low pressure, higher volume for a pressure tank. An air compressor is much more efficient and effective.
- What happens if I over-pressurize the tank?
- Over-pressurizing the tank can damage the bladder (in a bladder tank) or put undue stress on the system. Always adhere to the recommended pressure range. If you accidentally over-pressurize, release some air until you reach the correct level.
- Is it normal for the pressure tank to be warm to the touch?
- Slight warmth is normal due to the pump’s operation. However, excessive heat could indicate a problem with the pump motor. If the tank is very hot, turn off the pump and call a professional.
- How do I know what the correct cut-in and cut-out pressure settings are for my pump?
- The pressure settings are usually printed on the pump or pressure switch. If you can’t find them, consult the manufacturer’s documentation or contact a well service professional.
- My well water smells bad. Could this be related to short cycling?
- While not directly related, short cycling can exacerbate water quality issues. The frequent on/off cycles can stir up sediment and affect the water’s taste and odor. If you notice a change in water quality, have your well professionally tested.
Conclusion
Pressurizing a short cycling well pump might seem daunting, but by following these steps, you can often resolve the issue yourself. Remember to prioritize safety, take your time, and double-check your work. Regular maintenance and prompt attention to problems will keep your well pump system running smoothly for years to come. If you encounter any difficulties or are unsure about any step, don’t hesitate to call a qualified well service technician. With a little effort, you can keep your water flowing and avoid costly repairs. Happy plumbing!
“`


