
How to Make a Homemade Cycle Pump: A Step-by-Step Guide
Quick Summary: Building a homemade cycle pump is easier than you think! You’ll need a few basic materials like PVC pipes, a one-way valve, a piston, and some creativity. Assemble the pump body, create an airtight piston, install the valve, and add a hose connector. With some DIY skills, you can inflate your tires anytime, anywhere, saving money and staying prepared on the road or trail.
Ever been stranded with a flat tire and no pump? It’s a cyclist’s worst nightmare! Store-bought pumps can be expensive and sometimes unreliable. But what if you could make your own cycle pump, tailored to your needs, using simple, affordable materials? It’s totally possible, and I’m here to guide you through each easy step. Get ready to build a reliable, cost-effective solution that will keep you rolling. Let’s dive in and get pumping!
Why Build Your Own Cycle Pump?

There are plenty of reasons to consider making a DIY bike pump. Here are a few:
- Cost Savings: You’ll save money by using inexpensive, readily available materials.
- Customization: Tailor the pump to your specific needs, like size and pressure output.
- Self-Reliance: Gain the satisfaction of fixing your bike with a tool you built yourself.
- Emergency Preparedness: Have a backup pump ready for unexpected flats on the road.
- Educational Project: Learn about basic mechanics and improve your DIY skills.
Materials and Tools You’ll Need

Before you start, gather these essential materials and tools. This list ensures you have everything at hand for a smooth building process.
Materials:
- PVC Pipe: 1-inch diameter, approximately 12-18 inches long (for the pump body)
- PVC End Cap: One end cap to seal one end of the PVC pipe
- PVC Reducer: A reducer fitting to attach the hose
- One-Way Valve: A small valve to control air flow
- Piston: A rubber or plastic stopper that fits snugly inside the PVC pipe
- Hose: Flexible tubing to connect the pump to the tire valve
- Hose Clamps: To secure the hose to the pump and tire valve
- Tire Valve Connector: A Presta or Schrader valve connector, depending on your tire type
- Handle: A wooden or plastic handle for the piston rod
- Piston Rod: A metal or wooden rod to connect the piston to the handle
- O-Rings: For an airtight seal around the piston (various sizes)
- Epoxy or PVC Cement: To securely join the PVC parts
Tools:
- PVC Cutter or Saw: For cutting the PVC pipe to the desired length
- Drill: For drilling holes for the one-way valve and hose attachment
- Drill Bits: Assorted sizes to match the valve and hose fittings
- Sandpaper: For smoothing rough edges on the PVC pipe
- Measuring Tape: For accurate measurements
- Wrench or Pliers: To tighten hose clamps
- Safety Glasses: To protect your eyes during cutting and drilling
- Gloves: To protect your hands from epoxy and sharp edges
Step-by-Step Guide to Building Your Homemade Cycle Pump

Follow these detailed steps to create your DIY cycle pump. Each step includes clear instructions to guide you through the process.
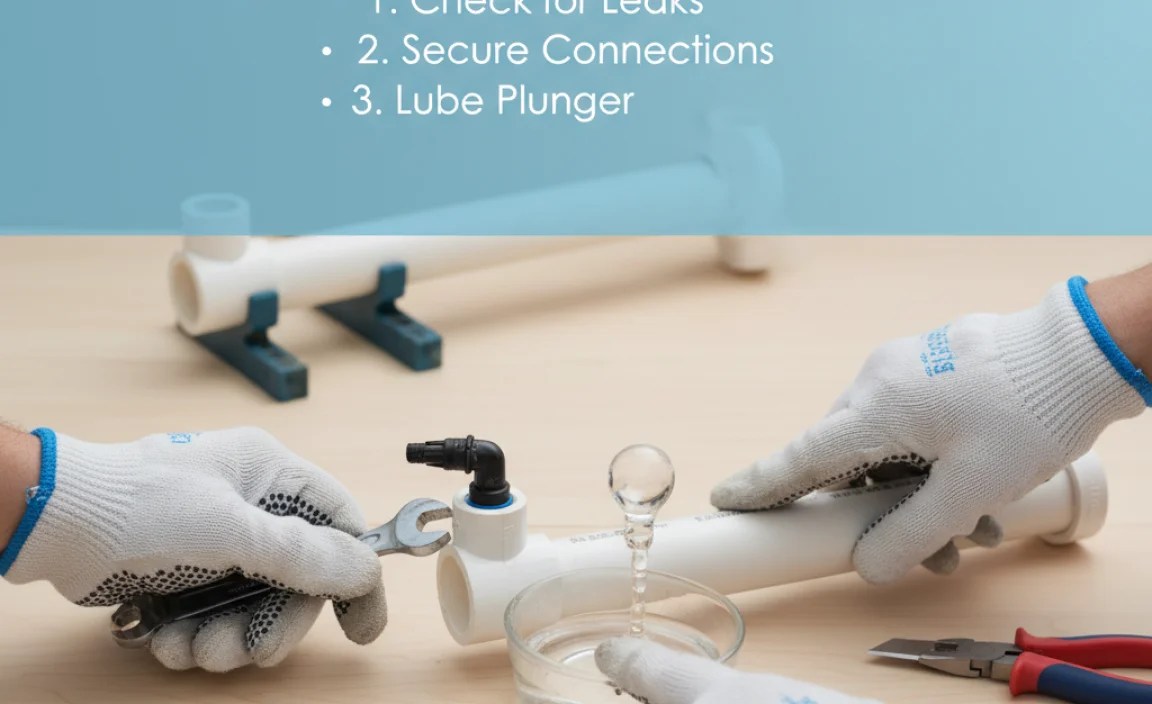
Step 1: Prepare the PVC Pipe
Start by cutting the PVC pipe to the desired length. A 12-18 inch pipe is ideal for a portable pump. Use a PVC cutter or saw for a clean cut. Smooth the edges with sandpaper to remove any burrs. This ensures a proper seal and prevents injury.
Step 2: Create the Piston Assembly
The piston is the heart of your pump. It needs to fit snugly inside the PVC pipe to create an airtight seal.
- Choose a Stopper: Select a rubber or plastic stopper that is slightly larger than the inner diameter of the PVC pipe.
- Add O-Rings: Wrap O-rings around the stopper to create a tighter seal. Experiment with different sizes until you achieve a snug fit.
- Attach the Piston Rod: Drill a hole in the center of the stopper. Insert the piston rod (metal or wood) and secure it with epoxy.
- Secure the Handle: Attach the handle to the other end of the piston rod. Make sure it’s firmly attached for comfortable pumping.
Step 3: Install the One-Way Valve
The one-way valve allows air to flow into the tire but prevents it from escaping. Correct placement is crucial for pump efficiency.
- Drill a Hole: Drill a hole near one end of the PVC pipe, sized to fit the one-way valve.
- Insert the Valve: Insert the one-way valve into the hole. Ensure it’s oriented correctly to allow air flow into the pipe.
- Secure the Valve: Use epoxy to secure the valve in place. Allow it to dry completely before proceeding.
Step 4: Attach the Hose Connector
The hose connector links the pump to your tire valve. A secure connection is essential for effective inflation.
- Drill Another Hole: Drill a hole near the same end of the PVC pipe as the one-way valve, sized to fit the PVC reducer.
- Insert the Reducer: Insert the PVC reducer into the hole and secure it with epoxy.
- Attach the Hose: Connect the hose to the reducer and secure it with a hose clamp.
- Connect the Tire Valve Connector: Attach the Presta or Schrader valve connector to the other end of the hose and secure it with a hose clamp.
Step 5: Seal the End Cap
The end cap seals the bottom of the pump, creating an airtight chamber. A proper seal is vital for efficient pumping.
- Apply Epoxy: Apply epoxy to the inside of the PVC end cap.
- Attach the End Cap: Slide the end cap onto the open end of the PVC pipe.
- Allow to Dry: Allow the epoxy to dry completely before using the pump.
Step 6: Test Your Homemade Pump
Before relying on your homemade pump, test it thoroughly. Check for leaks and ensure it effectively inflates your tires.
- Insert the Piston: Insert the piston assembly into the open end of the PVC pipe.
- Connect to Tire: Connect the tire valve connector to your tire valve.
- Pump: Pump the handle to inflate the tire. Check for air leaks around the piston, valve, and hose connections.
- Adjustments: If you detect leaks, tighten the hose clamps or apply more epoxy to the connections.
Troubleshooting Tips
Even with careful construction, issues can arise. Here’s how to handle common problems.
- Air Leaks: Check all connections and apply more epoxy or tighten hose clamps as needed. Ensure the O-rings on the piston are creating a tight seal.
- Low Pressure: Make sure the one-way valve is installed correctly and functioning properly. The piston may need additional O-rings for a tighter seal.
- Handle Slipping: Ensure the handle is securely attached to the piston rod. Use a stronger adhesive if necessary.
Enhancements and Modifications
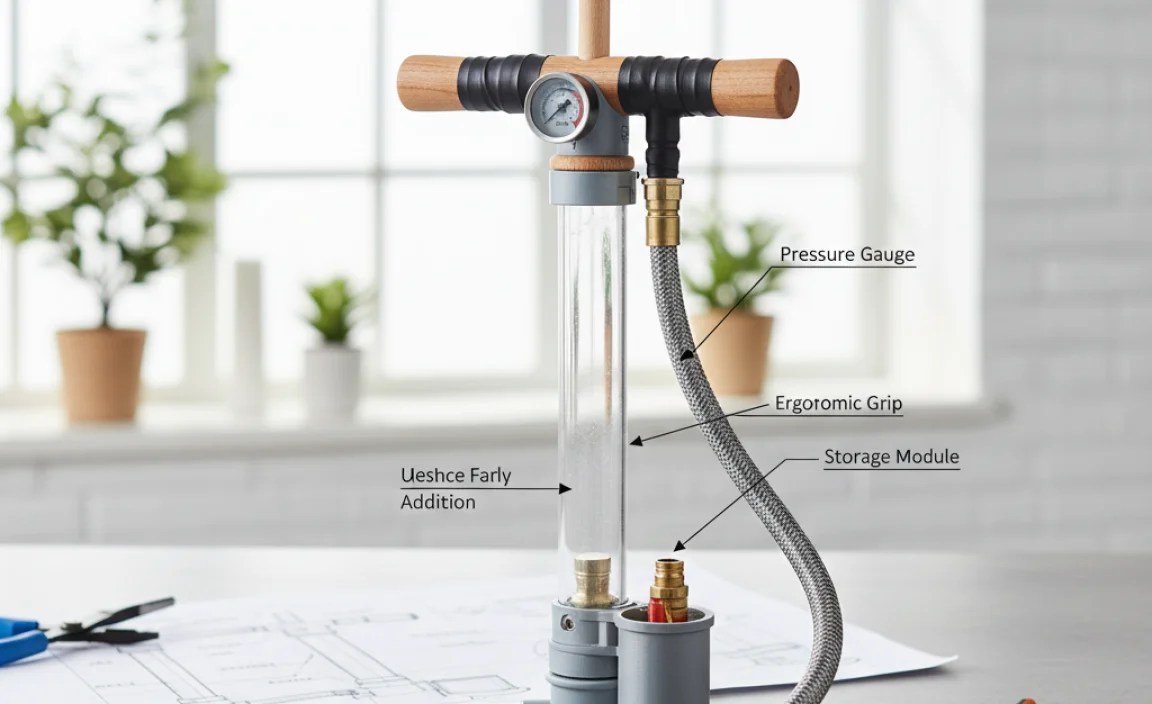
Want to take your homemade pump to the next level? Consider these modifications.
- Pressure Gauge: Add a small pressure gauge to monitor the tire pressure while pumping.
- Foot Rest: Attach a foot rest to the base of the pump for stability.
- Two-Stage Pumping: Design a two-stage piston for both high volume and high pressure.
- Storage Compartment: Integrate a small compartment to store tire levers or other small tools.
Cost Comparison: DIY vs. Store-Bought Cycle Pump
Let’s break down the costs to see how much you can save by building your own pump.
| Item | DIY Pump (Estimated Cost) | Store-Bought Pump (Estimated Cost) |
|---|---|---|
| PVC Pipe | $5 | N/A |
| PVC Fittings | $3 | N/A |
| One-Way Valve | $4 | N/A |
| Hose and Connectors | $8 | N/A |
| Piston Materials | $5 | N/A |
| Basic Hand Pump | N/A | $15 – $30 |
| Floor Pump | N/A | $30 – $100+ |
| Total | $25 | $15 – $100+ |
As you can see, building your own cycle pump can save you a significant amount of money compared to buying a store-bought pump. Plus, you get the satisfaction of creating something yourself!
Performance Comparison: DIY vs. Store-Bought Cycle Pump
Here’s a comparison of the performance characteristics of DIY and store-bought cycle pumps.
| Feature | DIY Pump | Store-Bought Pump |
|---|---|---|
| Cost | Lower | Higher |
| Customization | High | Low |
| Portability | Variable (can be tailored) | Variable (depends on model) |
| Durability | Moderate (depends on materials) | Variable (depends on brand and model) |
| Efficiency | Moderate (can be optimized) | High (usually more efficient) |
| Maintenance | Easy to repair | May require specialized parts |
While store-bought pumps often offer higher efficiency and refined features, a DIY pump provides cost savings, customization, and a fun project.
Safety Tips
Safety should always be a priority when building and using your homemade pump. Here are some essential tips:
- Wear Safety Glasses: Protect your eyes from debris when cutting and drilling.
- Use Gloves: Protect your hands from epoxy and sharp edges.
- Work in a Well-Ventilated Area: When using epoxy or PVC cement, ensure good ventilation to avoid inhaling harmful fumes.
- Properly Secure Connections: Ensure all connections are tight and secure to prevent leaks and potential injuries.
- Test Before Use: Always test the pump before relying on it on a ride to ensure it functions correctly.
FAQ: Your Questions Answered
Here are some common questions about building a homemade cycle pump.
1. Can I use any type of PVC pipe?
It’s best to use schedule 40 PVC pipe, as it’s durable and readily available. Ensure the diameter is appropriate for creating a good seal with your piston.
2. What type of one-way valve should I use?
A small, inline check valve works well. Make sure it’s compatible with the pressure you expect to generate in your pump.
3. How do I ensure an airtight seal for the piston?
Use O-rings that fit snugly around the piston. Experiment with different sizes and add grease to improve the seal.
4. Can I use this pump for high-pressure tires?
Yes, but you may need to reinforce the connections and use higher-quality materials to withstand the pressure. A smaller diameter pipe can also help generate higher pressure.
5. What if the pump is too hard to push?
Ensure the piston fits smoothly inside the pipe. Lubricate the piston with grease or adjust the O-rings for a better fit. Also, check that the one-way valve is functioning correctly.
6. How do I attach the hose securely?
Use hose clamps to secure the hose to the PVC reducer and tire valve connector. Make sure the clamps are tightened properly to prevent leaks.
7. Is it safe to use epoxy?
Yes, but work in a well-ventilated area and wear gloves to protect your skin. Allow the epoxy to dry completely before using the pump.
External Resources
For more detailed information and advanced techniques, check out these resources:
- Engineering ToolBox – PVC Pipes Dimensions: Detailed specifications on PVC pipe sizes and pressure ratings.
- United States Environmental Protection Agency (EPA): Information on safe handling and disposal of materials like PVC and epoxy.
Conclusion
Building your own cycle pump is a rewarding project that saves money and enhances your DIY skills. By following these simple steps, you can create a reliable tool for maintaining your bike tires. From selecting the right materials to fine-tuning the piston seal, each step contributes to a functional and personalized pump. So, gather your supplies, unleash your creativity, and get ready to enjoy the satisfaction of pumping up your tires with a tool you built yourself. Happy cycling!
“`


