
How to Make a Cycle Pump: A DIY Guide
Quick Summary: Building a simple cycle pump involves assembling a cylinder, piston, one-way valves, and an air hose. You’ll need basic tools like a drill, saw, and some plumbing supplies. This DIY project allows you to customize your pump and save money. Follow our step-by-step guide to create a functional bike pump from readily available materials.
Ever been stuck on the road with a flat tire and a useless pump? It’s a cyclist’s worst nightmare! Store-bought pumps can be unreliable or expensive. But what if you could make your own? Building a cycle pump is easier than you think. This guide will walk you through each step, from gathering materials to testing your finished pump. Get ready to create a custom pump that’s perfect for your needs and save some money along the way!
Materials and Tools You’ll Need

Before you start, gather all the necessary materials and tools. This will make the process smoother and more efficient.
Materials List:
- PVC pipe (1-inch diameter, about 12 inches long)
- PVC end cap (1-inch, one)
- PVC adapter (1-inch to ½-inch, one)
- ½-inch PVC pipe (about 6 inches long for the piston rod)
- Rubber or leather washer (slightly larger diameter than the 1-inch PVC pipe’s inner diameter)
- Two check valves (one-way valves, suitable for air)
- Bicycle tire valve (Presta or Schrader, depending on your needs)
- Air hose (flexible, about 2-3 feet long)
- Epoxy or PVC cement
- Handle material (wood, plastic, or metal)
- Screws or bolts for securing the handle
Tools List:
- Saw (for cutting PVC pipe)
- Drill with various drill bits
- Sandpaper
- Measuring tape or ruler
- Pencil or marker
- Wrench or pliers
- Safety glasses
- Work gloves
Step-by-Step Guide to Building Your Cycle Pump

Follow these steps carefully to construct your DIY cycle pump. Each step includes detailed instructions to ensure success.
Step 1: Prepare the Cylinder
The cylinder is the main body of your pump. It needs to be smooth and airtight for efficient pumping.
- Cut the PVC pipe: Use the saw to cut the 1-inch PVC pipe to your desired length (around 12 inches is a good starting point).
- Smooth the edges: Use sandpaper to smooth the cut edges of the PVC pipe. This will ensure a better seal with the end cap and adapter.
- Attach the end cap: Apply PVC cement to the inside of the end cap and the outside of one end of the PVC pipe. Slide the end cap onto the pipe and hold it firmly until the cement sets (follow the cement manufacturer’s instructions for drying time).
Step 2: Assemble the Piston
The piston creates the pressure needed to pump air. A good seal is crucial for this part.
- Prepare the piston rod: Cut the ½-inch PVC pipe to about 6 inches long. This will be your piston rod.
- Attach the washer: The rubber or leather washer acts as the piston head. Drill a hole in the center of the washer that is slightly smaller than the diameter of the ½-inch PVC pipe.
- Secure the washer: Force the ½-inch PVC pipe through the hole in the washer. You may need to use a bit of force. The washer should fit snugly on the pipe. Use epoxy to secure the washer to the pipe if needed.
Step 3: Install the Check Valves
Check valves ensure air flows in the correct direction.
- Prepare the adapter: Drill a hole in the side of the 1-inch to ½-inch PVC adapter. The hole should be large enough to accommodate one of the check valves.
- Insert the check valve: Insert the check valve into the hole, ensuring it is oriented to allow air to flow out of the cylinder. Use epoxy to secure it in place.
- Attach the adapter: Apply PVC cement to the inside of the adapter and the outside of the open end of the 1-inch PVC pipe. Slide the adapter onto the pipe and hold it firmly until the cement sets.
Step 4: Connect the Air Hose and Valve
This step connects your pump to the tire valve.
- Attach the tire valve: Connect the other check valve to the bicycle tire valve (Presta or Schrader). Ensure the valve is oriented to allow air to flow into the tire.
- Connect the air hose: Attach the air hose to both check valves. Use hose clamps or zip ties to ensure a secure connection.
Step 5: Create the Handle
The handle makes the pump easier to use.
- Prepare the handle material: Choose your handle material (wood, plastic, or metal). Cut it to a comfortable size and shape.
- Attach the handle: Drill holes in the handle material and the end of the ½-inch PVC piston rod. Use screws or bolts to secure the handle to the piston rod.
Step 6: Test Your Pump
Before you rely on your DIY pump, test it thoroughly.
- Insert the piston: Insert the piston into the cylinder.
- Test the pump: Place the tire valve on a bicycle tire and start pumping. Check for air leaks and ensure the tire inflates properly.
- Troubleshoot: If the pump isn’t working correctly, check all connections for leaks and ensure the check valves are oriented correctly.
Tips for Improving Your DIY Cycle Pump

Here are some tips to enhance the performance and durability of your homemade cycle pump.
- Use high-quality materials: Investing in better materials, such as high-grade PVC and durable check valves, will improve the pump’s lifespan and performance.
- Ensure airtight seals: Carefully apply PVC cement and epoxy to all connections to prevent air leaks.
- Consider ergonomics: Design the handle to be comfortable and easy to grip for efficient pumping.
- Add a pressure gauge: Incorporating a pressure gauge will allow you to monitor the tire pressure accurately. You can find small, inexpensive pressure gauges online or at hardware stores.
Advantages and Disadvantages of a DIY Cycle Pump

Building your own cycle pump has its pros and cons. Here’s a balanced look:
| Advantages | Disadvantages |
|---|---|
| Cost-effective: Cheaper than buying a high-end pump. | Time-consuming: Requires time and effort to build. |
| Customizable: Tailor the design to your specific needs. | Potentially less efficient: May not be as powerful as commercial pumps. |
| Educational: Learn about pump mechanics. | Durability concerns: May not last as long as professionally manufactured pumps. |
| Repairable: Easy to fix with readily available parts. | Requires tools: Needs tools like a saw and drill. |
Alternative DIY Cycle Pump Designs
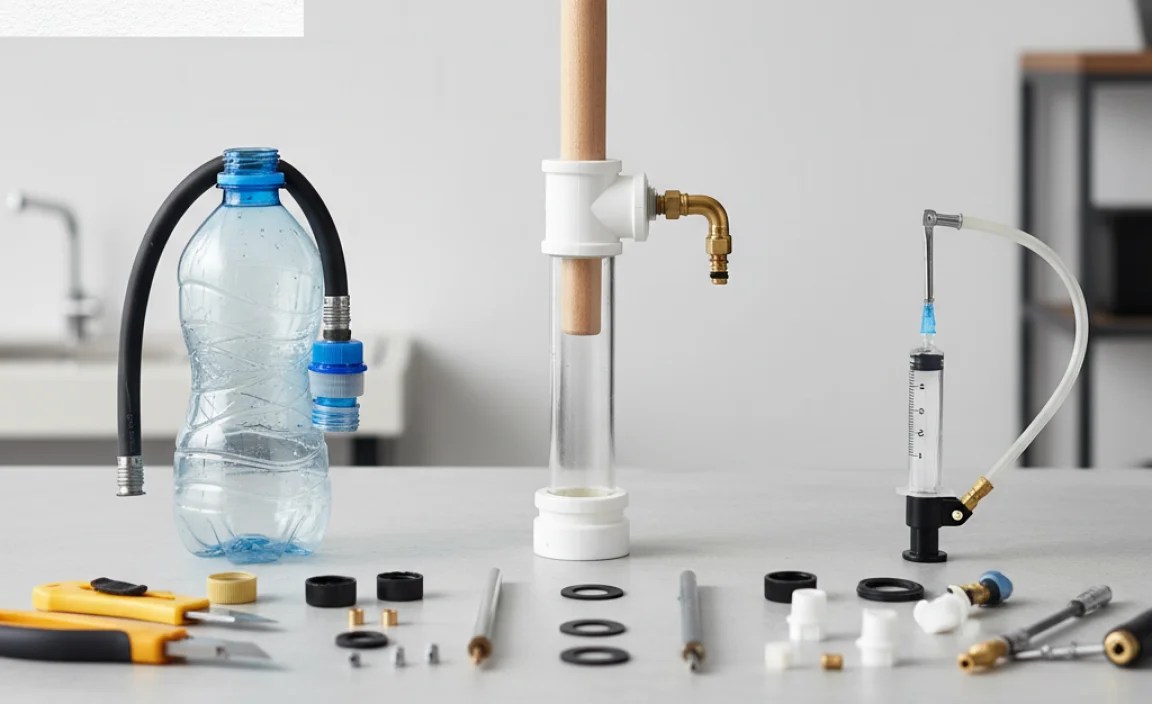
While the PVC pipe design is common, there are other ways to build a cycle pump. Here are a couple of alternative ideas:
Syringe Pump
A simple pump can be made using a large syringe. Attach an air hose to the nozzle and use a bicycle tire valve adapter. This is a lightweight and compact option, but it may require more effort to inflate tires.
Foot Pump
You can adapt a foot-operated air pump (like those used for inflatable mattresses) for bicycle tires. Replace the existing nozzle with a bicycle tire valve adapter. This type of pump offers hands-free operation and can be more efficient than a hand pump.
Maintaining Your DIY Cycle Pump
Proper maintenance will keep your DIY pump working efficiently for longer.
- Check for leaks: Regularly inspect all connections for air leaks. Tighten hose clamps and reapply epoxy if necessary.
- Lubricate the piston: Apply a small amount of silicone grease to the piston to keep it moving smoothly.
- Store properly: Store the pump in a dry place to prevent rust and corrosion.
Understanding Check Valves
Check valves are a critical component of any pump. They ensure that air flows in only one direction, preventing backflow and maintaining pressure.
Types of Check Valves
- Swing Check Valves: These have a hinged disc that swings open to allow flow and closes to prevent backflow.
- Ball Check Valves: These use a ball that seats against an opening to prevent backflow.
- Spring Check Valves: These use a spring to keep the valve closed until sufficient pressure opens it.
Choosing the Right Check Valve
For a DIY cycle pump, spring check valves are often the easiest to use and install. Ensure the check valves you choose are rated for air and can handle the pressure you’ll be generating.
Troubleshooting Common Issues
Even with careful construction, issues can arise. Here’s how to troubleshoot common problems:
| Problem | Possible Cause | Solution |
|---|---|---|
| Pump doesn’t inflate tire | Air leaks, check valve orientation | Check all connections, ensure check valves are correctly oriented |
| Piston is hard to move | Lack of lubrication, tight fit | Lubricate the piston, sand down the cylinder if needed |
| Air hose detaches | Loose connection | Tighten hose clamps or replace the hose |
| Valve doesn’t seal | Damaged valve, incorrect valve type | Replace the valve, ensure it’s compatible with your tire |
Safety Precautions
Safety should always be a priority when working with tools and building projects.
- Wear safety glasses: Protect your eyes from flying debris when cutting and drilling.
- Use work gloves: Protect your hands from cuts and abrasions.
- Work in a well-ventilated area: When using PVC cement or epoxy, work in a well-ventilated area to avoid inhaling harmful fumes.
- Follow tool instructions: Always follow the manufacturer’s instructions when using power tools.
Why This Project Matters
Building your own cycle pump isn’t just about saving money. It’s about understanding how things work and gaining a sense of self-reliance. Knowing you can fix your bike on the road gives you confidence. Plus, it’s a fun and educational project!
External Resources for Further Learning
Explore these resources for more information on bicycle maintenance and DIY projects:
- Park Tool Repair Help: Comprehensive guides on bike repair and maintenance.
- REI Expert Advice on Bicycle Maintenance: Tips and tutorials for keeping your bike in top condition.
- Sheldon Brown’s Bicycle Technical Info: A wealth of technical information on bicycles and their components.
FAQ: DIY Cycle Pump
Q: Is it really cheaper to build a cycle pump than to buy one?
A: Yes, typically. The cost of PVC pipe, check valves, and other materials is usually less than buying a decent quality pump from a store.
Q: How long will a DIY cycle pump last?
A: With proper construction and maintenance, a DIY pump can last for several years. The lifespan depends on the quality of materials and how frequently it’s used.
Q: Can I use this pump for car tires?
A: While possible, it’s not recommended. Car tires require much higher pressure than bicycle tires. This DIY pump is designed for lower pressure applications.
Q: What type of valve should I use, Presta or Schrader?
A: Choose the valve type that matches your bicycle tires. Presta valves are common on road bikes, while Schrader valves are often found on mountain bikes and hybrid bikes.
Q: How do I know if my check valves are installed correctly?
A: Check valves have an arrow indicating the direction of airflow. Make sure the arrow points away from the cylinder and towards the tire.
Q: What if my pump isn’t generating enough pressure?
A: Check for air leaks and ensure the piston is sealing properly. You may need to add more lubrication or replace the washer on the piston.
Q: Where can I find the materials for this project?
A: Most of the materials can be found at your local hardware store. You can also purchase check valves and bicycle tire valves online.
Conclusion
Building your own cycle pump is a rewarding project that combines practicality with a bit of DIY ingenuity. By following these steps, you can create a custom pump that meets your specific needs and saves you money. Not only will you have a functional tool, but you’ll also gain a deeper understanding of how pumps work and the satisfaction of building something yourself. So, gather your materials, roll up your sleeves, and get pumping!
“`


