
How to Shorten the Priming Cycle on Your Pentair SuperFlo VS Pump
Quick Summary: To shorten the priming cycle on your Pentair SuperFlo VS pump, start by ensuring the skimmer and pump baskets are clean and clear of debris. Check for any leaks in the plumbing connections and ensure all valves are properly positioned. Adjust the pump’s speed settings to a higher RPM during priming. If issues persist, inspect the impeller for obstructions and consider lubricating the O-rings. Proper maintenance and a few adjustments can significantly reduce priming time.
Is your Pentair SuperFlo VS pump taking too long to prime? It’s a common frustration for pool owners. A lengthy priming cycle means wasted energy and delays in getting your pool ready to enjoy. Don’t worry; with a few simple checks and adjustments, you can significantly reduce the priming time and get your pump working efficiently. This guide will walk you through each step, making the process straightforward and stress-free. We’ll cover everything from cleaning the baskets to inspecting for leaks, ensuring you have all the information you need. Let’s dive in and get your pump primed faster!
Understanding Priming and Why It Matters

Before we jump into solutions, let’s understand what priming means for your Pentair SuperFlo VS pump. Priming is the process of removing air from the pump and suction lines, allowing the pump to draw water efficiently. When air is present, the pump struggles to create the necessary suction, leading to a prolonged priming cycle or even a complete failure to prime.
A properly primed pump ensures:
- Efficient water circulation
- Optimal filtration
- Reduced energy consumption
- Prolonged pump life
Ignoring a slow priming cycle can lead to:
- Overheating of the pump motor
- Damage to the impeller
- Increased wear and tear on the pump components
Step-by-Step Guide to Shortening the Priming Cycle

Step 1: Clean the Skimmer and Pump Baskets
The first and easiest step is to check and clean both the skimmer and pump baskets. Debris accumulation in these baskets can severely restrict water flow, making it harder for the pump to prime.
- Turn off the pump: Always turn off the pump before performing any maintenance.
- Clean the skimmer basket: Remove the skimmer basket from the skimmer housing. Discard any leaves, twigs, and other debris. Rinse the basket thoroughly with a garden hose.
- Clean the pump basket: Open the pump lid (usually a clear, screw-on cover). Remove the pump basket and clean it as you did with the skimmer basket. Make sure no debris is stuck in the basket or the housing.
- Reinstall the baskets: Place the cleaned baskets back into their respective housings. Ensure they are seated correctly.
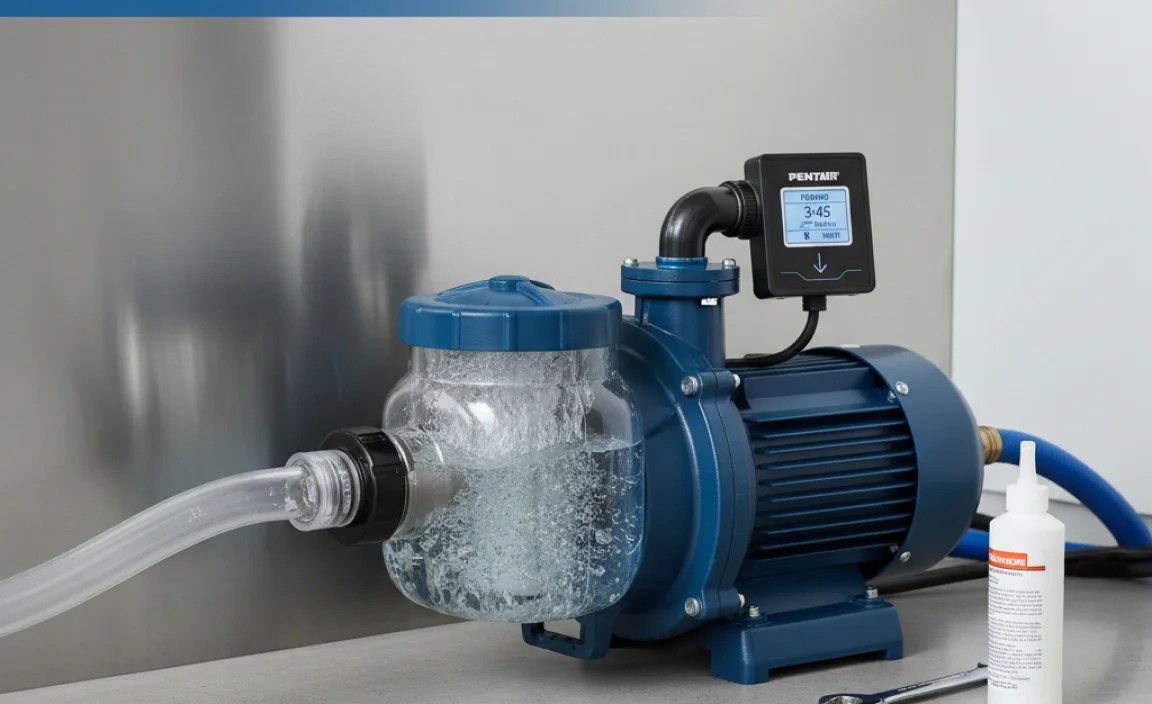
- Fill the pump basket housing with water: Before replacing the pump lid, fill the pump basket housing with water. This helps to initiate the priming process.
- Secure the pump lid: Replace the pump lid and ensure it is tightly sealed. The O-ring should be clean and properly seated to prevent air leaks.
Step 2: Inspect for Leaks in Plumbing Connections
Air leaks in the suction-side plumbing are a common cause of priming issues. Even small leaks can allow air to enter the system, making it difficult for the pump to establish suction.
- Visually inspect all connections: Check all pipe connections, valves, and fittings on the suction side of the pump (the pipes leading into the pump). Look for any signs of cracks, loose fittings, or damaged seals.
- Check unions and fittings: Pay close attention to unions (threaded connections that allow you to disconnect pipes) and other fittings. Ensure they are properly tightened.
- Inspect valves: Examine all valves (e.g., gate valves, ball valves) for leaks around the valve stem or body. Make sure they are in good working condition and properly aligned.
- Seal any leaks: If you find any leaks, repair them immediately. You may need to tighten fittings, replace O-rings, or use Teflon tape to seal threaded connections. For more significant leaks, you might need to replace the damaged pipe or fitting.
Step 3: Verify Valve Positions
Incorrect valve positions can restrict water flow to the pump, hindering the priming process. Make sure all valves are properly aligned to allow water to flow freely from the pool to the pump.
- Identify all valves: Locate all valves in your pool’s plumbing system, including skimmer valves, main drain valves, and any other isolation valves.
- Ensure proper alignment: Verify that the valves are positioned to allow water to flow from the skimmer(s) and main drain to the pump. Typically, the valves should be fully open or set to the desired ratio of skimmer to main drain flow.
- Adjust as needed: If you find any valves that are partially or fully closed, adjust them to the correct position.
Step 4: Adjust Pump Speed Settings
The Pentair SuperFlo VS pump has variable speed settings. Increasing the pump speed during the priming cycle can help to establish suction more quickly.
- Access the pump’s control panel: Locate the control panel on your Pentair SuperFlo VS pump.
- Increase the speed setting: Use the control panel to increase the pump’s speed setting. A higher RPM (revolutions per minute) will generate more suction.
- Monitor the priming process: Observe the pump as it attempts to prime. You should see water filling the pump basket housing and air being purged from the system.
- Reduce speed after priming: Once the pump is primed and water is flowing steadily, reduce the speed setting to your normal operating level. This will save energy and reduce wear and tear on the pump.
Note: Consult your Pentair SuperFlo VS pump manual for specific instructions on adjusting the speed settings. The optimal priming speed may vary depending on your pool’s plumbing configuration.
Step 5: Check the Impeller for Obstructions
The impeller is a rotating component inside the pump that creates the suction necessary to draw water. If the impeller is blocked by debris, the pump will struggle to prime.
- Turn off the pump and disconnect power: Always turn off the pump and disconnect the power supply before working on the impeller.
- Access the impeller: You may need to remove the pump lid and basket to access the impeller. Depending on the pump model, you might also need to remove a volute or diffuser.
- Inspect the impeller: Carefully inspect the impeller for any signs of blockage. Look for leaves, twigs, hair, or other debris that may be lodged in the impeller vanes.
- Remove any obstructions: Use a small tool (e.g., a screwdriver or pliers) to carefully remove any debris from the impeller. Be careful not to damage the impeller vanes.
- Reassemble the pump: Once the impeller is clear, reassemble the pump components in the reverse order of disassembly.
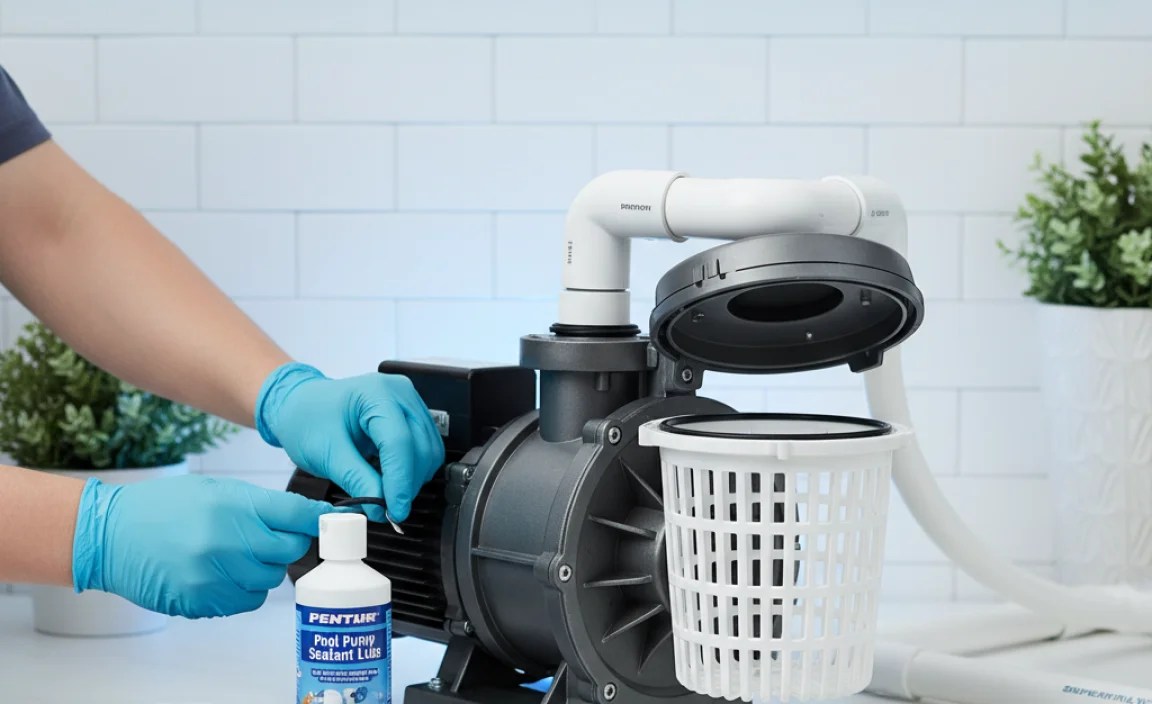
Step 6: Lubricate O-Rings
O-rings are used to create a watertight seal between various pump components, such as the pump lid and the volute. If the O-rings are dry, cracked, or damaged, they can allow air to enter the system, hindering the priming process.
- Locate the O-rings: Identify all O-rings in the pump assembly, including the pump lid O-ring, the volute O-ring, and any other O-rings used in the pump’s plumbing connections.
- Inspect the O-rings: Examine the O-rings for any signs of damage, such as cracks, tears, or flattening.
- Lubricate the O-rings: Apply a small amount of silicone-based lubricant to the O-rings. This will help to create a better seal and prevent air leaks.
- Replace damaged O-rings: If you find any O-rings that are damaged, replace them with new ones. Be sure to use the correct size and type of O-ring for your pump model.
Step 7: Prime the Pump Manually
If the pump still struggles to prime after performing the above steps, you can try priming it manually.
- Turn off the pump: Ensure the pump is turned off.
- Open the pump lid: Carefully open the pump lid.
- Fill the pump basket housing with water: Use a garden hose or bucket to fill the pump basket housing completely with water.
- Close the pump lid: Securely close the pump lid, ensuring the O-ring is properly seated.
- Turn on the pump: Turn on the pump and observe the priming process. The pump should now have a head start in establishing suction.
Troubleshooting Common Priming Problems
Even after following the steps above, you might still encounter priming issues. Here are some common problems and their solutions:
- Problem: Pump primes but loses prime quickly.
- Possible Cause: Air leak in the suction-side plumbing.
- Solution: Inspect all plumbing connections, valves, and fittings for leaks. Tighten or repair any leaks as needed.
- Problem: Pump makes a loud, grinding noise during priming.
- Possible Cause: Impeller blockage or damage.
- Solution: Inspect the impeller for obstructions and remove any debris. If the impeller is damaged, replace it.
- Problem: Pump runs continuously but never primes.
- Possible Cause: Low water level in the pool or spa.
- Solution: Ensure the water level is high enough to cover the skimmer opening. Add water if necessary.
- Problem: New pump not priming.
- Possible Cause: Incorrect installation or plumbing configuration.
- Solution: Double-check the installation instructions and ensure the plumbing is correctly configured. Consult a pool professional if needed.
Preventative Maintenance Tips
To minimize priming issues and keep your Pentair SuperFlo VS pump running smoothly, follow these preventative maintenance tips:
- Regularly clean the skimmer and pump baskets: Remove debris from the baskets at least once a week, or more often if needed.
- Inspect plumbing connections: Periodically check all plumbing connections for leaks or damage.
- Lubricate O-rings: Lubricate the O-rings at least once a year, or more often if they appear dry or cracked.
- Monitor pump performance: Pay attention to the pump’s performance and address any issues promptly.
- Winterize properly: If you live in an area with freezing temperatures, properly winterize your pool equipment to prevent damage.
When to Call a Professional

While many priming issues can be resolved with DIY troubleshooting, there are times when it’s best to call a pool professional. Consider seeking professional help if:
- You are unable to identify the cause of the priming problem.
- You are not comfortable working with electrical or plumbing components.
- The pump requires extensive repairs or component replacements.
- The problem persists despite your best efforts.
Cost Considerations
Addressing priming issues promptly can save you money in the long run. Ignoring these problems can lead to:
- Increased energy consumption: A pump that struggles to prime will run longer and consume more energy.
- Component damage: Overworking the pump can damage the motor, impeller, and other components, leading to costly repairs or replacements.
- Reduced pump lifespan: Neglecting maintenance can shorten the overall lifespan of the pump.
Here’s a breakdown of potential costs associated with priming issues:
| Issue | Potential Cost |
|---|---|
| Increased energy consumption | $50 – $200 per year |
| O-ring replacement | $5 – $20 |
| Impeller replacement | $50 – $150 |
| Pump motor replacement | $200 – $500 |
| Professional service call | $75 – $150 per hour |
Tools You Might Need
Having the right tools on hand can make the process of troubleshooting and repairing priming issues much easier. Here’s a list of tools you might need:
- Screwdrivers (Phillips and flathead)
- Pliers
- Adjustable wrench
- Teflon tape
- Silicone-based lubricant
- O-ring pick or small hook
- Garden hose
- Bucket
- Shop towel or rags
Frequently Asked Questions (FAQ)
Why is my Pentair SuperFlo VS pump not priming?
A Pentair SuperFlo VS pump might not prime due to several reasons, including clogged skimmer or pump baskets, air leaks in the plumbing, incorrect valve positions, a blocked impeller, or faulty O-rings. Each of these issues prevents the pump from creating the necessary suction to draw water.
How often should I clean my pump basket?
Ideally, you should clean your pump basket at least once a week. However, if your pool is surrounded by trees or experiences a lot of debris, you might need to clean it more frequently to ensure optimal water flow and prevent priming issues.
Can a dirty filter cause priming problems?
Yes, a dirty filter can restrict water flow and make it harder for the pump to prime. A clogged filter increases the resistance in the system, reducing the pump’s ability to establish suction. Regularly backwash or clean your filter to maintain proper flow.
What type of lubricant should I use on O-rings?
You should use a silicone-based lubricant specifically designed for pool equipment O-rings. Avoid using petroleum-based lubricants, as they can degrade the rubber and cause the O-rings to fail prematurely. Silicone lubricant helps create a better seal and prolongs the life of the O-rings.
How do I know if my impeller is damaged?
Signs of a damaged impeller include reduced water flow, unusual noises (such as grinding or rattling), and difficulty priming the pump. If you suspect impeller damage, turn off the pump, inspect the impeller for cracks or broken vanes, and replace it if necessary.
Is it normal for a new pump to take a long time to prime?
A new pump should prime relatively quickly. If it takes an excessively long time, double-check the installation to ensure all connections are tight and there are no air leaks. Also, make sure the pump is properly filled with water before starting it for the first time.
Can I use Teflon tape on pool plumbing connections?
Yes, Teflon tape (also known as PTFE tape) is commonly used to seal threaded connections in pool plumbing. Wrap the tape around the threads in the direction of tightening to create a watertight seal and prevent air leaks. Make sure to use Teflon tape specifically designed for plumbing applications.
Conclusion
Shortening the priming cycle on your Pentair SuperFlo VS pump is achievable with a systematic approach. By regularly cleaning the baskets, inspecting for leaks, verifying valve positions, adjusting pump speed, checking the impeller, and lubricating O-rings, you can significantly improve your pump’s efficiency and reduce priming time. Remember, consistent maintenance is key to preventing issues and prolonging the life of your pool equipment. If you encounter persistent problems or are uncomfortable performing these tasks yourself, don’t hesitate to consult a qualified pool professional. With a little effort, you can keep your pool pump running smoothly and enjoy a clear, clean pool all season long.
“`


