
How to Adjust Defrost Cycle on Heat Pump: A Simple Guide
Quick Summary: Adjusting the defrost cycle on your heat pump involves understanding your system’s controls. Typically, you’ll access the control board, often located within the outdoor unit, and adjust dip switches or potentiometer settings. Refer to your heat pump’s manual for specific instructions, as settings vary by model. If you’re uncomfortable working with electrical components, it’s best to consult a qualified HVAC technician.
Is your heat pump icing up too often, or not often enough? This is a common problem that many homeowners face, especially during the colder months. An improperly set defrost cycle can lead to wasted energy, inefficient heating, and even damage to your system. But don’t worry! Adjusting the defrost cycle is often a straightforward process. In this guide, we’ll walk you through the steps to understand and adjust your heat pump’s defrost cycle, so you can keep your home comfortable and your energy bills low. We’ll cover everything from identifying the controls to understanding the different settings. Let’s get started!
Understanding the Defrost Cycle

Before diving into adjustments, it’s important to understand what the defrost cycle is and why it’s necessary. A heat pump works by transferring heat from the outside air into your home. In cold weather, moisture in the air can freeze on the outdoor coil, reducing its ability to absorb heat. The defrost cycle melts this ice, allowing the heat pump to function efficiently.
Why is the Defrost Cycle Important?
The defrost cycle is crucial for maintaining the efficiency and lifespan of your heat pump. Here’s why:
- Efficiency: Ice buildup reduces the heat pump’s ability to transfer heat, making it work harder and consume more energy.
- Prevention of Damage: Excessive ice can damage the coil and other components.
- Comfort: A properly functioning defrost cycle ensures consistent heating performance.
How Does the Defrost Cycle Work?
During the defrost cycle, the heat pump temporarily switches to cooling mode, reversing the flow of refrigerant to heat the outdoor coil and melt the ice. To compensate for the temporary cooling, auxiliary heat (usually electric resistance heat) is activated to keep your home warm.
The defrost cycle is typically triggered in one of two ways:
- Time-Based: The defrost cycle activates at preset intervals (e.g., every 30, 60, or 90 minutes), regardless of whether ice is present.
- Demand-Based: The defrost cycle activates only when sensors detect ice buildup on the coil.
Identifying Your Heat Pump’s Defrost Controls

The first step in adjusting the defrost cycle is locating the controls. These are typically found on the control board inside the outdoor unit. However, the exact location and type of controls can vary depending on the make and model of your heat pump.
Where to Find the Control Board
- Turn Off the Power: Before you do anything, switch off the power to the heat pump at the breaker to avoid electrical shock.
- Locate the Outdoor Unit: Go to the outdoor unit of your heat pump system.
- Remove the Access Panel: Use a screwdriver to remove the access panel. This panel is usually on the side or front of the unit.
- Identify the Control Board: Look for a circuit board inside the unit. It’s usually enclosed in a plastic or metal housing.
Types of Defrost Controls
Once you’ve located the control board, you’ll need to identify the type of controls your heat pump uses. Common types include:
- Dip Switches: Small switches that can be toggled on or off to change settings.
- Potentiometers: Adjustable knobs or dials that allow you to fine-tune settings.
- Digital Displays: Some newer models have digital displays with menu options for adjusting the defrost cycle.
Refer to your heat pump’s manual to identify the specific controls for your model. If you don’t have the manual, you can usually find it online by searching for the model number of your heat pump.
Step-by-Step Guide to Adjusting the Defrost Cycle

Now that you understand the defrost cycle and have located the controls, let’s go through the steps to adjust it.
Step 1: Consult the Manual
The most important step is to consult your heat pump’s manual. The manual will provide specific instructions for adjusting the defrost cycle on your model. It will also tell you what each dip switch or potentiometer setting does.
Why is this important? Heat pumps vary significantly, and adjusting settings without understanding their function can lead to inefficient operation or even damage to the system.
Step 2: Understanding Dip Switch Settings
If your heat pump uses dip switches, the manual will provide a table or diagram showing the function of each switch. Common settings include:
- Defrost Interval: Sets the frequency of the defrost cycle (e.g., 30, 60, or 90 minutes).
- Defrost Termination Temperature: Sets the temperature at which the defrost cycle ends.
- Demand Defrost Enable/Disable: Enables or disables demand-based defrost.
Here’s an example of a typical dip switch configuration:
| Dip Switch | Function | On | Off |
|---|---|---|---|
| 1 | Defrost Interval | 60 minutes | 90 minutes |
| 2 | Defrost Termination Temperature | 50°F | 60°F |
| 3 | Demand Defrost | Enabled | Disabled |
To adjust the settings, use a small screwdriver or pen to toggle the switches to the desired position.
Step 3: Adjusting Potentiometer Settings
If your heat pump uses potentiometers, the manual will explain the function of each knob or dial. Common settings include:
- Defrost Time: Sets the duration of the defrost cycle.
- Defrost Sensitivity: Adjusts the sensitivity of the demand defrost sensor.
To adjust the settings, use a screwdriver to turn the potentiometer to the desired position. Be sure to make small adjustments and monitor the performance of the heat pump.
Step 4: Making Adjustments Based on Your Climate
The ideal defrost cycle settings depend on your climate. Here are some general guidelines:
- Cold, Humid Climates: In areas with frequent freezing temperatures and high humidity, a shorter defrost interval (e.g., 30 or 60 minutes) and a lower defrost termination temperature (e.g., 40°F or 50°F) may be necessary to prevent ice buildup.
- Dry, Cold Climates: In areas with dry, cold conditions, a longer defrost interval (e.g., 90 minutes) and a higher defrost termination temperature (e.g., 60°F) may be sufficient.
- Mild Climates: In milder climates where freezing temperatures are infrequent, demand-based defrost is usually the most efficient option.
Step 5: Testing and Monitoring
After making adjustments, it’s important to test and monitor the performance of your heat pump. Here’s what to look for:
- Ice Buildup: Check the outdoor coil regularly for ice buildup. If ice is forming, you may need to shorten the defrost interval or lower the defrost termination temperature.
- Defrost Frequency: Observe how often the defrost cycle activates. If it’s running too frequently, you may need to lengthen the defrost interval or raise the defrost termination temperature.
- Indoor Temperature: Monitor the temperature inside your home to ensure it remains comfortable during the defrost cycle. If the temperature drops significantly, you may need to adjust the auxiliary heat settings.
- Energy Consumption: Keep an eye on your energy bills to see if the adjustments have improved the efficiency of your heat pump.
Step 6: Fine-Tuning
Adjusting the defrost cycle is often a process of trial and error. It may take several adjustments to find the optimal settings for your climate and heat pump. Be patient and keep monitoring the performance of your system.
Advanced Defrost Cycle Settings
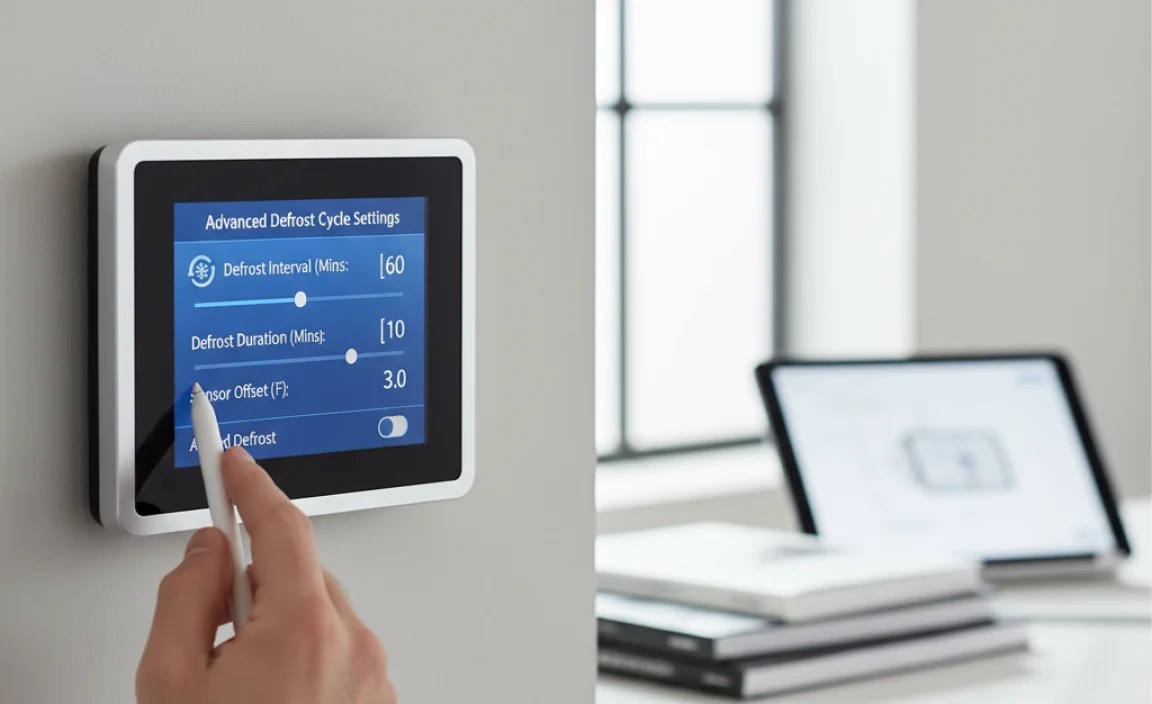
Some heat pumps have more advanced defrost settings that allow for even finer control. These settings may include:
- Adaptive Defrost: This feature automatically adjusts the defrost cycle based on weather conditions and usage patterns.
- Smart Defrost: This feature uses sensors to detect ice buildup and activates the defrost cycle only when necessary.
- Variable Speed Defrost: This feature adjusts the speed of the fan during the defrost cycle to optimize performance.
If your heat pump has these features, consult the manual for instructions on how to use them.
Troubleshooting Common Defrost Cycle Problems
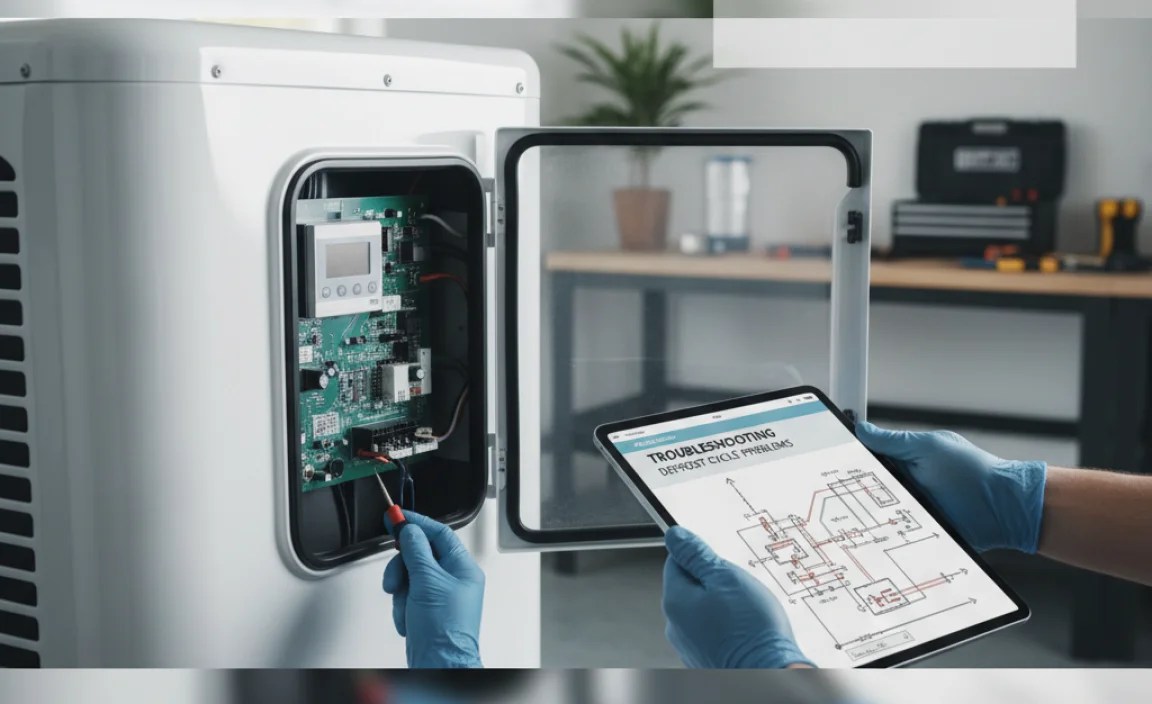
Even with proper adjustments, you may still encounter problems with the defrost cycle. Here are some common issues and how to troubleshoot them:
Problem: Heat Pump Icing Up
Possible Causes:
- Defrost cycle not activating frequently enough.
- Defrost termination temperature set too high.
- Demand defrost sensor malfunctioning.
- Refrigerant leak.
Solutions:
- Shorten the defrost interval.
- Lower the defrost termination temperature.
- Check the demand defrost sensor.
- Consult an HVAC technician to check for refrigerant leaks.
Problem: Defrost Cycle Running Too Frequently
Possible Causes:
- Defrost cycle activating too frequently.
- Defrost termination temperature set too low.
- Faulty defrost timer or control board.
Solutions:
- Lengthen the defrost interval.
- Raise the defrost termination temperature.
- Consult an HVAC technician to check the defrost timer or control board.
Problem: Indoor Temperature Dropping During Defrost
Possible Causes:
- Auxiliary heat not activating during defrost.
- Insufficient auxiliary heat capacity.
- Airflow problems.
Solutions:
- Check the auxiliary heat settings.
- Increase the auxiliary heat capacity.
- Check for airflow obstructions.
When to Call a Professional
While many defrost cycle adjustments can be made by homeowners, there are situations where it’s best to call a qualified HVAC technician. These include:
- If you’re uncomfortable working with electrical components.
- If you suspect a refrigerant leak.
- If you’ve made adjustments and the heat pump is still not functioning properly.
- If you’re not sure what settings to use for your climate.
A professional can diagnose the problem and make the necessary repairs or adjustments to ensure your heat pump is running efficiently and safely.
Tools You Might Need
Before you start adjusting the defrost cycle, gather these tools:
- Screwdriver Set: You’ll need a variety of screwdrivers to remove the access panel and adjust the controls.
- Multimeter: Useful for testing electrical components.
- Flashlight: Helps you see inside the unit.
- Heat Pump Manual: Essential for understanding the specific settings for your model.
Safety Precautions
Safety is paramount when working with electrical appliances. Always follow these precautions:
- Turn off the power: Before removing the access panel, turn off the power to the heat pump at the breaker.
- Wear safety glasses: Protect your eyes from debris.
- Avoid touching electrical components: If you’re not comfortable working with electricity, call a professional.
Cost Considerations
Adjusting the defrost cycle yourself is generally free, assuming you have the necessary tools. However, if you need to call a professional, the cost will vary depending on the complexity of the problem and the technician’s rates. Here’s a general idea:
| Service | Estimated Cost |
|---|---|
| Basic Defrost Cycle Adjustment | $75 – $150 |
| Defrost Sensor Replacement | $150 – $300 |
| Control Board Replacement | $300 – $600 |
The Benefits of a Properly Adjusted Defrost Cycle
Taking the time to adjust your heat pump’s defrost cycle can yield significant benefits:
- Energy Savings: An efficiently operating heat pump consumes less energy, lowering your utility bills.
- Improved Comfort: Consistent heating performance keeps your home comfortable.
- Extended Lifespan: Proper maintenance prevents damage and extends the lifespan of your heat pump.
FAQ: Adjusting Defrost Cycle on Heat Pump
Here are some frequently asked questions about adjusting the defrost cycle on a heat pump:
Q1: How often should my heat pump go into defrost?
A: The frequency depends on the weather. In cold, humid conditions, it might defrost every 30-60 minutes. In drier or milder conditions, it could be much less frequent, or only when needed with a demand defrost system.
Q2: What happens if the defrost cycle is not working correctly?
A: If the defrost cycle isn’t working, ice can build up on the outdoor coil, reducing efficiency and potentially damaging the heat pump. Your home might not heat effectively.
Q3: Can I manually force my heat pump into defrost mode?
A: Some heat pumps have a test mode that forces a defrost cycle. Consult your owner’s manual. However, don’t do this excessively, as it’s only for testing purposes.
Q4: Is it normal for my heat pump to make noise during the defrost cycle?
A: Yes, it’s normal for the heat pump to make hissing or gurgling noises as the refrigerant reverses and melts the ice. The fan may also stop during defrost.
Q5: What is a defrost termination temperature?
A: The defrost termination temperature is the temperature at which the defrost cycle ends. Once the coil reaches this temperature, the heat pump switches back to normal heating mode.
Q6: What does “demand defrost” mean?
A: Demand defrost means the heat pump only defrosts when it detects ice buildup on the coil, rather than on a timed interval. This is more efficient.
Q7: Should I cover my heat pump in the winter?
A: No, you should not cover your heat pump. Covering it can restrict airflow and prevent it from working properly. Keep the area around the unit clear of snow and debris.
Conclusion
Adjusting the defrost cycle on your heat pump can seem daunting, but with a little knowledge and patience, it’s a task many homeowners can tackle. By understanding the defrost cycle, identifying your heat pump’s controls, and following the steps outlined in this guide, you can optimize your system for efficiency and comfort. Remember to always consult your heat pump’s manual and prioritize safety. And if you’re ever unsure, don’t hesitate to call a qualified HVAC technician. With a properly adjusted defrost cycle, you can keep your home warm and your energy bills low all winter long. Happy heating!
“`


