
Specialized Shock Pump: Ultimate Guide!
Quick Summary:
A specialized shock pump lets you fine-tune the air pressure in your bike’s suspension. To use it, attach the pump head to the Schrader valve on your fork or shock, tighten the connection, and gently pump to reach your desired pressure. Always consult your bike’s manual for recommended settings, and bleed air slowly using the release valve to make precise adjustments.
Ever bounced along a trail feeling like your mountain bike’s suspension was fighting you, not helping? Or maybe you’ve noticed your front fork diving too much when you brake hard? The secret to a smooth, controlled ride often lies in properly setting your air suspension. But using a regular tire pump just won’t cut it. That’s where a specialized shock pump comes in.
These nifty tools let you precisely adjust the air pressure in your forks and shocks, making a world of difference in how your bike handles. It might seem intimidating at first, but don’t worry! This guide will walk you through everything you need to know, step by step. We’ll cover what a shock pump is, how to use it, and even some tips for getting the perfect suspension setup. Let’s get started!
What is a Specialized Shock Pump?

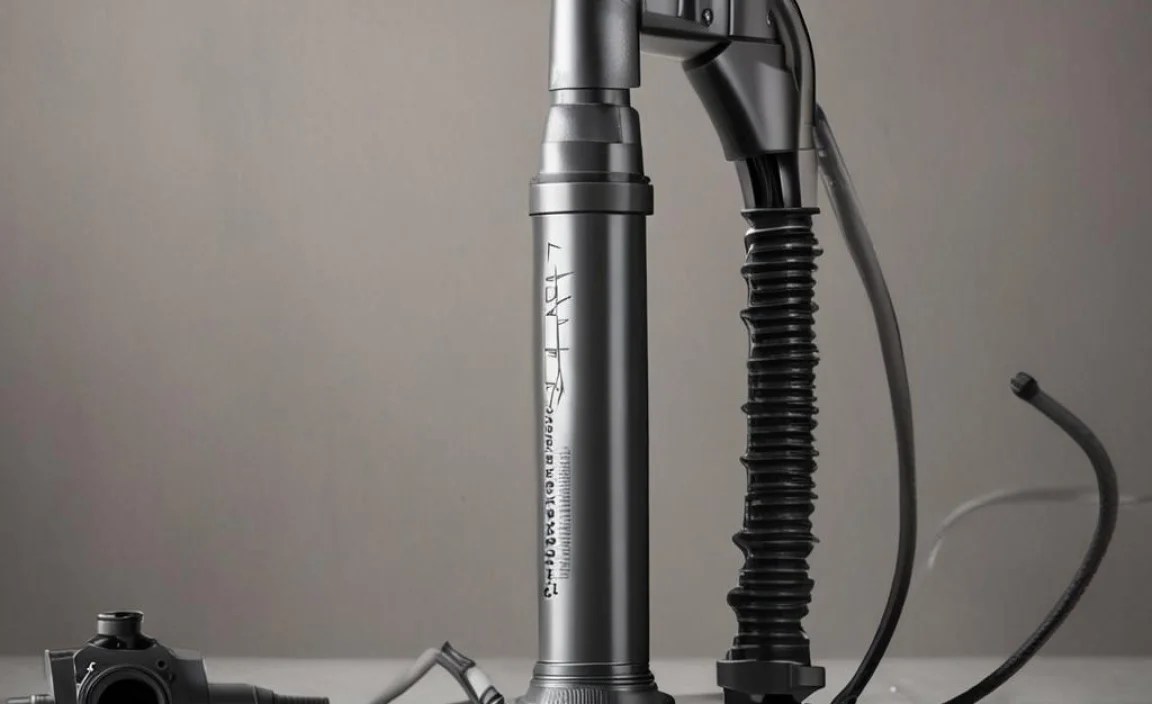
A specialized shock pump is a high-pressure, low-volume hand pump designed specifically for adjusting the air pressure in suspension forks and rear shocks on bicycles. Unlike a standard tire pump, which moves a lot of air at low pressure, a shock pump delivers small amounts of air at very high pressures, often up to 300 psi (pounds per square inch) or more. This precision is crucial for fine-tuning your suspension to match your weight, riding style, and the terrain you’re tackling.
Key Features of a Shock Pump:
- High-Pressure Gauge: Provides accurate pressure readings, usually in psi and bar.
- Low-Volume Delivery: Prevents over-inflation and allows for precise adjustments.
- Schrader Valve Compatibility: Designed to connect to the Schrader valves found on most air suspension systems.
- Bleed Valve: A small button or screw that allows you to release small amounts of air for fine-tuning.
- No-Loss Connector: Minimizes air loss when attaching or detaching the pump.
Why Use a Specialized Shock Pump?

Using a specialized shock pump is essential for several reasons:
- Precise Adjustments: Allows you to dial in your suspension for optimal performance and comfort.
- Prevents Damage: Using a regular tire pump can damage your suspension components due to the high pressure involved.
- Improved Handling: Properly inflated suspension improves control, traction, and overall riding experience.
- Enhanced Comfort: Fine-tuning your suspension reduces harshness and fatigue on long rides.
Tools You’ll Need
Before you start, gather these essential tools:
- Specialized Shock Pump: A reliable pump with an accurate gauge and bleed valve.
- Rag or Shop Towel: To clean the valve and pump head.
- Bike’s Manual: To find the recommended air pressure settings for your weight and riding style.
Step-by-Step Guide: Using a Specialized Shock Pump

Follow these steps to adjust your suspension with a specialized shock pump:
Step 1: Prepare Your Bike and Pump
Start by positioning your bike on a stable surface, like a bike stand or against a wall. Make sure the suspension valve is easily accessible. Inspect your shock pump to ensure the hose and pump head are in good condition and free from debris.
Step 2: Locate the Schrader Valve
Find the Schrader valve on your suspension fork or rear shock. It usually has a small cap that needs to be unscrewed. Keep the cap in a safe place, as you’ll need it later.
Step 3: Attach the Shock Pump
Carefully attach the shock pump head to the Schrader valve. Push it on firmly until it’s fully seated. Many pumps have a threaded or lever-lock mechanism to secure the connection. Tighten or lock it according to the pump’s instructions.
Step 4: Check the Initial Pressure
Once the pump is connected, the gauge will display the current air pressure in your suspension. Take note of this reading. It’s important to know where you’re starting from.
Step 5: Inflate to the Desired Pressure
Consult your bike’s manual or a suspension setup guide to determine the correct air pressure for your weight and riding style. Begin pumping slowly and steadily, monitoring the gauge as you go. Avoid over-pumping. If you reach the desired pressure, move to the next step. If you accidentally over-inflate, use the bleed valve (explained below) to release small amounts of air.
Step 6: Fine-Tune with the Bleed Valve
The bleed valve is a crucial feature for making precise adjustments. It allows you to release small amounts of air with each press. To use it, gently press the bleed valve button or turn the bleed screw (depending on your pump model). Watch the gauge closely as you release air, and stop when you reach the exact desired pressure. A good rule of thumb is to let out air in short bursts to avoid letting out too much.
Step 7: Detach the Pump
Carefully detach the shock pump from the Schrader valve. Most pumps have a “no-loss” system that minimizes air loss during detachment. However, it’s normal to hear a small hiss of air. Quickly replace the valve cap to protect the valve from dirt and debris.
Step 8: Test and Adjust
Take your bike for a short ride and test the suspension. Pay attention to how it feels over bumps and jumps. If it feels too harsh, reduce the air pressure slightly. If it bottoms out too easily, increase the pressure. Make small adjustments and repeat the testing process until you achieve the desired feel.
Understanding Air Pressure and Sag
Sag is the amount your suspension compresses when you’re sitting on the bike in a normal riding position. Setting the correct sag is crucial for optimal performance. Here’s how to measure and adjust it:
Measuring Sag:
- Set the O-ring (or zip tie) on the shock stanchion against the shock body.
- Carefully sit on your bike in a normal riding position.
- Gently dismount without bouncing the suspension.
- Measure the distance between the O-ring and the shock body. This is your sag.
Recommended Sag Values:
| Suspension Type | Sag Percentage |
|---|---|
| Cross-Country (XC) | 15-20% |
| Trail/All-Mountain | 20-25% |
| Enduro/Downhill | 25-35% |
Adjust air pressure to achieve the recommended sag for your riding style. More sag generally provides a plusher ride, while less sag offers a firmer, more efficient feel.
Troubleshooting Common Issues
Here are some common problems you might encounter and how to solve them:
- Problem: The pump won’t attach to the valve.
- Solution: Make sure the pump head is fully seated on the valve. Check for dirt or damage on the valve or pump head.
- Problem: The gauge isn’t showing a reading.
- Solution: Ensure the pump is properly connected and that the valve core is not stuck. Try slightly pressing the valve core with a small tool to release any blockage.
- Problem: Air is leaking when pumping.
- Solution: Tighten the pump head connection. Check the pump hose and seals for damage.
- Problem: I can’t get the pressure exactly right.
- Solution: Use the bleed valve to make small adjustments. Be patient and take your time.
Tips for Maintaining Your Shock Pump
To keep your shock pump in good working condition, follow these tips:
- Clean the Pump Head: Regularly clean the pump head with a rag to remove dirt and debris.
- Store Properly: Store the pump in a clean, dry place.
- Check the Hose: Inspect the hose for cracks or damage. Replace if necessary.
- Lubricate Seals: Periodically lubricate the seals with a silicone-based lubricant.
Choosing the Right Shock Pump
With so many shock pumps on the market, it’s important to choose one that meets your needs. Here are some factors to consider:
- Gauge Accuracy: Look for a pump with an accurate and easy-to-read gauge.
- Build Quality: Choose a pump made from durable materials that can withstand regular use.
- Bleed Valve: Ensure the pump has a bleed valve for precise adjustments.
- Comfortable Handle: A comfortable handle makes pumping easier, especially at high pressures.
- Price: Shock pumps range in price from around $30 to $100 or more. Consider your budget and needs when making your choice.
Here’s a comparison of some popular shock pumps:
| Model | Price Range | Key Features | Pros | Cons |
|---|---|---|---|---|
| RockShox High Pressure Fork/Shock Pump | $40-$50 | Accurate gauge, ergonomic handle | Durable, easy to use | Can be slightly bulky |
| Topeak PocketShock DXG | $50-$60 | Compact design, rotating hose | Portable, versatile | Smaller gauge can be harder to read |
| Lezyne Digital Shock Drive | $70-$80 | Digital gauge, precise readings | Highly accurate, easy to fine-tune | More expensive |
Alternative Suspension Setup Options
While a shock pump is essential for adjusting air pressure, there are other options to consider for fine-tuning your suspension:
- Volume Spacers: These are small plastic tokens that you can add to your fork or shock to adjust the air spring’s progression. Adding volume spacers makes the suspension feel firmer towards the end of its travel, preventing bottoming out.
- Professional Suspension Tuning: If you’re struggling to get your suspension dialed in, consider consulting a professional suspension tuner. They can analyze your riding style and the terrain you ride to recommend the optimal settings. Many bike shops offer suspension tuning services.
FAQ About Specialized Shock Pumps
Q1: Can I use a regular tire pump for my suspension?
A: No, you should not use a regular tire pump for your suspension. Tire pumps deliver a large volume of air at low pressure, which can damage your suspension components. A shock pump is designed to deliver small amounts of air at high pressure, allowing for precise adjustments without risking damage.
Q2: How often should I check my suspension pressure?
A: It’s a good idea to check your suspension pressure before each ride, especially if you’re riding frequently or tackling challenging terrain. Air pressure can fluctuate due to temperature changes and minor leaks. Regular checks ensure your suspension is performing optimally.
Q3: What does “psi” mean?
A: “PSI” stands for pounds per square inch. It’s a unit of measurement for pressure. Shock pumps use psi to indicate the air pressure in your suspension.
Q4: How do I know what pressure to set my suspension to?
A: Consult your bike’s manual or the suspension manufacturer’s website for recommended air pressure settings based on your weight and riding style. You can also find online suspension setup guides that provide general recommendations. Start with the recommended settings and then fine-tune to your personal preference.
Q5: What is a “no-loss” connector?
A: A “no-loss” connector is a feature on some shock pumps that minimizes air loss when you detach the pump from the Schrader valve. It helps to maintain the pressure you’ve set in your suspension.
Q6: Can I use the same shock pump for my fork and rear shock?
A: Yes, you can use the same shock pump for both your fork and rear shock, as long as they both use Schrader valves. Most shock pumps are designed to be compatible with both types of suspension.
Q7: What do I do if my shock pump gauge isn’t accurate?
A: If you suspect your shock pump gauge is inaccurate, compare it to another pump or gauge that you know is accurate. If the readings consistently differ, it may be time to replace your shock pump.
Conclusion
Using a specialized shock pump might seem a bit technical at first, but it’s a skill that will greatly improve your cycling experience. By following these steps and understanding the principles of air suspension, you can dial in your bike’s handling for optimal performance and comfort. Remember to always consult your bike’s manual, start with recommended settings, and make small adjustments based on your personal preferences. With a little practice, you’ll be confidently fine-tuning your suspension like a pro, enjoying smoother, more controlled rides on any terrain. So grab your shock pump, hit the trails, and experience the difference that properly tuned suspension can make!


