
How to Set Up Enduro Bike Suspension With Shock Pump: Easy!
Do you love riding your enduro bike? Does it feel bumpy and hard to control? Setting up your bike’s suspension can make a big difference. It can make your rides smoother and more fun. You can learn how to set up enduro bike suspension with a shock pump. It might seem tricky, but it is easier than you think.
Have you ever bounced on a trampoline? A good suspension feels like that. It absorbs bumps and keeps you in control. Let’s find out how to make your bike feel great! This guide helps you learn to adjust your suspension. Grab your shock pump, and let’s get started!
Key Takeaways
- Learning how to set up enduro bike suspension with a shock pump improves your ride.
- A shock pump is essential for adjusting air pressure in your suspension.
- Setting the correct sag helps your suspension work effectively on trails.
- Adjusting rebound and compression damping fine-tunes suspension performance.
- Regular maintenance ensures your suspension stays in top condition for every ride.
Why Set Up Enduro Bike Suspension?

Setting up your enduro bike’s suspension is super important. It’s like tuning a musical instrument. When it’s in tune, it sounds great. When your suspension is set up right, your bike rides great. You will have more control and comfort. Good suspension helps you go faster. It also makes riding safer. Imagine hitting a big bump. If your suspension is wrong, it can throw you off balance. But if it’s set up correctly, it absorbs the bump. You stay in control. Knowing how to set up enduro bike suspension with a shock pump is a skill. This skill helps you enjoy your rides even more. It also helps you ride different trails better. You’ll feel like a pro!
- Better control on rough trails.
- Increased comfort during long rides.
- Improved speed and efficiency.
- Enhanced safety when tackling obstacles.
- Reduced fatigue from bumpy terrain.
Think about your favorite video game. You probably adjust the settings to make it easier or harder. Setting up your suspension is similar. You are adjusting your bike to fit the trail and your riding style. When you know how to set up enduro bike suspension with a shock pump, you can fine-tune everything. You can change the air pressure and damping. These adjustments make your bike feel perfect. This helps you handle any trail. It makes every ride more fun and exciting. Plus, a well-tuned suspension lasts longer. Regular adjustments prevent wear and tear. This saves you money in the long run.
Why Does Suspension Matter?
Have you ever ridden a bike with flat tires? It feels slow and bumpy, right? Good suspension is the opposite. It makes your ride smooth and fast. Suspension absorbs bumps. It keeps your tires on the ground. This gives you more control. Imagine you are riding downhill. There are rocks and roots everywhere. With good suspension, your bike soaks them up. You can focus on steering and having fun. Without it, you would be bouncing all over the place. You might even crash. This is why suspension is so important. It keeps you safe and helps you ride better. Learning how to set up enduro bike suspension with a shock pump is like unlocking a superpower. It lets you conquer any trail.
How Does Suspension Work?
Suspension works like a spring. When you hit a bump, the spring compresses. This absorbs the impact. Then, the spring releases. This pushes the wheel back down. But it’s not just a simple spring. There’s also something called damping. Damping controls how fast the spring moves. It stops the bike from bouncing too much. Think of it like a door closer. It stops the door from slamming. Damping does the same thing for your suspension. It keeps your ride smooth and controlled. Different bikes have different types of suspension. Some use air springs. Others use coil springs. Air springs are adjusted with a shock pump. This lets you change the pressure. This makes the suspension softer or firmer.
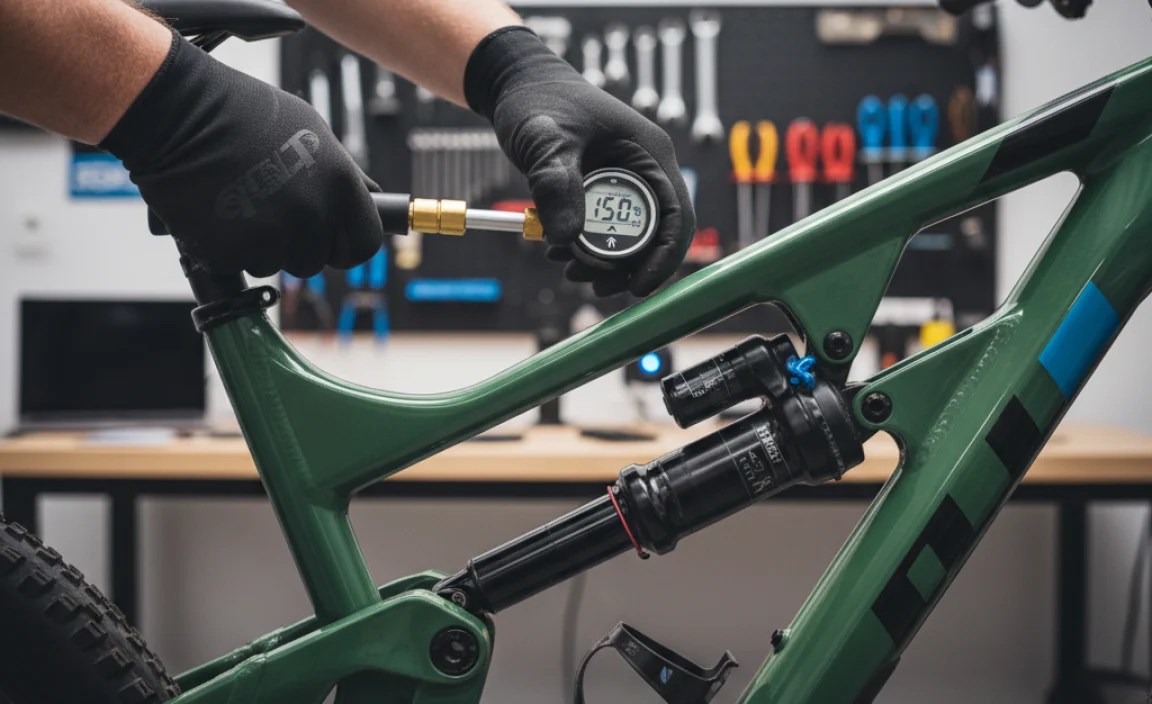
What is a Shock Pump?
A shock pump is a special pump for bike suspension. It’s not like a regular tire pump. It’s designed to pump air at very high pressures. This is needed for air suspension. The pump has a gauge. This shows you how much pressure is in the suspension. This is important. Too much or too little pressure can ruin your ride. Shock pumps also have a special valve. This valve prevents air from escaping when you disconnect the pump. This ensures you get the exact pressure you want. Using a shock pump might seem tricky at first. But it’s actually quite easy. Just attach it to the valve on your suspension. Then, pump until you reach the right pressure. Check the gauge to be sure. It’s a tool every enduro biker should have.
Fun Fact or Stat: Did you know that a properly set up suspension can improve your average speed on a trail by up to 15%?
Tools Needed to Set Up Suspension

Before you start, you need the right tools. The most important tool is a shock pump. This pump lets you add and remove air from your suspension. Make sure it has a gauge. This helps you see the pressure. You’ll also need a ruler or measuring tape. This is for measuring sag. Sag is how much the suspension compresses when you sit on the bike. You might need some Allen wrenches. These are for adjusting the damping settings. These settings control how fast the suspension moves. A notepad and pen can also be helpful. Write down your settings. This way, you can remember what works best. Having these tools makes the job easier. It also helps you get the best performance from your suspension. Don’t forget to read your bike’s manual. It has important information about your suspension.
- Shock pump with a pressure gauge.
- Ruler or measuring tape for sag.
- Allen wrenches for damping adjustments.
- Notepad and pen for recording settings.
- Your bike’s suspension manual.
Imagine you’re a chef. You wouldn’t try to cook a fancy meal without the right pots and pans. Setting up your suspension is similar. You need the right tools to do the job well. A good shock pump is like a chef’s favorite knife. It’s precise and reliable. A ruler is like a measuring cup. It helps you get the right amount of sag. Allen wrenches are like different-sized spoons. They let you adjust the damping settings. The notepad is like a recipe book. It helps you remember your settings. Having all these tools makes the process smoother. It helps you understand how to set up enduro bike suspension with a shock pump. It also ensures your suspension performs its best.
Why a Good Shock Pump Matters?
Have you ever tried to inflate a balloon with a hole in it? It’s frustrating, right? A bad shock pump is similar. It might leak air. It might not give you an accurate reading. A good shock pump is precise. It lets you add small amounts of air. This helps you fine-tune your suspension. It also has a reliable gauge. This shows you the exact pressure. Some pumps even have a bleed valve. This lets you release small amounts of air. This is useful for getting the pressure just right. Investing in a good shock pump is worth it. It makes the setup process easier. It helps you get the most out of your suspension. It also lasts longer than a cheap pump.
How to Measure Sag Correctly?
Measuring sag is like tailoring a suit. You want it to fit just right. Too much sag and your suspension will bottom out easily. Too little sag and it will feel harsh. To measure sag, you’ll need a friend. First, set the O-ring on your shock. Then, get on your bike in your riding gear. Stand up in a neutral riding position. Have your friend measure how far the O-ring has moved. This is your sag measurement. Compare it to the recommended sag for your bike. Adjust the air pressure in your shock to get the right sag. This is a crucial step. It helps your suspension work properly.
What Allen Wrenches Do I Need?
Allen wrenches are like keys. They unlock different settings on your suspension. You’ll need a set of Allen wrenches. These come in different sizes. The most common sizes are 2.5mm, 3mm, 4mm, and 5mm. These wrenches let you adjust the damping settings. These settings control how fast the suspension moves. Some bikes also have external adjustments. These can be turned by hand. But most require an Allen wrench. Check your bike’s manual to see which sizes you need. Having the right Allen wrenches is important. It lets you fine-tune your suspension. This helps you get the best performance on the trail. Don’t force the wrenches. Use the right size to avoid damaging the adjustments.
Fun Fact or Stat: Professional enduro racers often spend hours fine-tuning their suspension before a race, making tiny adjustments to gain every possible advantage.
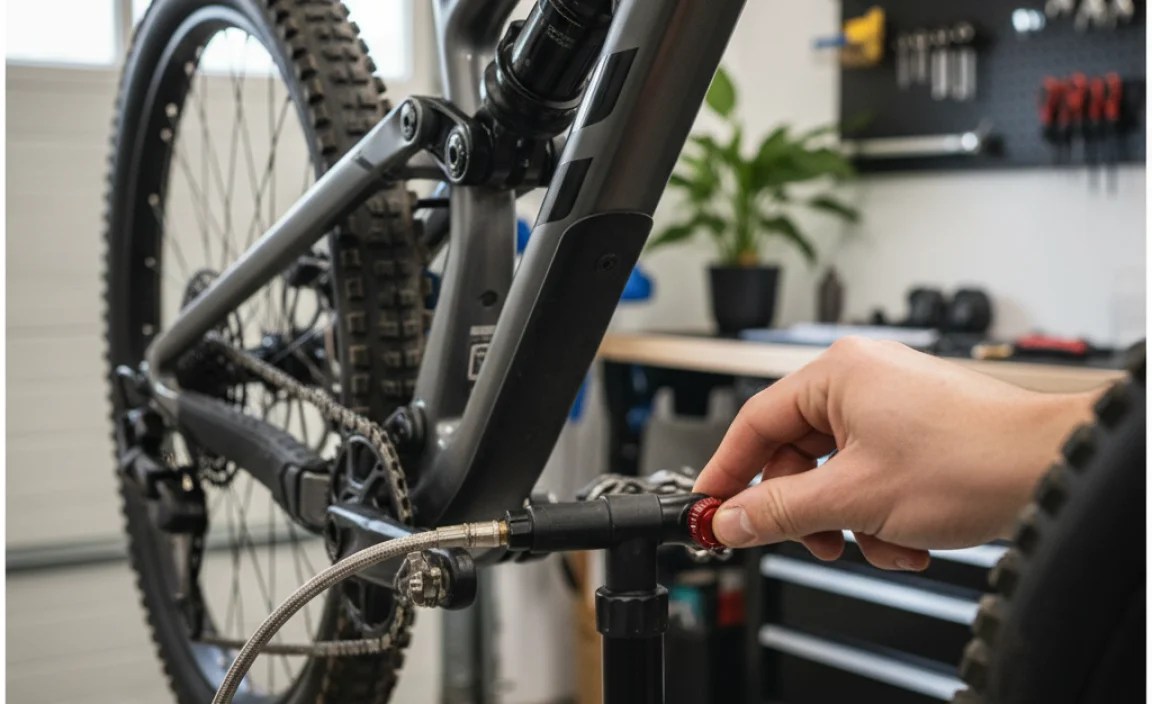
Setting Initial Air Pressure
Setting the initial air pressure is very important. It’s like setting the foundation of a house. If the foundation is bad, the house will be unstable. If the air pressure is wrong, your suspension won’t work right. Start by checking your bike’s manual. It will tell you the recommended air pressure for your weight. Use the shock pump to add air to your suspension. Check the gauge to see the pressure. If you’re not sure where to start, use the recommended pressure. You can always adjust it later. Too much pressure will make the suspension stiff. Too little pressure will make it bottom out easily. Adjusting the air pressure is a key part of learning how to set up enduro bike suspension with a shock pump. Take your time and get it right.
- Check your bike’s manual for recommended pressure.
- Use the shock pump to add air.
- Monitor the pressure gauge carefully.
- Start with the recommended pressure if unsure.
- Adjust later based on how it feels.
Imagine you’re inflating a tire. You wouldn’t just pump it up without checking the pressure, right? Setting air pressure in your suspension is similar. You need to know how much air to put in. The recommended pressure is a starting point. But it’s not always perfect. You might need to adjust it based on your riding style. If you like to ride aggressively, you might need more pressure. This will prevent the suspension from bottoming out. If you prefer a smoother ride, you might need less pressure. This will make the suspension more sensitive to small bumps. Learning how to set up enduro bike suspension with a shock pump involves experimenting. Try different pressures. See what feels best for you. Always make small adjustments at a time.
Finding the Right Starting Point
Finding the right starting point is like finding the trailhead. You need to know where to begin. The best place to start is with the manufacturer’s recommendations. These are usually found in your bike’s manual. They are based on your weight. If you don’t have the manual, you can often find this information online. Many suspension manufacturers have charts. These charts show the recommended pressure for different weights. Once you have this starting point, you can adjust from there. It’s important to be patient. Don’t expect to get it perfect on the first try. It takes time and experimentation. But with practice, you’ll learn how to set up enduro bike suspension with a shock pump like a pro.
What Happens If Pressure Is Too High?
Imagine bouncing on a basketball that’s overinflated. It’s hard and doesn’t give much. Too much air pressure in your suspension is similar. It makes the suspension stiff. It won’t absorb bumps as well. This can make your ride uncomfortable. It can also reduce your control. The bike will feel harsh. It will bounce off obstacles. This can make it harder to stay on your line. It can also increase the risk of crashing. If you think your pressure is too high, let some air out. Use the bleed valve on your shock pump. Make small adjustments until it feels better. Remember, the goal is a smooth, controlled ride.
What Happens If Pressure Is Too Low?
Think about riding a bike with flat tires. It feels sluggish and unstable. Too little air pressure in your suspension is similar. It makes the suspension soft. It will bottom out easily. This means it will compress all the way. This can damage the suspension. It can also be dangerous. When the suspension bottoms out, it can throw you off balance. This can lead to a crash. If you think your pressure is too low, add more air. Use your shock pump to add air gradually. Check the pressure after each pump. Aim for the recommended pressure for your weight. This will give you a good starting point.
Fun Fact or Stat: The air pressure in your suspension can change with temperature. Hotter temperatures increase pressure, while colder temperatures decrease it.
Measuring and Adjusting Sag
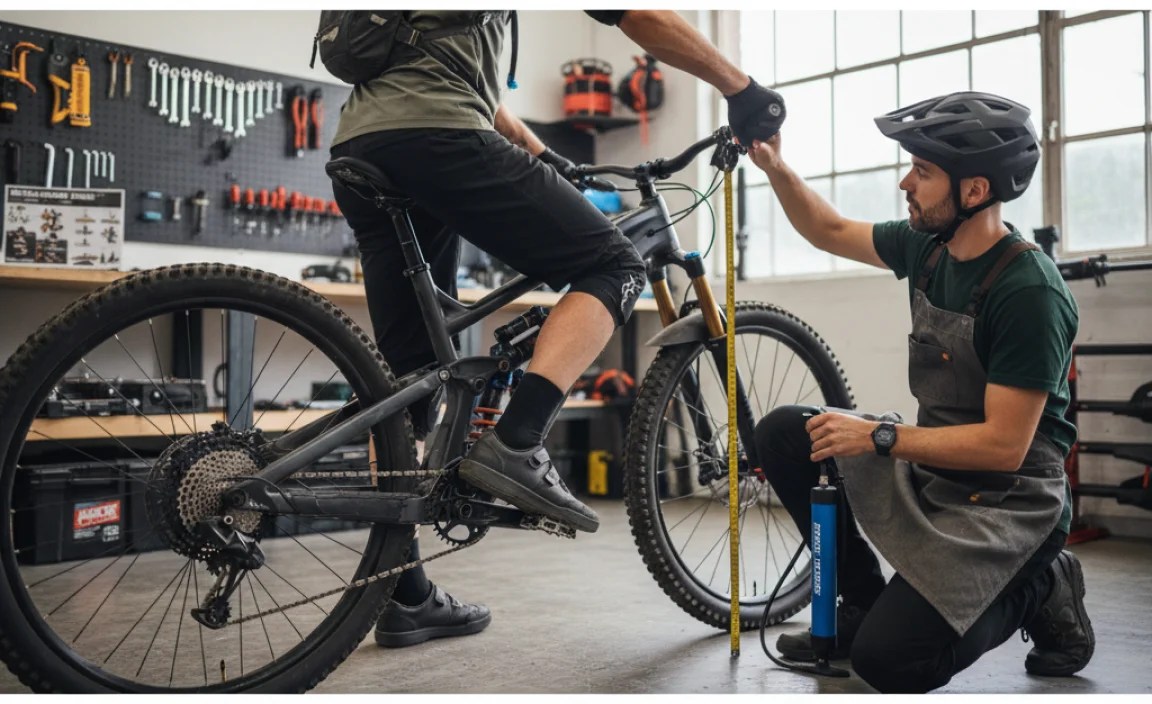
Measuring and adjusting sag is a key step. It’s like adjusting the seat height on your bike. If the seat is too high or too low, it’s uncomfortable. If the sag is wrong, your suspension won’t work right. Sag is how much the suspension compresses when you sit on the bike. To measure sag, you’ll need a friend. Set the O-ring on your shock. Get on your bike in your riding gear. Stand in a neutral riding position. Have your friend measure how far the O-ring has moved. This is your sag measurement. Compare it to the recommended sag for your bike. Adjust the air pressure to get the right sag. This is essential for learning how to set up enduro bike suspension with a shock pump.
- Set the O-ring on your shock.
- Get on your bike in riding gear.
- Have a friend measure the O-ring movement.
- Compare to recommended sag.
- Adjust air pressure to achieve correct sag.
Imagine you’re balancing a seesaw. If one side is too heavy, it won’t work. Sag is like balancing the seesaw of your suspension. It ensures that the suspension is balanced. It also ensures it works properly. Too much sag means the suspension is too soft. It will bottom out easily. Too little sag means the suspension is too stiff. It won’t absorb small bumps. The right amount of sag depends on your bike and riding style. Most bikes recommend 25-30% sag. This means the suspension should compress 25-30% of its travel. Experiment with different amounts of sag. See what feels best for you. Learning how to set up enduro bike suspension with a shock pump includes understanding sag.
Why Is Sag Important?
Have you ever tried to jump on a trampoline that’s too loose? It doesn’t bounce well, right? Sag is similar. It ensures your suspension is ready to respond. It allows the suspension to extend into holes and bumps. This keeps your tires on the ground. This gives you more control. Without proper sag, the suspension might top out. This means it extends all the way. This can cause a harsh feeling. It can also make it harder to control the bike. Sag also affects your bike’s geometry. It changes the head angle and seat angle. These angles affect how the bike handles. Getting the right sag is crucial for good handling.
How Much Sag Do I Need?
Think about choosing the right size shoes. You want them to fit comfortably. The right amount of sag is similar. It depends on your bike and your riding style. Most enduro bikes recommend 25-30% sag. This is a good starting point. If you ride mostly downhill, you might want more sag. This will give you more plushness. If you ride mostly uphill, you might want less sag. This will make the bike pedal more efficiently. Experiment with different amounts of sag. See what feels best for you. Remember, there’s no one-size-fits-all answer. It’s all about finding what works for you.
Adjusting Air Pressure for Sag
Adjusting air pressure for sag is like tuning a guitar. You’re trying to get the right sound. If you have too much sag, you need to add air. Use your shock pump to add air gradually. Check the sag after each pump. If you have too little sag, you need to let air out. Use the bleed valve on your shock pump to release air. Make small adjustments. Check the sag after each adjustment. It can take some time to get it perfect. But it’s worth it. The right sag makes a big difference in how your bike rides. It’s a key part of learning how to set up enduro bike suspension with a shock pump.
Fun Fact or Stat: Some professional riders adjust their sag depending on the specific course they are racing on, optimizing for different types of terrain.
Adjusting Rebound Damping
Adjusting rebound damping is important. It’s like controlling how fast a spring bounces back. Rebound damping controls how fast your suspension returns after hitting a bump. If the rebound is too fast, the bike will feel bouncy. If it’s too slow, the bike will feel sluggish. Find the rebound adjuster on your shock. It’s usually a small knob with a plus and minus sign. Turn the knob to adjust the rebound. Start with the recommended setting. Then, test the suspension. Push down on the seat and watch how quickly it returns. Adjust the rebound until it feels controlled. Learning how to set up enduro bike suspension with a shock pump includes mastering rebound damping.
- Find the rebound adjuster knob.
- Turn the knob to adjust rebound.
- Start with the recommended setting.
- Test by pushing down on the seat.
- Adjust until it feels controlled.
Imagine you’re dribbling a basketball. If it bounces too high, it’s hard to control. Rebound damping is like controlling the bounce of your suspension. It keeps the bike stable. It helps you maintain control. If the rebound is too fast, the bike will bounce too much. This can make it hard to stay on your line. If the rebound is too slow, the bike will pack up. This means it won’t return to its full travel before hitting the next bump. This can make the ride feel harsh. The right rebound setting depends on your riding style. It also depends on the terrain. Experiment with different settings. See what feels best for you. Learning how to set up enduro bike suspension with a shock pump includes understanding rebound.
What is Rebound Damping?
Have you ever watched a slow-motion video of a spring? It bounces up and down. Rebound damping controls this bounce. It slows down the spring. This keeps the bike stable. Damping uses oil. The oil flows through small holes. This creates resistance. This resistance slows down the spring. More resistance means slower rebound. Less resistance means faster rebound. Rebound damping is important for control. It keeps the bike from bouncing out of control. It also helps the suspension work effectively.
How to Tell If Rebound Is Too Fast?
Think about riding over a series of small bumps. If the rebound is too fast, the bike will feel bouncy. It will kick up after each bump. This is like a pogo stick. It makes it hard to stay in control. It can also be tiring. You’ll have to work harder to keep the bike stable. To test the rebound, push down on the seat. Watch how quickly it returns. If it bounces back quickly, the rebound is too fast. Slow it down by turning the rebound adjuster. Turn it towards the minus sign. This will slow down the rebound.
How to Tell If Rebound Is Too Slow?
Imagine riding over a series of small bumps. If the rebound is too slow, the bike will feel harsh. It will pack up after each bump. This means it won’t return to its full travel. This makes the ride feel rough. It can also reduce your control. The suspension won’t be able to absorb the next bump. To test the rebound, push down on the seat. Watch how quickly it returns. If it returns slowly, the rebound is too slow. Speed it up by turning the rebound adjuster. Turn it towards the plus sign. This will speed up the rebound.
Fun Fact or Stat: Rebound damping is more critical on trails with lots of small, fast bumps, while compression damping is more important for big hits and drops.
| Aspect | Rebound Too Fast | Rebound Too Slow |
|---|---|---|
| Feel | Bouncy, uncontrolled | Harsh, packed-up |
| Control | Reduced, bike kicks | Reduced, suspension doesn’t recover |
| Performance | Poor over multiple bumps | Poor bump absorption |
| Adjustment | Slow down rebound | Speed up rebound |
Adjusting Compression Damping
Adjusting compression damping is vital. It’s like setting the firmness of a mattress. Compression damping controls how easily your suspension compresses when you hit a bump. If the compression is too soft, the suspension will bottom out easily. If it’s too firm, the suspension will feel harsh. Find the compression adjuster on your shock. It’s usually a small knob with a plus and minus sign. Turn the knob to adjust the compression. Start with the recommended setting. Then, test the suspension. Ride over some small bumps. Adjust the compression until it feels right. Learning how to set up enduro bike suspension with a shock pump involves understanding compression.
- Find the compression adjuster knob.
- Turn the knob to adjust compression.
- Start with the recommended setting.
- Test by riding over bumps.
- Adjust until it feels right.
Imagine you’re driving a car over a speed bump. If the suspension is too soft, the car will bottom out. Compression damping is like controlling how your suspension handles bumps. It keeps the bike from bottoming out. It also prevents it from feeling harsh. If the compression is too soft, the suspension will compress too easily. This can cause it to bottom out on big hits. If the compression is too firm, the suspension won’t absorb small bumps. This can make the ride uncomfortable. The right compression setting depends on your riding style. It also depends on the terrain. Experiment with different settings. See what feels best for you. Learning how to set up enduro bike suspension with a shock pump includes understanding compression.
What is Compression Damping?
Have you ever squeezed a sponge? It compresses. Compression damping controls how easily your suspension compresses. It uses oil. The oil flows through small holes. This creates resistance. This resistance slows down the compression. More resistance means firmer compression. Less resistance means softer compression. Compression damping is important for preventing bottoming out. It also helps the suspension absorb bumps smoothly. It works with rebound damping. Together, they control the movement of the suspension.
How to Tell If Compression Is Too Soft?
Think about jumping off a small curb. If the compression is too soft, the suspension will bottom out. This means it will compress all the way. You’ll feel a harsh impact. This can be uncomfortable. It can also damage the suspension. To test the compression, ride over some bumps. If the suspension bottoms out easily, the compression is too soft. Increase the compression by turning the adjuster. Turn it towards the plus sign. This will make the compression firmer.
How to Tell If Compression Is Too Firm?
Imagine riding over a bumpy road. If the compression is too firm, the ride will feel harsh. The suspension won’t absorb the bumps. You’ll feel every bump. This can be tiring. It can also reduce your control. The bike will bounce off obstacles. To test the compression, ride over some small bumps. If the suspension feels stiff, the compression is too firm. Decrease the compression by turning the adjuster. Turn it towards the minus sign. This will make the compression softer.
Fun Fact or Stat: Some modern suspension systems have high-speed and low-speed compression damping adjustments, allowing for even finer control over suspension performance.
Test Riding and Fine-Tuning
Test riding and fine-tuning are the final steps. It’s like test driving a car. You want to make sure everything feels right. After making adjustments, take your bike for a ride. Find a trail with different types of terrain. Pay attention to how the suspension feels. Does it feel smooth and controlled? Does it bottom out easily? Does it feel harsh? Make small adjustments based on how it feels. Adjust the air pressure, rebound, and compression. Keep testing until you’re happy with the setup. This is an important part of learning how to set up enduro bike suspension with a shock pump. It takes time and practice. But it’s worth it. A well-tuned suspension makes riding more fun.
- Ride on various terrains.
- Pay attention to how it feels.
- Adjust air pressure, rebound, and compression.
- Keep testing until satisfied.
- Record your final settings.
Imagine you’re baking a cake. You wouldn’t just follow the recipe without tasting it, right? Test riding is like tasting the cake. It lets you see if your adjustments are working. It gives you a chance to fine-tune things. Don’t be afraid to experiment. Try different settings. See what feels best for you. Remember, there’s no perfect setup. It’s all about finding what works for you. A good suspension setup makes a big difference. It makes riding more comfortable. It also gives you more control. It helps you ride faster and safer. Learning how to set up enduro bike suspension with a shock pump is a valuable skill.
What to Look for During a Test Ride?
Have you ever gone to an amusement park? You test the rides before deciding which ones you like. A test ride is similar. It lets you see how your suspension performs. Pay attention to how it feels on different types of terrain. Does it feel smooth on small bumps? Does it handle big hits well? Does it feel stable in corners? These are all important things to consider. Also, pay attention to how your body feels. Are you getting tired easily? Is your back sore? A good suspension setup should make riding more comfortable. It should also reduce fatigue.
How Often Should I Fine-Tune?
Think about tuning a musical instrument. You don’t just tune it once and forget about it. You need to tune it regularly. Fine-tuning your suspension is similar. You should fine-tune it whenever you ride different terrain. You should also fine-tune it if you change your riding style. For example, if you’re going to ride a downhill park, you might want to increase the compression damping. This will prevent the suspension from bottoming out. If you’re going to ride a cross-country trail, you might want to decrease the compression damping. This will make the suspension more sensitive to small bumps. It’s a good idea to keep a record of your settings. This will help you remember what works best for different situations.
Why Keep a Record of My Settings?
Imagine you found a secret recipe for the best cookies ever. You’d want to write it down, right? Keeping a record of your suspension settings is similar. It helps you remember what works best. You can write down the air pressure, rebound damping, and compression damping. You can also write down the type of terrain you were riding. This will help you quickly set up your suspension for similar rides in the future. It will also help you learn more about your suspension. You’ll start to understand how different adjustments affect the ride. This will make you a better rider.
Fun Fact or Stat: Many professional riders use data acquisition systems to record suspension performance during races, allowing them to analyze and fine-tune their setups with incredible precision.
Summary
Setting up your enduro bike suspension makes riding better. It improves control and comfort. Learning how to set up enduro bike suspension with a shock pump is important. You need a shock pump, ruler, and Allen wrenches. Start by setting the right air pressure. Then, measure and adjust sag. Adjust rebound and compression damping. Test ride and fine-tune your settings. Keep a record of what works best. This helps you adjust quickly for different trails. A well-tuned suspension makes riding more fun and safer. It lets you handle any trail with confidence.
Conclusion
Learning how to set up enduro bike suspension with a shock pump is a great skill. It takes time and practice. But it is worth the effort. A properly set up suspension improves your ride. It gives you more control and comfort. It also makes riding safer. Don’t be afraid to experiment. Try different settings. Find what works best for you. Enjoy the ride!
Frequently Asked Questions
Question No 1: What is sag, and why is it important for my enduro bike’s suspension?
Answer: Sag is the amount your suspension compresses when you sit on your bike. It’s like how much a chair sinks when you sit down. It is important because it ensures your suspension is ready to absorb bumps. It also helps maintain traction. Too much or too little sag can make your ride uncomfortable and reduce control. Measuring and setting sag correctly is a key step in learning how to set up enduro bike suspension with a shock pump. It ensures your suspension works properly on the trail.
Question No 2: How often should I check and adjust the air pressure in my enduro bike’s suspension?
Answer: You should check your suspension’s air pressure before every ride. This ensures it’s at the right level. Temperature changes can affect air pressure. So can small leaks. It’s like checking the air in your tires. Regular checks help maintain consistent performance. If you notice a significant change in pressure, inspect your suspension for leaks. Adjusting the air pressure is a key part of learning how to set up enduro bike suspension with a shock pump. It helps you fine-tune your ride for different conditions.
Question No 3: What does rebound damping do, and how do I adjust it for different terrains?
Answer: Rebound damping controls how quickly your suspension returns after hitting a bump. It’s like how fast a spring bounces back. Adjusting rebound damping affects how your bike handles different terrains. If the rebound is too fast, the bike will feel bouncy. If it’s too slow, the bike will feel sluggish. For rough terrain, slow down the rebound. This keeps the bike stable. For smoother terrain, speed up the rebound. This improves responsiveness. Adjusting rebound is important when you learn how to set up enduro bike suspension with a shock pump.
Question No 4: Can I use a regular tire pump to adjust the air pressure in my enduro bike’s suspension?
Answer: No, you should not use a regular tire pump for your suspension. A regular tire pump cannot reach the high pressures needed for suspension. It also doesn’t have a precise gauge. This can lead to over or under-inflation. Always use a shock pump. Shock pumps are designed for high-pressure suspension systems. They have accurate gauges. They also have special valves. These prevent air loss when disconnecting. Using the right tool is key when you learn how to set up enduro bike suspension with a shock pump.
Question No 5: How do I know if my enduro bike’s suspension is bottoming out, and what should I do about it?
Answer: Bottoming out happens when your suspension compresses all the way. You’ll feel a harsh impact. It can also damage your suspension. To check if you’re bottoming out, look at the O-ring on your shock. If it’s at the end of the travel, you’re bottoming out. To fix this, add more air pressure. You can also increase compression damping. This will make the suspension firmer. Adjusting these settings is part of learning how to set up enduro bike suspension with a shock pump. It prevents damage and improves control.
Question No 6: What are some common mistakes people make when setting up their enduro bike suspension, and how can I avoid them?
Answer: One common mistake is not checking sag. Another is using the wrong air pressure. Some people also forget to adjust rebound and compression. To avoid these mistakes, follow a systematic approach. Start with the manufacturer’s recommendations. Measure and adjust sag. Adjust rebound and compression. Test ride and fine-tune your settings. Keep a record of your settings. This will help you learn from your mistakes. Taking your time is very important when you want to learn how to set up enduro bike suspension with a shock pump.


