
How to Easily Pump a Bike Tire With a Mini Pump
Quick Summary: Pumping a bike tire with a mini pump can seem tough, but it’s manageable with the right technique. First, make sure your pump fits the valve (Presta or Schrader). Secure the pump head onto the valve, use the ground for leverage, and pump in smooth, full strokes. Check the tire pressure frequently to avoid overinflation. With a little practice, you’ll be back on the road in no time!
Ever been stranded with a flat bike tire and only a mini pump? It’s a common cyclist’s woe! Mini pumps are great for on-the-go repairs but can be tricky to use effectively. Many riders struggle to get their tires properly inflated with these compact tools. But don’t worry, it’s totally achievable with the right know-how. This guide will walk you through each step, making the process simple and stress-free.
We’ll cover everything from identifying your tire valve type to mastering the pumping technique. Plus, we’ll share tips for maximizing your mini pump’s efficiency. Ready to keep rolling? Let’s get started!
Understanding Your Bike Tire Valve

Before you even touch your mini pump, you need to know what type of valve your bike tires have. The two most common types are Presta and Schrader. Knowing the difference is crucial for a successful inflation.
Presta Valves
Presta valves are typically found on higher-end bikes, especially road bikes. They are narrower than Schrader valves and have a locking nut at the top.
- Appearance: Slim, with a small nut to unscrew.
- Usage: Unscrew the nut before inflating and screw it back on afterward.
- Pros: Holds higher pressure, common on performance bikes.
- Cons: More fragile, can be bent or broken if handled roughly.
Schrader Valves
Schrader valves are the same type you find on car tires. They are wider and more robust than Presta valves.
- Appearance: Wider, with a spring-loaded pin in the center.
- Usage: Simply attach the pump head and start inflating.
- Pros: Durable, easy to use, universally compatible.
- Cons: Can’t hold as high pressure as Presta, bulkier.
How to Identify Your Valve Type
Take a close look at your tire valve. Is it slim with a nut, or wider like a car tire valve? Once you know, you can ensure your mini pump is compatible or make necessary adjustments.
Essential Gear for Pumping Your Bike Tire

Having the right gear makes the job much easier. Here’s what you’ll need:
- Mini Pump: Choose a reliable mini pump that fits your valve type.
- Spare Tube: Always carry a spare tube in case of a flat.
- Tire Levers: These help you remove the tire from the rim.
- Multi-Tool: A multi-tool with essential Allen wrenches can be a lifesaver.
- Patch Kit: For fixing small punctures on the go.
Choosing the Right Mini Pump
Mini pumps come in various shapes and sizes, with different features. Here’s what to consider:
- Valve Compatibility: Ensure the pump works with both Presta and Schrader valves, or choose one specifically for your valve type. Some pumps have a switch or adapter for different valves.
- Pressure Gauge: A built-in gauge helps you avoid over- or under-inflating your tires.
- Mounting Bracket: A bracket lets you attach the pump to your bike frame for easy access.
- Size and Weight: Consider the pump’s size and weight for portability.
Recommended Mini Pumps
Here are a few highly-rated mini pumps:
- Lezyne Micro Floor Drive HP: Known for its efficiency and footpad for easier pumping.
- Topeak RaceRocket HP: Compact and lightweight, with a built-in hose.
- Crankbrothers Sterling S: Affordable and reliable, with a reversible valve head.
Step-by-Step Guide: Pumping Your Bike Tire with a Mini Pump

Alright, let’s get to the main event. Follow these steps to pump your bike tire effectively with a mini pump.
Step 1: Prepare Your Bike and Valve
First, make sure your bike is in a stable position. If you have a flat tire, try to find a safe spot away from traffic. Here’s what to do:
- Position the Bike: Turn your bike upside down or lean it against a stable object.
- Access the Valve: Locate the valve on the tire.
- Presta Valve Prep: If you have a Presta valve, unscrew the small nut at the top. Gently push the valve in to ensure it’s not stuck.
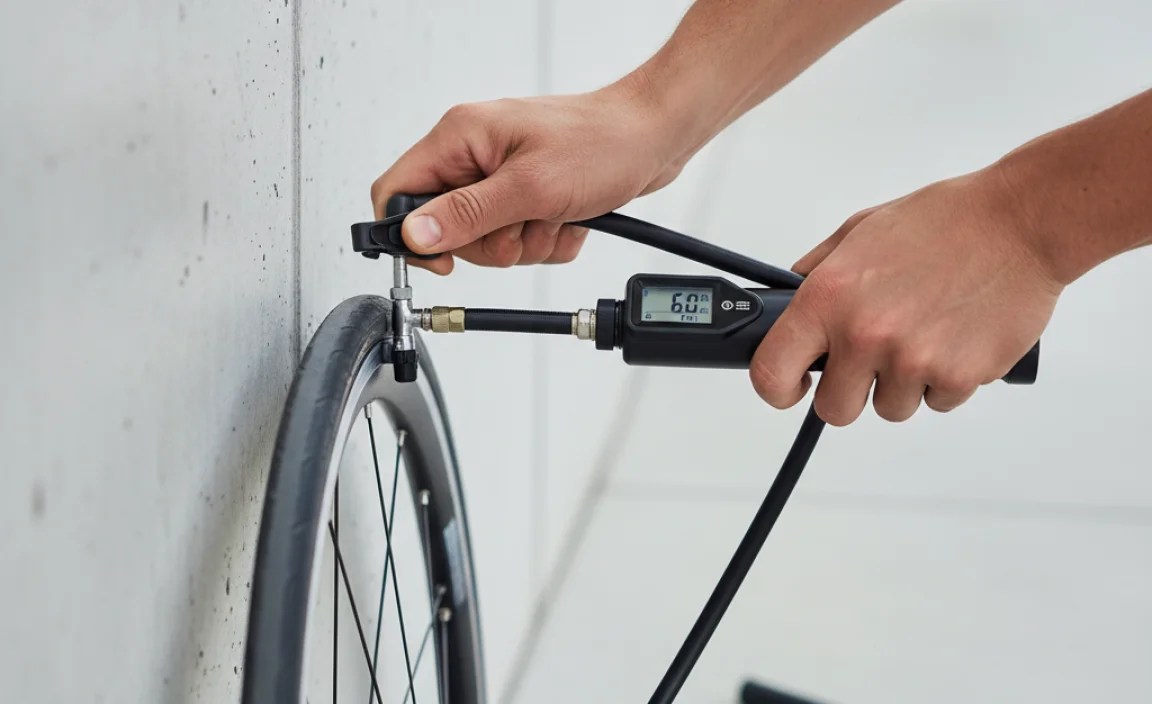
Step 2: Attach the Pump Head
Attaching the pump head correctly is crucial for an airtight seal. Follow these steps:
- Position the Pump Head: Place the pump head over the valve.
- Secure the Connection: Press the pump head firmly onto the valve. Some pumps have a lever or locking mechanism to secure the connection. Make sure it’s properly engaged.
- Check the Seal: Ensure there are no air leaks. If you hear hissing, readjust the pump head until the seal is tight.
Step 3: Begin Pumping
Now comes the pumping action. Here’s how to do it efficiently:
- Stance: Position yourself comfortably. If your pump has a footpad, place your foot on it for stability.
- Grip: Hold the pump handle firmly with both hands.
- Stroke: Use smooth, full strokes. Push the pump handle down and pull it back up completely. Avoid short, choppy strokes.
- Leverage: Use your body weight to help push the pump handle down. This makes pumping easier and more efficient.
Step 4: Monitor Tire Pressure
Keeping an eye on the tire pressure is essential to avoid overinflation. Here’s how to do it:
- Check Regularly: Stop pumping every few strokes to check the tire pressure.
- Use a Gauge: If your pump has a built-in gauge, use it to monitor the pressure. If not, you can use a separate tire pressure gauge.
- Target Pressure: Inflate the tire to the recommended pressure, which is usually printed on the tire sidewall.
Step 5: Detach the Pump Head
Once you reach the desired pressure, carefully detach the pump head:
- Release the Lever: If your pump has a lever, release it.
- Remove the Pump Head: Gently pull the pump head straight off the valve.
- Presta Valve: If you have a Presta valve, screw the nut back down to secure the valve.
Step 6: Check Your Work
Finally, give your tire a quick check to ensure everything is in order:
- Visual Inspection: Look for any signs of leaks or damage.
- Pressure Check: Double-check the tire pressure with a gauge if possible.
- Ride Test: Take a short ride to ensure the tire feels firm and stable.
Tips for Efficient Pumping
Mini pumps aren’t known for their efficiency, but these tips can help you get the most out of them:
- Use Full Strokes: Maximize each pump stroke by extending it fully.
- Maintain a Steady Pace: Avoid rushing. Smooth, consistent strokes are more effective.
- Use Your Body Weight: Lean into the pump to generate more force.
- Keep the Pump Clean: Regularly clean the pump head and barrel to ensure smooth operation.
- Check for Leaks: Ensure the pump head is securely attached to the valve to prevent air leaks.
Troubleshooting Common Issues

Even with the best technique, you might encounter some issues. Here’s how to troubleshoot them:
| Issue | Possible Cause | Solution |
|---|---|---|
| Air Leak | Loose pump head, damaged valve | Reattach pump head, replace valve |
| Difficulty Pumping | Clogged pump, low tire pressure | Clean pump, use body weight |
| Pump Head Won’t Attach | Incorrect valve type, damaged pump head | Use correct adapter, replace pump head |
| Tire Won’t Inflate | Puncture, valve issue | Replace tube, check valve |
Maintaining Your Mini Pump
A well-maintained mini pump will last longer and perform better. Here’s how to keep it in top shape:
- Clean Regularly: Wipe down the pump after each use to remove dirt and debris.
- Lubricate: Apply a small amount of lubricant to the pump piston occasionally.
- Store Properly: Store the pump in a dry place to prevent corrosion.
- Inspect Regularly: Check for any signs of wear or damage, and replace parts as needed.
When to Replace Your Mini Pump
Even with good maintenance, mini pumps eventually wear out. Here are some signs it’s time for a replacement:
- Reduced Efficiency: If the pump requires significantly more effort to inflate tires.
- Air Leaks: If you can’t get a good seal between the pump head and valve.
- Physical Damage: If the pump is cracked, bent, or otherwise damaged.
- Worn Parts: If parts like the piston or seals are worn out.
Mini Pump vs. Other Bike Pumps
Mini pumps are just one type of bike pump. Here’s a quick comparison to other options:
| Pump Type | Pros | Cons | Best For |
|---|---|---|---|
| Mini Pump | Portable, lightweight | Less efficient, requires more effort | On-the-go repairs |
| Floor Pump | Efficient, easy to use | Not portable | Home use |
| CO2 Inflator | Fast inflation | Requires cartridges, can be wasteful | Quick repairs, racing |
Alternative Inflation Methods
Sometimes, a mini pump might not be the best option. Here are a few alternatives:
- CO2 Inflators: These use compressed CO2 cartridges to quickly inflate tires. They are great for fast repairs but require you to carry cartridges.
- Floor Pumps: If you’re at home or near your car, a floor pump is much more efficient.
- Bike Shops: Most bike shops offer free air if you’re in a pinch.
FAQ: Common Questions About Mini Pumps
Let’s tackle some frequently asked questions to clear up any remaining doubts.
What is the ideal tire pressure for my bike?
The ideal tire pressure is usually printed on the sidewall of your tire. It’s typically given as a range (e.g., 80-130 PSI). Use a tire pressure gauge to ensure you’re within this range.
Can I use a mini pump for tubeless tires?
Yes, you can, but it might be challenging. Tubeless tires often require a quick burst of air to seat the bead properly. A mini pump may not provide enough volume quickly enough. A CO2 inflator or a floor pump with a rapid inflation chamber is often more effective.
How often should I check my tire pressure?
It’s a good idea to check your tire pressure before each ride, especially if you haven’t ridden in a few days. Tires can slowly lose air over time.
What do I do if my mini pump doesn’t fit my valve?
Some mini pumps come with adapters for different valve types. Check if your pump has an adapter and use it accordingly. If not, you may need to purchase a separate adapter.
Is it possible to over-inflate my tires with a mini pump?
Yes, it is. Over-inflating your tires can lead to a blowout, which can be dangerous. Always monitor the tire pressure while pumping and stay within the recommended range.
Can I use a mini pump on any type of bike?
Yes, mini pumps are versatile and can be used on most types of bikes, including road bikes, mountain bikes, and hybrids. Just ensure the pump is compatible with your bike’s valve type.
How do I know if my tire is properly inflated with a mini pump?
The best way to know is to use a tire pressure gauge. However, if you don’t have one, you can squeeze the tire. It should feel firm and have minimal give. Avoid riding on under-inflated tires, as this can lead to pinch flats and decreased efficiency.
Conclusion
Pumping a bike tire with a mini pump might seem daunting at first, but with the right technique and a little practice, you can master it. Remember to identify your valve type, secure the pump head properly, use full strokes, and monitor your tire pressure. With these tips, you’ll be well-prepared to handle flat tires on the road, ensuring a smooth and enjoyable ride.
Keep your mini pump in good condition, and don’t hesitate to explore alternative inflation methods if needed. Happy cycling!


