
How to Use a Bike Floor Pump: Easy Pro Tips
Have you ever ridden your bike and felt the tires were flat? It is hard to pedal with low tires. You might wonder how to use a bike floor pump. A floor pump helps you fill your tires with air. This makes your bike ride smooth and easy. Let’s learn about bike floor pumps!
Have you seen your parents use a bike pump? Maybe you thought it looked tricky. But it is not hard once you know the steps. We will show you how to use a pump. You will be able to pump your own tires. This will keep your bike ready for fun rides.
Learning about a bike floor pump is cool. It is like having a magic tool for your bike. This tool keeps your tires full. Full tires make biking more fun. Are you ready to learn how to use this tool? Let’s get started and explore the world of bike pumps!
Key Takeaways
- Using a bike floor pump keeps your tires properly inflated for safe rides.
- Make sure the pump head fits your bike’s valve (Presta or Schrader).
- Lock the pump head onto the valve stem to prevent air leaks while pumping.
- Pump until you reach the recommended PSI (pounds per square inch) on the tire.
- Knowing how to use a bike floor pump means fewer flat tires and more fun!
Understanding Your Bike’s Valve Type

Before you learn how to use a bike floor pump, know your valve. Bikes have two main valve types. These are Schrader and Presta valves. Schrader valves are like car tire valves. They are wider and have a pin in the center. Presta valves are thinner and have a lock nut. Look at your tire to see which valve you have. Knowing this helps you pick the right pump. Some pumps work with both valve types. Others need an adapter. Using the wrong pump head will not work. It can even damage the valve. So, check your valve type first. This small step makes pumping much easier. It also keeps your tires in good shape. It is an important part of bike care.
- Schrader valves are wider and have a center pin.
- Presta valves are thin and have a lock nut.
- Some pumps work with both valve types.
- Using the wrong pump can damage the valve.
- Always check your valve type first.
Imagine you are about to bake cookies. You need to know if you have sugar or salt. Using salt instead of sugar would ruin the cookies. Knowing your bike valve is similar. It helps you get the right pump head. This makes sure you can pump air into your tires. It keeps your bike ready for fun. Always double-check your valve type. This simple step saves time and trouble. It also helps you enjoy your bike rides more. Taking care of your bike means knowing its parts. It means understanding how they work together. Learning about valves is part of being a good bike owner.
Why Valve Type Matters
Why does your valve type matter so much? It is all about getting a good connection. A good connection lets air flow into the tire. A bad connection lets air leak out. Schrader valves need a wider opening. Presta valves need a smaller one. If you try to use a Schrader pump on a Presta valve, it will not work. The pump head will not fit right. You will end up wasting your time and energy. You might even damage the valve. That is why knowing your valve type is so important. It helps you get the right pump head. It makes pumping your tires quick and easy. It also prevents damage to your bike.
How to Identify Valve Types
Is it hard to tell the difference between valves? Not at all! Schrader valves are like the ones on car tires. They are short and stout. Presta valves are longer and thinner. They also have a small nut on top. This nut needs to be opened before you pump. Look closely at your bike tires. Which type do you see? Once you know, you can pick the right pump. You can also get the right adapter if needed. Knowing how to identify valve types is a useful skill. It helps you take care of your bike. It also makes you a more confident bike rider.
Adapters for Different Valves
What if your pump does not fit your valve? Do not worry! Adapters can help. An adapter lets you use a Schrader pump on a Presta valve. It is a small piece that screws onto the Presta valve. Then you can use the Schrader pump as normal. Adapters are easy to find at bike shops. They are also cheap. Keeping an adapter handy is a good idea. It lets you help friends with different valve types. It also makes sure you can always pump your tires. Adapters are a simple solution to a common problem. They make bike maintenance easier for everyone.
Fun Fact or Stat: Most mountain bikes use Presta valves for better performance at high pressures.
Connecting the Pump Head Securely
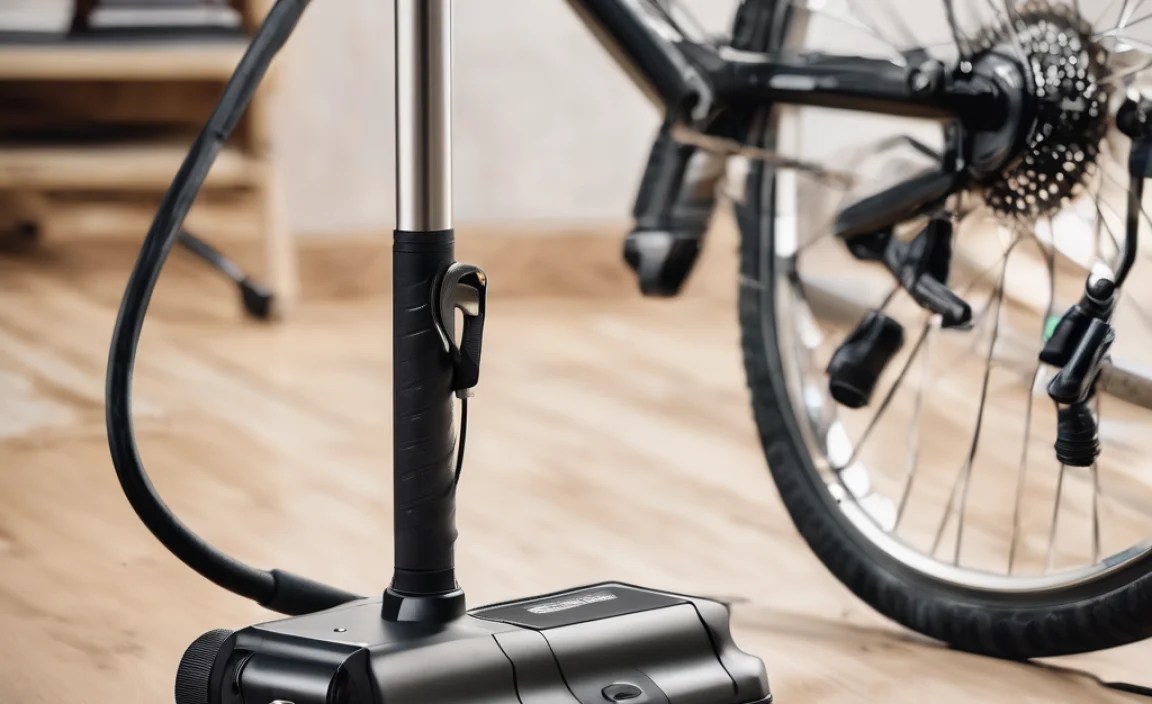
Now that you know your valve, let’s connect the pump head. This step is key to how to use a bike floor pump. First, remove the valve cap. Next, place the pump head over the valve. Make sure it goes straight on. For Schrader valves, push the pump head firmly. Then flip the lever to lock it. For Presta valves, first, unscrew the small nut. Then push the pump head on. Flip the lever to lock it. If the pump head is not locked, air will leak. You will hear a hissing sound. This means you need to adjust the connection. A secure connection is important for easy pumping. It also helps you get the right air pressure.
- Remove the valve cap before starting.
- Place the pump head straight onto the valve.
- Lock the lever to create a tight seal.
- Listen for hissing sounds that mean leaks.
- A secure connection makes pumping easier.
Imagine you are connecting a garden hose. If the hose is not on tight, water sprays everywhere. Connecting the pump head is the same. If it is not secure, air leaks out. This makes it hard to pump up the tire. It also wastes your energy. That is why locking the pump head is so important. It creates a tight seal. This seal keeps the air going into the tire. It also helps you reach the right pressure. Taking the time to connect the pump head right is worth it. It makes pumping easier and more effective.
Locking Mechanisms Explained
What is the deal with those levers on pump heads? They are part of the locking mechanism. This mechanism holds the pump head tight to the valve. When you flip the lever, it clamps down. This creates a seal that stops air from leaking. Different pumps have different levers. Some are easier to use than others. Practice with your pump to get used to the lever. Make sure it is locked tight before you start pumping. A good locking mechanism makes a big difference. It helps you pump your tires quickly and easily.
Troubleshooting Leaks
Uh oh, you hear hissing! That means air is leaking. What should you do? First, check the pump head connection. Make sure the lever is locked. If it is, try pushing the pump head on harder. Sometimes it takes a little extra pressure. If it still leaks, take the pump head off. Look at the valve. Is it damaged? If not, try again. Make sure the pump head is straight. Sometimes a little adjustment is all it takes. Troubleshooting leaks can be frustrating. But with a little patience, you can fix it.
Maintaining Your Pump Head
Did you know you need to take care of your pump head? Over time, the rubber inside can wear out. This can cause leaks. To keep your pump head in good shape, clean it. Use a damp cloth to wipe off dirt. Also, check the rubber parts. If they look cracked or worn, replace them. You can buy replacement parts at bike shops. Taking care of your pump head will make it last longer. It will also help you pump your tires more easily. A little maintenance goes a long way.
Fun Fact or Stat: A poorly connected pump head can waste up to 30% of your pumping effort due to air leaks!
Pumping Air: The Right Technique

Now for the fun part: pumping air! This is where you see how to use a bike floor pump in action. Stand with your feet on the pump’s base. This keeps the pump steady. Grip the handle firmly. Then, push down on the handle. Use your body weight to help. You should feel air going into the tire. Watch the gauge on the pump. This tells you how much air is in the tire. Keep pumping until you reach the right pressure. The pressure is measured in PSI (pounds per square inch). Check the side of your tire for the right PSI. Do not over-inflate. This can cause the tire to burst. Pumping takes a little practice. But soon you will get the hang of it.
| Tire Type | Recommended PSI (approximate) | Why This PSI? |
|---|---|---|
| Road Bike Tires | 80-130 PSI | Lower rolling resistance for speed. |
| Mountain Bike Tires | 25-35 PSI | Better grip and comfort on trails. |
| Hybrid Bike Tires | 40-70 PSI | A balance of speed and comfort. |
| Kids’ Bike Tires | 30-50 PSI | Depends on tire size; check sidewall. |
- Stand with your feet on the pump’s base.
- Grip the handle firmly and push down.
- Use your body weight to help pump.
- Watch the gauge to check the pressure.
- Do not over-inflate the tire.
Think about blowing up a balloon. You need to push air into it. Pumping a bike tire is similar. You push air into the tire using the pump. The pump has a handle that you push down. This pushes air through the hose. The hose connects to the tire valve. The air goes into the tire. The tire gets harder as it fills up. You need to stop when the tire is full enough. The gauge on the pump helps you know when to stop. It shows you how much air is in the tire. Pumping takes a little effort. But it is worth it to have a properly inflated tire.
Finding the Right PSI
How do you know what PSI is right for your tire? Look at the side of the tire. There should be a range of numbers. For example, it might say “40-65 PSI.” This means the tire can handle between 40 and 65 PSI. Choose a number in that range. If you ride on smooth roads, use a higher number. This will make your bike faster. If you ride on bumpy trails, use a lower number. This will give you more comfort. Experiment to find what works best for you. Remember, it is better to under-inflate than over-inflate.
Using Your Body Weight
Pumping can be tiring. But there is a trick to make it easier. Use your body weight! Instead of just using your arms, lean into the pump. Push down with your whole body. This will give you more power. It will also save your arms from getting tired. Practice using your body weight to pump. You will be surprised how much easier it is. It is like using a seesaw. Your weight helps you lift the other side.
Avoiding Over-Inflation
What happens if you put too much air in the tire? The tire can burst! This is dangerous. It can also damage your bike. That is why it is important to watch the gauge. Stop pumping when you reach the maximum PSI. If you accidentally over-inflate, let some air out. Use the small button on the pump head. Press it to release air. Check the gauge again. Make sure you are in the right range. Avoiding over-inflation keeps you safe. It also protects your tires.
Fun Fact or Stat: Properly inflated tires can improve your cycling efficiency by up to 10%!
Checking Tire Pressure After Pumping
After pumping, always check the tire pressure. This is an important part of how to use a bike floor pump correctly. Use a tire pressure gauge. These gauges are small and easy to use. Press the gauge onto the valve. It will give you a reading. Compare the reading to the recommended PSI. If it is too low, add more air. If it is too high, let some air out. Checking the pressure makes sure your tires are just right. This helps you ride safely and comfortably. It also helps your tires last longer. Make checking tire pressure a habit. It is a simple step that makes a big difference.
- Use a tire pressure gauge to check pressure.
- Press the gauge onto the valve for a reading.
- Compare the reading to the recommended PSI.
- Adjust the pressure as needed.
- Check pressure regularly for safe rides.
Imagine you are baking a cake. You check the oven temperature. This makes sure the cake cooks right. Checking tire pressure is like checking the oven. It makes sure your tires are ready for riding. A tire pressure gauge is like a thermometer for your tires. It tells you how much air is inside. If the pressure is too low, the ride will be bumpy. If it is too high, the tire could burst. Checking the pressure helps you avoid these problems. It keeps your bike in good shape. It also makes your rides more fun.
Using a Tire Pressure Gauge
How do you use a tire pressure gauge? It is easy! First, find the valve on your tire. Remove the valve cap. Then, press the gauge onto the valve. Make sure it is on tight. The gauge will show you the pressure. Some gauges have a needle that moves. Others have a digital display. Read the number on the gauge. This is the PSI of your tire. Compare it to the recommended PSI. Then, add or release air as needed. Using a tire pressure gauge is a simple way to keep your tires in good shape.
Why Accurate Pressure Matters
Why is accurate tire pressure so important? It affects how your bike rides. If the pressure is too low, the tire will be soft. This makes it harder to pedal. It also makes the bike feel slow. If the pressure is too high, the tire will be hard. This makes the ride bumpy. It also increases the risk of a flat tire. Accurate pressure gives you the best of both worlds. It makes the bike easy to pedal. It also makes the ride comfortable. It is worth taking the time to get the pressure right.
Digital vs. Analog Gauges
What kind of tire pressure gauge should you use? There are two main types: digital and analog. Digital gauges show the pressure on a screen. They are easy to read. They are also very accurate. Analog gauges have a needle that moves. They are less expensive. They can also be accurate. The best gauge is the one you find easiest to use. Try both types to see which you prefer. No matter which you choose, make sure it is reliable.
Fun Fact or Stat: Maintaining proper tire pressure can extend the life of your tires by up to 20%!
Proper Storage of Your Bike Pump

Taking care of your bike pump is important. This helps it last longer. It also makes sure it is ready when you need it. Proper storage is part of this. Keep your pump in a dry place. This prevents rust and damage. Do not leave it in the sun. The sun can damage the plastic and rubber parts. Store it in a garage or shed. You can also hang it on a wall. This keeps it out of the way. When you store your pump right, it will be ready for your next bike ride. This is a simple way to keep your bike in good shape. It also saves you money in the long run.
- Store the pump in a dry place.
- Avoid storing it in direct sunlight.
- Hang the pump on a wall to save space.
- Protect it from extreme temperatures.
- Regularly check for damage or wear.
Imagine you have a favorite toy. You want to keep it safe. You put it away in a special place. This protects it from getting broken. Storing your bike pump is the same. You want to keep it safe from damage. A dry place keeps it from rusting. The sun can make the plastic crack. Storing it in a good place helps it last longer. It also means it will be ready when you need it. Taking care of your things shows you value them. It also helps you save money by not having to replace them.
Protecting from the Elements
The weather can be hard on your bike pump. Rain can cause rust. Sun can cause cracking. Extreme temperatures can damage the seals. To protect your pump, store it indoors. A garage, shed, or even a closet works well. If you must store it outside, cover it. Use a tarp or a plastic bag. This will shield it from the worst of the weather. Remember, a little protection goes a long way. It helps your pump stay in good shape for years to come.
Preventing Rust and Corrosion
Rust is the enemy of metal. It can weaken your pump. It can also make it hard to use. To prevent rust, keep your pump dry. Wipe it down after each use. If you live in a humid area, use a rust inhibitor. This is a spray that protects metal from rust. You can find it at hardware stores. Apply it to the metal parts of your pump. This will keep them looking new. It will also help your pump work smoothly.
Organizing Your Storage Space
Where should you store your bike pump? It depends on your space. If you have a garage, you can hang it on the wall. Use hooks or a special pump holder. If you have a shed, you can store it on a shelf. If you live in an apartment, use a closet. You can also store it under your bed. The key is to keep it out of the way. You do not want to trip over it. You also want to be able to find it easily. A little organization makes a big difference.
Fun Fact or Stat: Storing your bike pump indoors can increase its lifespan by up to 50%!
Maintaining Your Bike Floor Pump
Just like your bike, your floor pump needs care. This will help it work well for a long time. Regular maintenance is important. Check the hose for cracks. Make sure the pump head is clean. Lubricate the moving parts. This keeps them working smoothly. If you notice any problems, fix them right away. Do not wait until the pump breaks down. A little maintenance can prevent big problems. It also saves you money. A well-maintained pump makes how to use a bike floor pump easier. It also makes pumping more efficient.
- Check the hose for cracks regularly.
- Clean the pump head after each use.
- Lubricate moving parts to keep them smooth.
- Fix any problems as soon as you notice them.
- Store the pump properly to prevent damage.
Imagine you have a pet. You need to feed it and give it water. You also need to take it to the vet. This keeps it healthy and happy. Taking care of your bike pump is similar. You need to clean it and lubricate it. You also need to fix any problems. This keeps it working well. A well-maintained pump is a reliable tool. It is always ready when you need it. Taking care of your things shows responsibility. It also helps you get the most out of them.
Cleaning the Pump Head
The pump head can get dirty. Dirt and grime can clog it up. This can make it hard to connect to the valve. To clean the pump head, use a damp cloth. Wipe off any dirt or grime. You can also use a small brush. This helps you get into the small spaces. Be careful not to damage the rubber parts. After cleaning, let the pump head dry. A clean pump head works better. It also lasts longer.
Lubricating Moving Parts
The moving parts of your pump need lubrication. This keeps them working smoothly. Use a light oil or grease. Apply it to the piston and other moving parts. Work the pump handle to distribute the lubricant. Do this regularly. It will prevent squeaking and stiffness. It will also make pumping easier. A well-lubricated pump is a pleasure to use.
Replacing Worn Parts
Over time, some parts of your pump may wear out. The hose can crack. The pump head can leak. The piston can become loose. When this happens, replace the worn parts. You can buy replacement parts at bike shops. Replacing worn parts is cheaper than buying a new pump. It also extends the life of your pump. A well-maintained pump is a valuable tool. It is worth taking the time to care for it.
Fun Fact or Stat: Regular maintenance can extend the life of your bike floor pump by up to 3 years!
Troubleshooting Common Pump Problems
Sometimes, your bike pump might not work right. Knowing how to use a bike floor pump also means knowing how to fix it. You might have trouble connecting the pump head. You might have air leaks. The pump might not build pressure. Do not worry. These problems are often easy to fix. First, check the connection. Make sure the pump head is locked. Next, check the hose for leaks. If the pump is not building pressure, lubricate the piston. If you still have problems, take the pump to a bike shop. They can help you diagnose and fix the problem. With a little troubleshooting, you can get your pump working again.
- Check the pump head connection for leaks.
- Inspect the hose for cracks or damage.
- Lubricate the piston if the pump is stiff.
- Make sure the valve is not clogged.
- Take the pump to a shop for major repairs.
Imagine you are playing a video game. You run into a problem. You do not give up. You try different things until you solve it. Troubleshooting your bike pump is similar. You might run into a problem. But you do not give up. You try different solutions until you fix it. Maybe the pump head is not connecting right. You try adjusting it. Maybe there is a leak in the hose. You try patching it. With a little effort, you can often solve the problem. This saves you money and keeps your pump working.
Difficulty Connecting the Pump Head
Is it hard to connect the pump head? This is a common problem. First, make sure you are using the right adapter. Schrader valves need a different adapter than Presta valves. Next, make sure the valve is clean. Dirt can prevent a good connection. Finally, make sure the pump head is locked. The lever should be flipped all the way. If you are still having trouble, try a different pump head. Some pump heads are easier to use than others. With a little patience, you will find a solution.
Air Leaks and Loss of Pressure
Are you losing air while pumping? This can be frustrating. First, check the pump head connection. Make sure it is tight. Next, check the hose for leaks. Small cracks can cause air to escape. If you find a leak, try patching it with tape. If the leak is large, replace the hose. Finally, check the valve. A damaged valve can also cause leaks. If the valve is damaged, replace it. Stopping air leaks makes pumping much easier.
Pump Not Building Pressure
Is your pump not building pressure? This means the air is not going into the tire. First, make sure the pump head is connected. Next, check the piston. It might need lubrication. Apply a light oil or grease. Work the pump handle to distribute the lubricant. If the piston is damaged, replace it. Finally, check the check valve. This valve prevents air from flowing backwards. If it is stuck, clean it or replace it. Getting your pump to build pressure makes it useful again.
Fun Fact or Stat: Over 70% of common bike pump issues can be resolved with simple troubleshooting steps!
Summary
Learning how to use a bike floor pump is a great skill. First, know your valve type: Schrader or Presta. Then, connect the pump head securely. Make sure it locks tightly to avoid leaks. Next, pump air using your body weight. Watch the gauge to reach the right PSI. Always check the tire pressure after pumping. Store your pump in a dry place to prevent damage. Regular maintenance keeps your pump working well. This includes cleaning and lubricating parts. With these steps, you can keep your tires inflated. You’ll also enjoy smooth, safe bike rides.
Conclusion
Using a bike floor pump is easy. You can keep your tires inflated. This makes your bike rides fun and safe. Remember to check your tire pressure often. This helps you avoid flats. Knowing how to use a bike floor pump empowers you. Now you can take care of your bike. Enjoy your rides!
Frequently Asked Questions
Question No 1: What is PSI and why does it matter when using a bike floor pump?
Answer: PSI stands for pounds per square inch. It measures the amount of air pressure inside your bike tire. The right PSI is important for several reasons. First, it affects how your bike rides. Too little PSI makes it harder to pedal. Too much PSI makes the ride bumpy. Second, it affects your safety. The correct PSI helps prevent flat tires. It also gives you better control of your bike. Check your tire’s sidewall for the recommended PSI range. Then, use your bike floor pump to reach that pressure. Always use a tire pressure gauge to ensure accuracy. Knowing the right PSI is key to a good bike ride.
Question No 2: How often should I check and inflate my bike tires using a bike floor pump?
Answer: You should check your bike tires before every ride. Even if they look okay, they can lose air over time. Use your bike floor pump to add air as needed. This will keep your tires at the right pressure. If you ride your bike every day, check the tires daily. If you ride less often, check them before each ride. Also, check them after any significant change in temperature. Temperature affects tire pressure. Regular checks and inflation keep your tires in good shape. They also make your rides safer and more enjoyable. Make it a habit to check your tires before you ride.
Question No 3: Can I use a car tire pump to inflate my bike tires?
Answer: It is not recommended to use a car tire pump on your bike tires. Car tire pumps often deliver too much air too quickly. This can easily over-inflate your bike tires. Over-inflation can cause the tire to burst. Bike floor pumps are designed to deliver air more slowly and precisely. They also have gauges that show the PSI. If you must use a car tire pump, be very careful. Use short bursts of air. Check the pressure frequently with a tire pressure gauge. It is always better to use a bike floor pump if possible. This is the safest and most effective way to inflate your bike tires.
Question No 4: What should I do if my bike tire keeps losing air, even after using a bike floor pump?
Answer: If your bike tire keeps losing air, there might be a leak. First, check the valve. Make sure it is not damaged or loose. Tighten the valve core if needed. Next, check the tire for punctures. Look for small holes or cuts. You can also listen for hissing sounds. If you find a puncture, you need to repair it. You can use a patch kit or replace the inner tube. If you cannot find a puncture, the tire might be seeping air through the sidewall. In this case, you need to replace the tire. Addressing leaks promptly keeps your tires properly inflated. It also prevents further damage.
Question No 5: How do I know if I’m using the right amount of force when using a bike floor pump?
Answer: Using the right amount of force comes with practice. You should feel resistance as you push down on the pump handle. This means air is flowing into the tire. Use your body weight to help. This makes pumping easier and more efficient. Watch the gauge on the pump. It will show you how much air is going into the tire. If the gauge is not moving, check the connection. Make sure the pump head is locked onto the valve. If it is too hard to push down, you might be over-inflating the tire. Stop pumping and check the pressure. With practice, you will get a feel for the right amount of force.
Question No 6: Can I use the same bike floor pump for different types of bikes (e.g., road bike, mountain bike)?
Answer: Yes, you can often use the same bike floor pump for different types of bikes. However, you need to make sure the pump head is compatible with the valve types on each bike. Some pumps have dual heads that work with both Schrader and Presta valves. Others require you to switch adapters. Road bikes typically use Presta valves. Mountain bikes often use Presta valves as well, but some use Schrader valves. Check the valve type on each bike. Then, make sure your pump is set up correctly. You also need to adjust the PSI for each type of bike. Road bikes need higher PSI than mountain bikes. Adjusting the PSI ensures safe and efficient rides on all your bikes.


