
CO2 Inflator Kit Components Explained: The Smart Guide
Have you ever seen a flat bike tire? It can ruin your ride! A CO2 inflator kit can help. It fills your tire fast. But what are the parts inside? Let’s get the CO2 inflator kit components explained so you know!
These kits are small and easy to carry. They use CO2 gas to pump up tires. Knowing the parts helps you use it right. Are you ready to learn about your CO2 inflator kit components explained? Let’s explore each piece!
Key Takeaways
* A CO2 inflator kit has a CO2 cartridge, inflator head, and sometimes a sleeve.
* The inflator head controls the CO2 flow into your tire.
* CO2 cartridges come in different sizes. Choose the right one for your tire.
* Understanding CO2 inflator kit components explained helps you fix flats quickly.
* Always practice using your CO2 inflator kit before you need it on a ride.
CO2 Inflator Kit Components Explained Simply
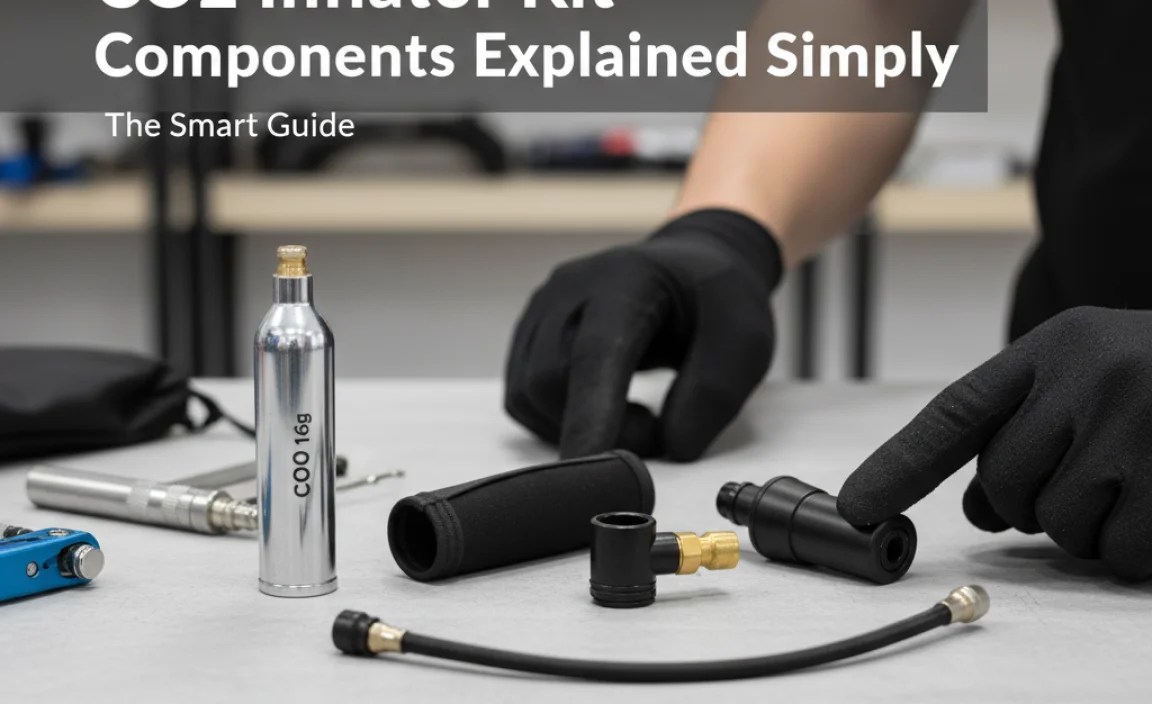
A CO2 inflator kit is like a mini air pump. It’s super handy when you get a flat tire. The main parts are the CO2 cartridge, the inflator head, and a protective sleeve. The CO2 cartridge holds the compressed gas. The inflator head lets you control the flow of gas into your tire. The sleeve keeps your hands from getting too cold when the CO2 is released. Some kits also include extra stuff. These could be tire levers or a small multi-tool. Knowing each part helps you fix your tire fast. It also makes sure you do it safely. Have you ever felt stuck with a flat far from home? A CO2 inflator kit can be a lifesaver!
* CO2 cartridge holds the compressed gas.
* The inflator head controls the gas flow.
* A sleeve protects your hands from the cold.
* Some kits have tire levers.
* Multi-tools can also be included.
Think of the CO2 inflator kit as a quick fix for flat tires. It is not a replacement for a regular pump. A regular pump lets you add a little air at a time. This helps you get the tire pressure just right. A CO2 inflator dumps all the air in at once. This can be good in a hurry. But it can also be tricky to get the pressure perfect. Also, CO2 leaks out of tires faster than regular air. So, it is best to use a CO2 inflator to get you home. Then, use a regular pump to fill the tire properly. Understanding the CO2 inflator kit components explained helps you use it well!
What is a CO2 Cartridge?
Have you ever seen a small metal tube filled with gas? That’s a CO2 cartridge! It holds compressed CO2 gas. This gas helps fill your tire quickly. CO2 cartridges come in different sizes. The size you need depends on your tire. Road bikes use smaller cartridges. Mountain bikes need bigger ones. Always check your tire size before buying a cartridge. Using the wrong size can be a problem. Too little gas, and your tire won’t fill. Too much gas, and you could damage the tire.
### What is an Inflator Head?
The inflator head is the part that controls the CO2 flow. It connects to the CO2 cartridge and the tire valve. Some inflator heads have a button or knob. This lets you control how fast the gas goes in. Others just release all the gas at once. Inflator heads come in different types. Some work with both Presta and Schrader valves. Others only work with one type. Make sure your inflator head matches your tire valves. Using the wrong one won’t work.
Why Use a Protective Sleeve?
When CO2 gas releases, it gets very cold. This can freeze your hands! A protective sleeve helps. It’s usually made of foam or rubber. The sleeve goes around the CO2 cartridge. This stops your hands from getting too cold. Some inflator kits come with a sleeve. If yours doesn’t, you can use a glove. Always protect your hands when using a CO2 inflator.
Fun Fact or Stat: The first CO2 cartridges were invented in the late 1800s for seltzer bottles!
How Different Sizes Affect CO2 Inflator Kits Explained
The size of the CO2 cartridge matters. Different tires need different amounts of CO2. Road bike tires are thin. They need less gas. Mountain bike tires are big. They need more gas. Cartridges are measured in grams. Common sizes are 12g, 16g, and 25g. Check your tire’s recommended pressure. This tells you how much CO2 you need. Using the right size helps you inflate your tire properly. It also prevents damage. It is also worth considering carrying a few smaller cartridges rather than a single large one. That way, you have some backup.
| Cartridge Size | Best For | Approximate Tire Pressure (Road Bike) | Approximate Tire Pressure (Mountain Bike) |
| :————- | :—————- | :————————————- | :—————————————– |
| 12g | Road Bike | 90-100 PSI | 20-25 PSI |
| 16g | Road Bike/Gravel | 110-120 PSI | 25-30 PSI |
| 20g | Mountain Bike | 100-110 PSI | 30-35 PSI |
| 25g | Large MTB/Fatbike | 90-100 PSI | 35-40 PSI |
* Road bike tires need less CO2.
* Mountain bike tires need more CO2.
* Cartridges come in 12g, 16g, and 25g sizes.
* Check your tire’s recommended pressure.
* Use the right size cartridge for your tire.
Imagine you are blowing up a balloon. A small balloon needs less air. A big balloon needs more air. It’s the same with bike tires! If you use too little CO2, the tire will be flat. If you use too much, it could burst. Always check the numbers on your tire. They tell you the right pressure. Also, practice using the CO2 inflator at home. This way, you will know how to use it when you need it. Understanding how different sizes affect CO2 inflator kits explained keeps you safe!
What is Tire Pressure?
Tire pressure is how much air is in your tire. It’s measured in PSI. PSI means pounds per square inch. The right tire pressure makes riding easier. It also helps prevent flats. Check your tire’s sidewall for the recommended PSI. Use a pump with a gauge to measure the pressure.
How to Read Your Tire Sidewall?
Your tire sidewall has important information. It tells you the tire size and recommended pressure. Look for numbers like “700x25c” or “26×2.1”. These tell you the tire size. Also, look for “PSI” followed by a range of numbers. This tells you the recommended pressure. Always follow these guidelines.
Why Does Pressure Matter?
The right tire pressure makes a big difference. Too little pressure, and you could get a flat. Too much pressure, and the tire could burst. The right pressure makes your ride smoother. It also helps you go faster. Always check your tire pressure before each ride.
Fun Fact or Stat: Tire pressure is often lower in the winter because cold air reduces pressure!
Using Your CO2 Inflator Kit Components Explained Safely
Safety is very important when using a CO2 inflator kit. CO2 gas is very cold when it releases. Always wear gloves or use a sleeve. This protects your hands from frostbite. Never point the inflator head at yourself or others. The gas comes out very fast. It could hurt someone. Always follow the instructions that come with your kit. Different kits might have different steps. Also, dispose of the used CO2 cartridge properly. Do not just throw it on the ground. Recycle it if you can. A responsible cyclist is a safe cyclist.
* Wear gloves or use a sleeve.
* Never point the inflator at anyone.
* Follow the kit instructions.
* Dispose of used cartridges properly.
* Recycle cartridges when possible.
Imagine you are using a can of spray paint. You would not point it at your face. The same goes for a CO2 inflator. The gas comes out with force. It can hurt your eyes or skin. Always be careful and aware of your surroundings. Also, practice using the kit at home first. This way, you will be ready when you need it on the road. Understanding how to use your CO2 inflator kit components explained safely is key!
What is Frostbite?
Frostbite is when your skin freezes. It can happen very quickly with CO2 gas. The gas is extremely cold when it releases. This can freeze your skin in seconds. Symptoms of frostbite include numbness and pale skin. If you think you have frostbite, seek medical help.
How to Store CO2 Cartridges?
Store CO2 cartridges in a cool, dry place. Keep them away from heat and direct sunlight. Heat can cause the cartridges to leak or explode. Also, keep them out of reach of children. CO2 cartridges are not toys.
Can You Reuse CO2 Cartridges?
No, you cannot reuse CO2 cartridges. They are designed for single use only. Once you use a cartridge, it is empty. Trying to refill it can be dangerous. Always use a new cartridge each time.
Fun Fact or Stat: The temperature of CO2 gas releasing from a cartridge can reach -109.3 degrees Fahrenheit (-78.5 degrees Celsius)!
Step-by-Step Guide: CO2 Inflator Kit Components Explained

Using a CO2 inflator kit is easy. First, find the hole in your tire. Remove what caused it, like glass or a nail. Then, put in a new tube or patch the hole. Next, attach the inflator head to the CO2 cartridge. Follow the instructions on your kit. Then, connect the inflator head to your tire valve. Slowly release the CO2 gas. Watch the tire fill up. Be careful not to overfill it. Once the tire is firm, you are ready to ride. Always double-check the tire pressure with a gauge. This makes sure it’s just right.
* Remove the object from the tire.
* Install a new tube or patch the hole.
* Attach the inflator head to the cartridge.
* Connect the inflator to the tire valve.
* Release the CO2 gas slowly.
Imagine you are following a recipe. Each step is important. If you miss a step, the recipe might not work. It’s the same with a CO2 inflator. Follow each step carefully. Make sure everything is connected right. This will help you fill your tire quickly and safely. Also, practice at home before you need it on the road. This way, you will be a pro when you get a flat. Knowing the step-by-step guide: CO2 inflator kit components explained makes it easy!
Finding the Hole
Finding the hole is the first step. Look closely at the tire. Sometimes you can see the object that caused the flat. Other times, you need to look carefully. Spin the tire slowly and check for cuts or punctures.
Inserting a New Tube
If your tube is damaged, you need to replace it. Take the old tube out of the tire. Then, put in a new tube. Make sure the tube is seated properly in the tire. This prevents pinch flats.
Connecting the Inflator
Connecting the inflator correctly is key. Make sure the inflator head is securely attached to the cartridge. Then, connect it to the tire valve. Some inflators have a screw-on design. Others have a push-on design. Use the right one for your valve.
Fun Fact or Stat: Many professional cyclists use CO2 inflators during races to save time!
Common Mistakes When Using CO2 Inflator Kits Explained
People make mistakes when using CO2 inflator kits. One mistake is not using a sleeve or gloves. This can cause frostbite. Another mistake is overfilling the tire. This can cause the tire to burst. Also, some people forget to remove the object from the tire. This will cause another flat. Always double-check everything before you inflate the tire. Read the instructions carefully. Practice at home before you need it on the road. Knowing the common mistakes when using CO2 inflator kits explained will help you avoid them.
* Not using a sleeve or gloves.
* Overfilling the tire.
* Forgetting to remove the object.
* Not reading the instructions.
* Not practicing at home.
Imagine you are baking a cake. You forget to add sugar. The cake will not taste good. It’s the same with a CO2 inflator. If you forget a step, it might not work. Always take your time and be careful. Also, ask for help if you are not sure what to do. It’s better to be safe than sorry. Learning about common mistakes when using CO2 inflator kits explained can keep you safe and riding smoothly.
Why is Overfilling Bad?
Overfilling a tire can be dangerous. It can cause the tire to burst. This can lead to a crash. Always check the recommended pressure on your tire. Use a pump with a gauge to measure the pressure.
How to Avoid Frostbite?
Frostbite can happen quickly with CO2 gas. Always wear gloves or use a sleeve. This protects your hands from the cold. If you don’t have gloves, use a rag or piece of cloth.
What to Do After Inflating?
After inflating your tire, check the pressure. Use a pump with a gauge to make sure it’s right. Also, check the tire for any cuts or bulges. If you see anything unusual, do not ride the bike.
Fun Fact or Stat: The pressure in a CO2 cartridge can be over 800 PSI!
Maintaining Your CO2 Inflator Kit Components Explained
Taking care of your CO2 inflator kit is important. This will help it last longer. Check the inflator head for damage. Make sure it’s clean and free of dirt. Store the CO2 cartridges in a cool, dry place. Keep them away from heat and direct sunlight. Replace any damaged parts. Also, check the expiration date on the cartridges. Old cartridges might not work as well. A well-maintained kit is a reliable kit. It will be ready when you need it most.
* Check the inflator head for damage.
* Store cartridges in a cool, dry place.
* Replace damaged parts.
* Check the expiration date.
* Keep the kit clean.
Imagine you have a toy car. You need to clean it and oil the wheels. This will make it run smoothly. It’s the same with a CO2 inflator kit. Keep it clean and check the parts. This will make sure it works when you need it. Also, inspect your kit before each ride. This way, you will know if anything needs to be replaced. Understanding how to maintain your CO2 inflator kit components explained keeps you prepared!
How to Clean the Inflator Head?
Clean the inflator head with a dry cloth. Remove any dirt or debris. If it’s very dirty, use a little soap and water. Make sure to dry it completely before storing it.
What to Look for in Cartridges?
Check the cartridges for rust or damage. Do not use a cartridge that is rusty or dented. Also, check the expiration date. Old cartridges may not work properly.
Where to Store Your Kit?
Store your CO2 inflator kit in a safe place. Keep it out of reach of children. Also, keep it away from heat and direct sunlight. A good place to store it is in your bike bag or toolbox.
Fun Fact or Stat: CO2 cartridges have a shelf life of about 5 years if stored properly!
Choosing the Right CO2 Inflator Kit Components Explained
There are many CO2 inflator kits to choose from. Some are simple and easy to use. Others have more features. Think about what you need. Do you want a kit with a pressure gauge? Do you need one that works with both Presta and Schrader valves? Consider the size of your tires. This will help you choose the right size cartridges. Read reviews before you buy a kit. This will help you find one that is reliable. Choosing the right CO2 inflator kit components explained makes your rides safer and more fun.
* Consider your needs.
* Think about the features you want.
* Consider your tire size.
* Read reviews before buying.
* Choose a reliable kit.
Imagine you are buying a new bike. You would not just pick the first one you see. You would think about what kind of riding you will do. You would also read reviews. It’s the same with a CO2 inflator kit. Take your time and choose the right one for you. Also, ask your local bike shop for advice. They can help you find a kit that fits your needs. Learning how to choose the right CO2 inflator kit components explained sets you up for success.
What are Presta and Schrader Valves?
Presta and Schrader valves are two types of tire valves. Presta valves are thin and have a locking nut. Schrader valves are wider and look like car tire valves. Most road bikes use Presta valves. Mountain bikes often use Schrader valves.
Do You Need a Gauge?
A gauge measures the tire pressure. Some CO2 inflator kits have a gauge. This helps you avoid overfilling the tire. If you are not sure how much pressure to use, a gauge is helpful.
What About Extras?
Some CO2 inflator kits come with extras. These might include tire levers or a multi-tool. Tire levers help you remove the tire from the rim. A multi-tool has different tools for fixing your bike. These extras can be helpful, but they are not essential.
Fun Fact or Stat: Some high-end CO2 inflators have built-in pressure regulators for precise inflation!
Summary
CO2 inflator kits are very useful tools for cyclists. They help you fix flat tires quickly. Understanding the CO2 inflator kit components explained is key. The main parts are the CO2 cartridge, inflator head, and sleeve. The cartridges come in different sizes. Choose the right size for your tires. Always use a sleeve to protect your hands. Also, follow the instructions carefully. Practice at home before using it on the road. This will help you avoid mistakes. Keeping your kit maintained and knowing what you need will keep you safe and riding with confidence.
Conclusion
CO2 inflator kits are a must-have for any cyclist. They are small, lightweight, and easy to use. Understanding the CO2 inflator kit components explained will help you fix flats fast. Always be careful and follow the instructions. With a little practice, you will be a pro at fixing flats on the road. This will keep you riding and having fun!
Frequently Asked Questions
Question No 1: What are the main parts of a CO2 inflator kit?
Answer: The main parts of a CO2 inflator kit are the CO2 cartridge, the inflator head, and a protective sleeve. The CO2 cartridge holds the compressed gas. The inflator head lets you control the flow of gas into your tire. The sleeve keeps your hands from getting too cold. Knowing all the CO2 inflator kit components explained will keep you safe and prepared on your next ride!
Question No 2: How do I choose the right size CO2 cartridge?
Answer: Choose the right size CO2 cartridge based on your tire size. Road bike tires need smaller cartridges. Mountain bike tires need larger ones. Check your tire’s recommended pressure. This tells you how much CO2 you need. Using the right size helps you inflate your tire properly. It also prevents damage. You can find the correct cartridge based on the CO2 inflator kit components explained in the manual.
Question No 3: How do I use a CO2 inflator kit safely?
Answer: Always wear gloves or use a sleeve to protect your hands from frostbite. Never point the inflator head at yourself or others. Follow the instructions that come with your kit. Dispose of the used CO2 cartridge properly. Recycle it if you can. Always consider the CO2 inflator kit components explained when handling your inflator.
Question No 4: Can I reuse a CO2 cartridge?
Answer: No, you cannot reuse a CO2 cartridge. They are designed for single use only. Once you use a cartridge, it is empty. Trying to refill it can be dangerous. Always use a new cartridge each time you need to inflate your tire. To avoid issues, make sure you know the CO2 inflator kit components explained.
Question No 5: What should I do if I overfill my tire with a CO2 inflator?
Answer: If you overfill your tire, let some air out. Use a pump with a gauge to measure the pressure. Release some air until you reach the recommended pressure. Overfilling can cause the tire to burst. Also, be very cautious when dealing with CO2 inflator kit components explained, as they can be dangerous.
Question No 6: How do I store my CO2 inflator kit?
Answer: Store your CO2 inflator kit in a cool, dry place. Keep it away from heat and direct sunlight. Heat can cause the cartridges to leak or explode. Also, keep it out of reach of children. A good place to store it is in your bike bag or toolbox. Always remember to handle CO2 inflator kit components explained by the manufacturer carefully.


