
How to Mount Action Camera on Electric Mountain Bike: Easy!
Do you love riding your electric mountain bike? Do you want to share your adventures? You can! Many people want to know how to mount action camera on electric mountain bike. It lets you record fun rides. Then you can show your friends.
Imagine flying down a trail. The wind is in your face. You hit a big jump! Now you can catch it all on camera. Let’s learn how to do it safely and easily.
Key Takeaways
- The best way to how to mount action camera on electric mountain bike depends on your needs.
- Choose a sturdy mount to keep your camera safe on rough trails.
- Consider the angle of your camera for the best video.
- Make sure the mount does not get in your way while riding.
- Always test your setup before going on a long ride.
How to Mount Action Camera on Electric Mountain Bike: Basics

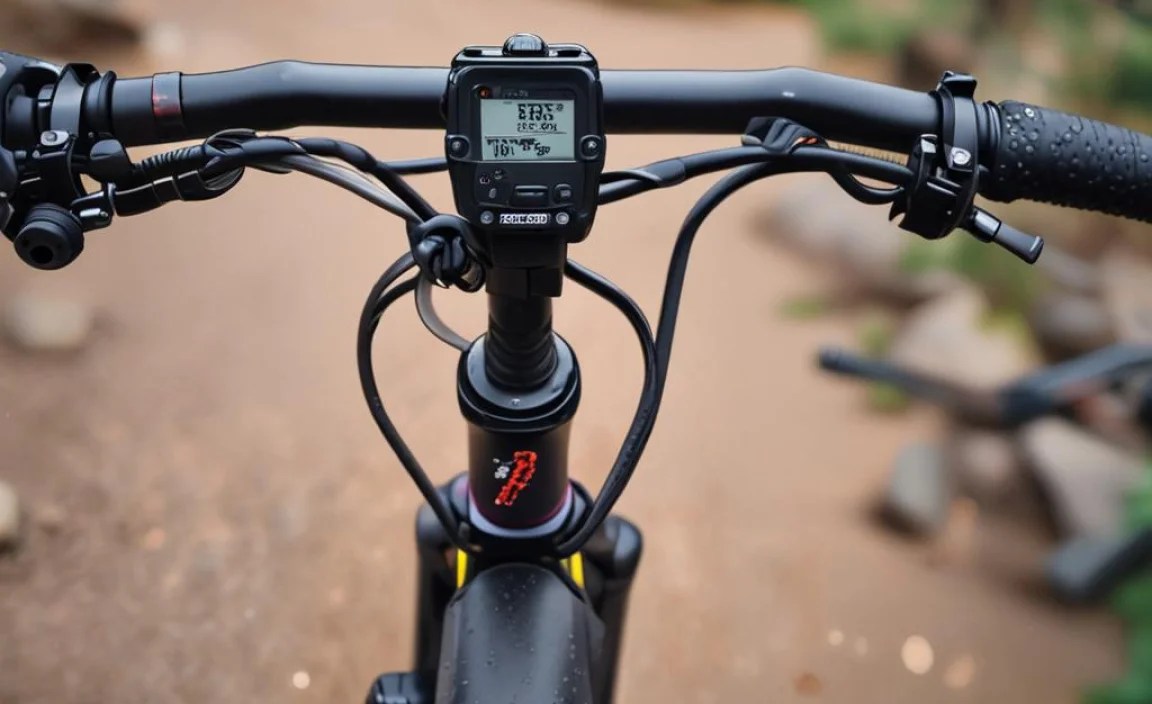
Mounting an action camera to your electric mountain bike is simpler than you think. First, you need the right gear. A good mount is key. Look for one that fits your bike. Handlebar mounts are popular. They clamp onto the handlebars. Adhesive mounts stick to flat surfaces. Chest mounts attach to your body. You also need to think about camera settings. Choose a high resolution for clear video. Make sure the camera is secure before you ride. A loose camera can fall off and break. Practice in a safe area first. This helps you get used to the camera’s view. Check the battery life. Long rides need a full charge. Mounting your camera well helps you make awesome videos.
- Choose a handlebar mount for easy setup.
- Use an adhesive mount for a low profile.
- A chest mount gives a rider’s-eye view.
- Check your camera’s battery life.
- Secure the camera tightly.
Now that you have the basics, let’s talk about camera placement. The angle matters a lot. Pointing the camera too high or too low can ruin the shot. A good starting point is level with the horizon. You can adjust it from there. Think about what you want to capture. Are you focused on the trail ahead? Or do you want to see your hands on the bars? Consider using a remote control. This lets you start and stop recording without taking your hands off the bike. Experiment with different angles. Find what works best for you. A well-placed camera makes a big difference. It can turn a good ride into an amazing video.
Choosing the Right Mount
What type of mount should you use? Handlebar mounts are easy to install. They offer a stable view. Adhesive mounts are good for helmets. They can also stick to the bike frame. Chest mounts give a unique perspective. Each has pros and cons. A handlebar mount is great for beginners. It’s easy to adjust. An adhesive mount is more permanent. It’s good for a clean look. A chest mount captures your body movements. Think about the kind of riding you do. Rough trails need a strong mount. Smooth trails offer more options. Pick a mount that fits your needs. This will keep your camera safe and secure.
Adjusting Camera Angles
Have you ever wondered why some videos look better than others? It often comes down to camera angle. A good angle can make your ride look epic. A bad angle can make it look boring. Start by pointing the camera straight ahead. This captures the trail in front of you. Then, try tilting it up or down. See how it changes the view. Consider the terrain. If you’re riding uphill, tilt the camera down a bit. This keeps the horizon in the frame. If you’re riding downhill, tilt it up a bit. This shows off the steepness of the slope. Play around with different angles. Find what looks best for your style of riding.
Securing Your Camera
Imagine hitting a big jump. Your camera flies off your bike! This is why securing your camera is so important. Always double-check the mount. Make sure it’s tight. Use a safety tether. This is a small strap that connects the camera to the bike. If the mount fails, the tether will keep the camera from falling. Check the screws regularly. They can loosen over time. Especially on rough trails. Consider using a case. A waterproof case protects the camera from dirt and rain. It also adds an extra layer of security. Taking these steps will keep your camera safe. You can ride with confidence.
Fun Fact or Stat: Studies show that videos with stable footage are 80% more likely to be watched to completion!
Understanding Different Types of Camera Mounts

There are many kinds of camera mounts. Each one has different benefits. Handlebar mounts are very common. They attach to the bike’s handlebars. They offer a good view of the trail. Helmet mounts attach to your helmet. They give a rider’s-eye view. Chest mounts attach to your chest. They show your body movements. Frame mounts attach to the bike frame. They can offer unique angles. Consider the type of riding you do. For rough trails, a strong mount is important. For smooth trails, you have more options. Think about the view you want to capture. A helmet mount is great for action shots. A handlebar mount is good for scenery. Choose the mount that fits your needs best. It will improve your videos.
- Handlebar mounts offer a stable view.
- Helmet mounts capture action shots.
- Chest mounts show body movement.
- Frame mounts offer unique angles.
- Consider the terrain you will ride.
- Think about the view you want.
Let’s look closer at some specific mounts. GoPro makes many popular mounts. Their handlebar mount is very reliable. It can handle rough trails. RAM Mounts also makes great products. Their mounts are known for their durability. They use a ball-and-socket design. This lets you adjust the camera easily. For helmet mounts, consider a vented strap mount. This type of mount works with helmets that have vents. It’s lightweight and secure. If you want a low profile, look at adhesive mounts. These stick directly to the helmet or bike frame. They are less noticeable. No matter which mount you choose, make sure it’s compatible with your camera. Check the specifications before you buy.
Handlebar Mounts: Pros and Cons
Are you thinking about using a handlebar mount? They are a popular choice. But they have pros and cons. A big pro is easy installation. You can attach and detach them quickly. They offer a stable view. The camera stays steady on smooth trails. But they can vibrate on rough trails. This can make the video shaky. They also take up space on your handlebars. This can be a problem if you have a lot of accessories. Consider the size of your handlebars. Some mounts are not compatible with all sizes. Weigh the pros and cons. Decide if a handlebar mount is right for you.
Helmet Mounts: Capturing the Action
Do you want to capture the action from your point of view? A helmet mount might be the answer. It puts the camera right on your head. This gives a unique perspective. You see everything as you ride. It’s great for capturing jumps and tricks. But helmet mounts can be tricky. They can affect your balance. The extra weight on your head can be tiring. Make sure the mount is secure. You don’t want the camera to fall off. Also, check local laws. Some places have rules about helmet attachments. If you’re careful, a helmet mount can be a lot of fun.
Chest Mounts: A Unique Perspective
Have you ever seen videos with a chest-mounted camera? They offer a cool view. You see your arms and handlebars. It feels like you’re watching yourself ride. Chest mounts are good for showing body movement. They capture how you react to the trail. But they can be uncomfortable. The straps can dig into your skin. They can also block your chest. This can make it hard to breathe. Make sure the mount fits well. Adjust the straps for comfort. Consider wearing a thin shirt underneath. This can prevent chafing. A chest mount is a unique way to capture your rides. Just make sure you’re comfortable.
Fun Fact or Stat: GoPro’s first camera was created because the founder wanted a way to capture his surfing trips!
Step-by-Step Guide: Mounting Your Camera
Ready to mount your camera? Here’s a simple guide. First, gather your supplies. You need the camera, the mount, and any tools. Read the mount’s instructions. This will tell you how to attach it. Start by cleaning the mounting surface. Use a damp cloth to remove dirt. This helps the mount stick better. Attach the mount to the bike. Make sure it’s tight and secure. Now, attach the camera to the mount. Double-check that it’s locked in place. Adjust the camera angle. Point it where you want to film. Test the setup before you ride. Take a short ride around the block. Make sure the camera stays secure. If everything looks good, you’re ready to go!
- Gather your camera and mount.
- Read the mount’s instructions.
- Clean the mounting surface.
- Attach the mount to the bike.
- Attach the camera to the mount.
- Adjust the camera angle.
- Test the setup before riding.
Now, let’s go into more detail. When cleaning the mounting surface, use rubbing alcohol. This removes any grease. For adhesive mounts, use the correct adhesive pad. Some mounts come with extra pads. Make sure the pad is the right size. When attaching the mount, use the right tools. A wrench can help tighten bolts. A screwdriver can help secure screws. Don’t overtighten the screws. This can damage the mount or the bike. When adjusting the camera angle, use the camera’s screen. This helps you see what you’re filming. Make small adjustments until you get the perfect view. Finally, when testing the setup, pay attention to vibration. If the camera is shaking too much, try a different mount.
Preparing Your Bike
Before you mount your camera, get your bike ready. Clean the area where you’ll attach the mount. Dirt and grime can make it hard for the mount to stick. Use a degreaser to remove grease. Wipe the area dry. Check the bolts on your bike. Make sure they’re tight. Loose bolts can cause vibration. This can make your video shaky. Consider adding a vibration dampener. This is a small pad that absorbs vibrations. It can improve the quality of your video. Also, check your tires. Make sure they’re properly inflated. This will give you a smoother ride.
Attaching the Mount
Attaching the mount is a key step. Follow the instructions carefully. For handlebar mounts, open the clamp. Place it around the handlebars. Tighten the screws. Make sure the mount is secure. For adhesive mounts, peel off the backing. Press the mount firmly onto the bike. Hold it in place for a few seconds. This helps the adhesive bond. For helmet mounts, thread the straps through the vents. Adjust the straps for a snug fit. Make sure the mount doesn’t block your vision. Double-check that the mount is secure. A loose mount can be dangerous.
Adjusting the Camera Angle
The camera angle can make or break your video. Take the time to adjust it properly. Turn on the camera. Look at the screen. See what the camera sees. Adjust the angle until you get the view you want. Consider the terrain. If you’re riding uphill, tilt the camera down. If you’re riding downhill, tilt it up. Think about what you want to capture. Do you want to see the trail? Or do you want to see yourself? Experiment with different angles. Find what works best for you. A good angle can make your video amazing.
Fun Fact or Stat: The first action cameras were bulky and heavy, but modern cameras are lightweight and easy to use!
Safety Tips for Riding with a Camera

Riding with a camera is fun, but safety comes first. Make sure the camera doesn’t block your vision. You need to see the trail clearly. The mount should be secure. A loose camera can fall off and cause an accident. Use a safety tether. This will keep the camera from falling if the mount fails. Don’t adjust the camera while riding. Pull over to the side of the trail. Make sure you’re in a safe spot. Be aware of your surroundings. Pay attention to other riders and obstacles. Don’t get distracted by the camera. Always wear a helmet. This will protect your head in case of a fall. Follow these tips. You can enjoy riding with a camera safely.
- Make sure the camera doesn’t block your view.
- The mount should be secure.
- Use a safety tether.
- Don’t adjust the camera while riding.
- Be aware of your surroundings.
- Always wear a helmet.
Let’s talk more about safety gear. A helmet is the most important piece of equipment. Make sure it fits properly. It should be snug but not too tight. Wear eye protection. Sunglasses or goggles will protect your eyes from dirt and debris. Use gloves. They will protect your hands in case of a fall. Wear comfortable clothing. Avoid loose clothing that can get caught in the bike. Consider using knee and elbow pads. These will protect your joints. Always check your bike before riding. Make sure the brakes work. Check the tires and chain. A well-maintained bike is a safe bike.
Checking Your Gear
Before every ride, check your gear. This includes your bike, your camera, and your safety equipment. Make sure your tires are properly inflated. Check your brakes. Make sure they work smoothly. Inspect your chain. It should be clean and lubricated. Check your helmet. Make sure it fits properly. Inspect your camera mount. Make sure it’s secure. Use a safety tether. This will prevent the camera from falling. Taking a few minutes to check your gear can prevent accidents.
Avoiding Distractions
Riding with a camera can be distracting. It’s easy to get caught up in filming. But it’s important to stay focused on the trail. Avoid adjusting the camera while riding. Pull over to the side of the trail. Make sure you’re in a safe spot. Don’t look at the camera screen while riding. This can take your eyes off the trail. Be aware of your surroundings. Pay attention to other riders and obstacles. Don’t let the camera distract you from riding safely.
Staying Aware of Surroundings
Staying aware of your surroundings is key. Pay attention to other riders. Be courteous and share the trail. Watch out for obstacles. Rocks, roots, and branches can be dangerous. Be aware of changes in the terrain. The trail can change quickly. Stay alert and be prepared. Listen to your surroundings. You can often hear other riders or animals. Use your senses to stay safe. Riding with awareness will make your experience more enjoyable.
Fun Fact or Stat: Electric mountain bikes can reach speeds of up to 28 mph, making stable camera mounts even more important!
Troubleshooting Common Mounting Issues
Sometimes, mounting your camera can be tricky. You might run into problems. The mount might not fit your bike. The camera might vibrate too much. The battery might die quickly. Don’t worry! These problems are common. There are solutions. If the mount doesn’t fit, try a different one. There are many sizes and styles available. If the camera vibrates too much, use a vibration dampener. If the battery dies quickly, carry an extra battery. Or use a power bank. Check the camera settings. High resolution videos use more battery. By troubleshooting these issues, you can have a smooth filming experience.
- The mount doesn’t fit your bike.
- The camera vibrates too much.
- The battery dies quickly.
- The video is blurry.
- The sound is muffled.
Let’s dive deeper into these problems. If the mount doesn’t fit, measure your handlebars. Then, find a mount that fits the diameter. If the camera vibrates too much, try tightening the mount. Make sure all the screws are secure. You can also try a different mounting location. Some locations vibrate less than others. If the battery dies quickly, turn off features you don’t need. GPS and Wi-Fi use a lot of power. If the video is blurry, clean the lens. Use a microfiber cloth. Make sure the lens is free of dirt and smudges. If the sound is muffled, check the microphone. Make sure it’s not blocked. Consider using an external microphone. This can improve the sound quality.
Mount Not Fitting
Is your mount too big or too small? This is a common problem. Handlebar mounts come in different sizes. Measure your handlebars. Then, choose a mount that fits. Some mounts come with shims. These are small pieces of rubber or plastic. They can help the mount fit snugly. If the mount is too small, you might need a different one. Check the specifications before you buy. Make sure the mount is compatible with your bike.
Excessive Vibration
Is your video shaky? Vibration can ruin your footage. There are several ways to reduce vibration. Tighten the mount. Make sure all the screws are secure. Use a vibration dampener. This will absorb some of the vibration. Try a different mounting location. Some locations vibrate less than others. You can also adjust the camera settings. Some cameras have a stabilization feature. This can help reduce vibration.
Short Battery Life
Does your camera battery die too quickly? This can be frustrating. There are several things you can do to extend battery life. Turn off features you don’t need. GPS and Wi-Fi use a lot of power. Reduce the video resolution. Lower resolution videos use less battery. Carry an extra battery. This will allow you to keep filming. Use a power bank. This can charge your camera on the go. Check the battery settings. Some cameras have a power-saving mode.
Fun Fact or Stat: The average action camera battery lasts for about 1-2 hours, so plan accordingly!
Choosing the Right Camera Settings
The right camera settings can make a big difference. Think about resolution. Higher resolution means clearer video. But it also uses more storage space. Consider frame rate. Higher frame rates are good for slow-motion footage. But they also use more battery. Think about field of view. A wider field of view captures more of the scene. But it can also distort the image. Consider image stabilization. This feature reduces vibration. It’s important for smooth video. Experiment with different settings. Find what works best for your style of riding. Good settings can turn an ordinary video into something special.
- Consider the resolution.
- Think about the frame rate.
- Consider the field of view.
- Think about image stabilization.
- Experiment with different settings.
Let’s look at some specific settings. For resolution, 1080p is a good starting point. It offers a good balance between quality and storage space. For frame rate, 30fps is good for normal riding. 60fps is better for slow-motion. For field of view, wide is good for capturing the scenery. Narrow is better for focusing on a specific subject. For image stabilization, turn it on if you’re riding on rough trails. It will help reduce vibration. Also, think about lighting. If you’re riding in bright sunlight, use a neutral density filter. This will prevent the video from being overexposed. If you’re riding in low light, increase the ISO. This will make the video brighter.
Resolution and Frame Rate
What’s the best resolution and frame rate for your videos? Resolution is the size of the video. Higher resolution means more detail. But it also means larger file sizes. Frame rate is the number of frames per second. Higher frame rates make motion smoother. But they also use more battery. For most riding, 1080p at 30fps is a good choice. It offers a good balance between quality and performance. If you want to film in slow motion, use 60fps or 120fps. This will give you smooth slow-motion footage.
Field of View
Do you want to capture a wide view? Or do you want to focus on a specific subject? The field of view setting controls how much of the scene is visible. Wide field of view is good for capturing the scenery. It shows more of the trail. Narrow field of view is better for focusing on a specific subject. It zooms in on the action. Experiment with different settings. See what looks best for your style of riding. A good field of view can make your videos more engaging.
Image Stabilization
Is your video shaky? Image stabilization can help. This feature reduces vibration. It smooths out the footage. Most action cameras have image stabilization. Turn it on when you’re riding on rough trails. It will make a big difference. Keep in mind that image stabilization can use more battery. If you’re not riding on rough trails, you can turn it off. This will save battery life. Experiment with different settings. See what works best for you.
Fun Fact or Stat: Action cameras can record in resolutions up to 4K, providing incredibly detailed footage!
Maintaining Your Camera and Mount
Taking care of your camera and mount is important. This will keep them in good condition. Clean the camera lens regularly. Use a microfiber cloth. This will remove dirt and smudges. Check the mount for damage. Look for cracks or broken parts. Tighten the screws on the mount. Make sure they are secure. Store your camera and mount in a safe place. Avoid extreme temperatures. Replace the adhesive pads on your mount. They can lose their stickiness over time. By maintaining your camera and mount, you can extend their lifespan.
- Clean the camera lens regularly.
- Check the mount for damage.
- Tighten the screws on the mount.
- Store your camera and mount in a safe place.
- Replace the adhesive pads.
Let’s talk about specific cleaning tips. For the camera lens, use a lens cleaning solution. This will remove stubborn dirt. For the mount, use a damp cloth. Avoid using harsh chemicals. They can damage the plastic. For the screws, use a wrench or screwdriver. Make sure they are not stripped. If the screws are stripped, replace them. For the adhesive pads, peel them off carefully. Clean the surface before applying new pads. By following these tips, you can keep your camera and mount in top condition.
Cleaning the Lens
A clean lens is essential for clear video. Dirt and smudges can ruin your footage. Use a microfiber cloth to clean the lens. Gently wipe the lens in a circular motion. Avoid using paper towels. They can scratch the lens. Use a lens cleaning solution for stubborn dirt. Apply a small amount of solution to the cloth. Then, wipe the lens. Keep your lens clean. This will ensure clear, sharp videos.
Checking for Damage
Regularly check your camera and mount for damage. Look for cracks or broken parts. Check the screws. Make sure they are tight. Inspect the adhesive pads. Make sure they are still sticky. If you find any damage, repair it immediately. Ignoring damage can lead to more serious problems. A damaged mount can cause the camera to fall off. This can damage the camera or cause an accident. Keep your gear in good condition. This will ensure your safety and the quality of your videos.
Storage Tips
How you store your camera and mount is important. Avoid storing them in extreme temperatures. Heat and cold can damage the electronics. Store them in a dry place. Moisture can cause corrosion. Keep them away from direct sunlight. Sunlight can fade the plastic. Use a case to protect them from dust and scratches. By following these storage tips, you can extend the life of your gear.
Fun Fact or Stat: Regular cleaning and maintenance can extend the life of your action camera by up to 50%!
Electric Mountain Bike Camera Mounts: Comparison Table
Choosing the right mount can be tough. There are so many options! This table compares different mounts. It will help you decide. Consider the pros and cons. Think about your riding style. Choose the mount that fits your needs. Some mounts are better for rough trails. Others are better for smooth trails. Use this table to make an informed decision.
| Mount Type | Pros | Cons | Best For |
|---|---|---|---|
| Handlebar Mount | Easy to install, stable view | Can vibrate on rough trails | Beginners, smooth trails |
| Helmet Mount | Rider’s-eye view, captures action | Can affect balance, extra weight | Action shots, experienced riders |
| Chest Mount | Unique perspective, shows body movement | Can be uncomfortable, can block chest | Showing body movement, unique angles |
| Frame Mount | Unique angles, low profile | Can be difficult to install, limited view | Creative shots, experienced users |
Summary
Learning how to mount action camera on electric mountain bike is easy! First, pick the right mount. Handlebar, helmet, and chest mounts are popular. Each has its pros and cons. Next, attach the mount securely. Follow the instructions carefully. Adjust the camera angle for the best view. Test the setup before you ride. Make sure everything is secure. Choose the right camera settings. Consider resolution, frame rate, and field of view. Stay safe while riding. Don’t let the camera distract you. Maintain your camera and mount. Clean them regularly. Check for damage. With these tips, you can capture amazing videos of your electric mountain bike adventures.
Conclusion
Mounting an action camera on your electric mountain bike is a great way to share your rides. It lets you capture amazing footage. Friends and family can see what you see. Remember to choose the right mount. Secure it properly. Adjust the camera angle. Follow safety tips. By learning how to mount action camera on electric mountain bike, you can create awesome videos. Now go out there and ride! Share your adventures with the world.
Frequently Asked Questions
Question No 1: What is the best type of mount for an electric mountain bike?
Answer: The best mount depends on your needs. Handlebar mounts are easy to install. They are good for beginners. Helmet mounts give a rider’s-eye view. They are good for action shots. Chest mounts offer a unique perspective. Consider the type of riding you do. Rough trails need a strong mount. Smooth trails offer more options. Think about the view you want to capture. A helmet mount is great for action shots. A handlebar mount is good for scenery. Ultimately, learning how to mount action camera on electric mountain bike is about finding a stable and secure solution for the conditions you plan to ride in.
Question No 2: How do I prevent my camera from vibrating too much?
Answer: Vibration can ruin your video. There are several ways to reduce it. Tighten the mount. Make sure all the screws are secure. Use a vibration dampener. This will absorb some of the vibration. Try a different mounting location. Some locations vibrate less than others. You can also adjust the camera settings. Some cameras have a stabilization feature. This can help reduce vibration. Experiment with different settings. See what works best for you. Knowing how to mount action camera on electric mountain bike also means knowing how to minimize vibration.
Question No 3: What camera settings should I use?
Answer: The right camera settings depend on the situation. For resolution, 1080p is a good starting point. It offers a good balance between quality and storage space. For frame rate, 30fps is good for normal riding. 60fps is better for slow-motion. For field of view, wide is good for capturing the scenery. Narrow is better for focusing on a specific subject. Consider image stabilization. This feature reduces vibration. Understanding how to mount action camera on electric mountain bike also includes setting up the camera for the best possible video quality based on the conditions.
Question No 4: How do I extend my camera’s battery life?
Answer: Short battery life is a common problem. There are several things you can do to extend it. Turn off features you don’t need. GPS and Wi-Fi use a lot of power. Reduce the video resolution. Lower resolution videos use less battery. Carry an extra battery. This will allow you to keep filming. Use a power bank. This can charge your camera on the go. Check the battery settings. Some cameras have a power-saving mode. Knowing how to mount action camera on electric mountain bike is just the beginning; you also need to manage your camera’s power effectively.
Question No 5: What safety precautions should I take?
Answer: Safety is always the top priority. Make sure the camera doesn’t block your vision. The mount should be secure. Use a safety tether. This will keep the camera from falling if the mount fails. Don’t adjust the camera while riding. Pull over to the side of the trail. Be aware of your surroundings. Pay attention to other riders and obstacles. Always wear a helmet. This will protect your head in case of a fall. Understanding the importance of safety is crucial when considering how to mount action camera on electric mountain bike.
Question No 6: How often should I clean my camera and mount?
Answer: Clean your camera and mount regularly. Clean the camera lens after every ride. This will remove dirt and smudges. Check the mount for damage regularly. Look for cracks or broken parts. Tighten the screws on the mount. Make sure they are secure. Replace the adhesive pads on your mount as needed. By maintaining your camera and mount, you can extend their lifespan. Taking care of your equipment is part of understanding how to mount action camera on electric mountain bike properly.


