
How to Make a Mini Air Pump for Your Bike: A Simple Guide
Quick Summary: Building a mini air pump for your bike is easier than you think! You can create a functional pump using basic materials like a syringe, tubing, and a valve stem. This DIY project is perfect for emergencies on the road. With a few simple steps, you’ll have a compact and reliable pump to keep your tires inflated and your ride smooth.
Ever been stuck on a bike ride with a flat tire and no pump? It’s frustrating! Store-bought mini pumps can be pricey or unreliable. Luckily, you can make your own mini air pump with items you probably already have. This guide will walk you through each step, so you can build a pump that’s lightweight, effective, and perfect for those unexpected flats. Get ready to save the day (and your ride!) with your DIY mini air pump.
Why Build Your Own Mini Air Pump?

Before diving into the how-to, let’s look at why you might want to build your own mini air pump. There are several benefits to this DIY project:
- Cost-Effective: Making your own pump is often cheaper than buying a new one.
- Customizable: You can tailor the size and design to fit your specific needs.
- Reliable: Knowing how your pump works means you can fix it easily if something goes wrong.
- Convenient: A homemade mini pump can be incredibly compact and easy to carry.
- Educational: Building your own gear gives you a better understanding of how things work.
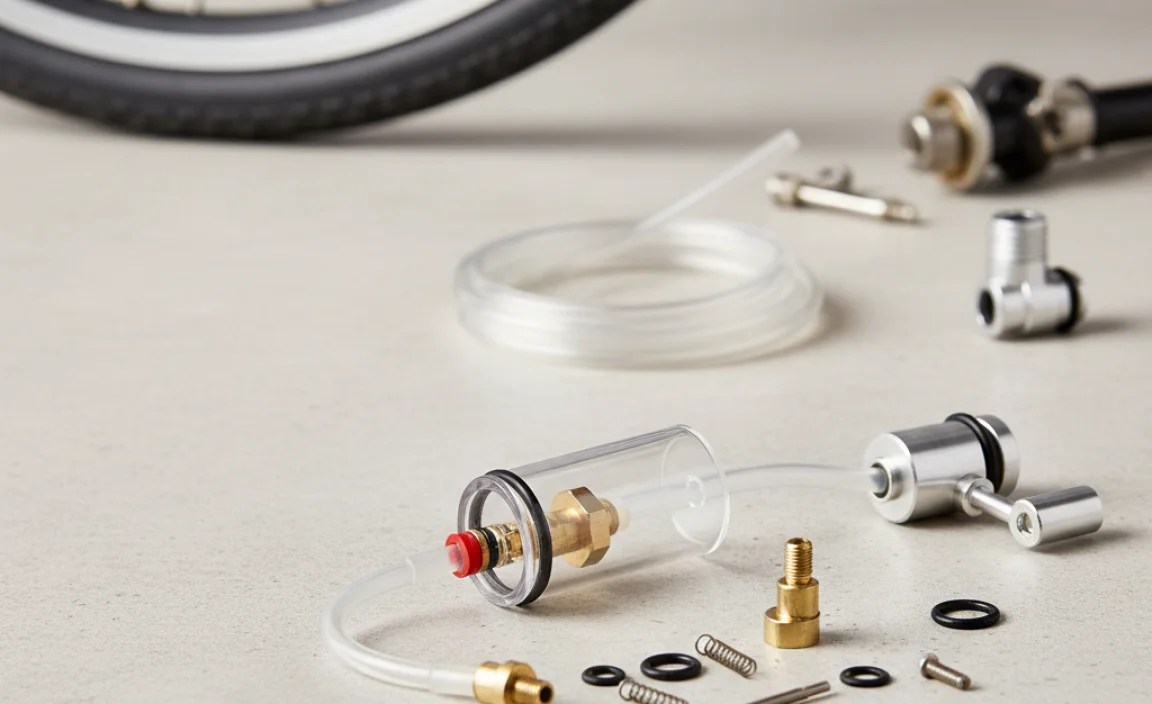
What You’ll Need

To build your mini air pump, gather these materials. Most can be found at your local hardware store or online.
- Syringe: A large syringe (50-60cc) works best for moving a decent amount of air.
- Tubing: Flexible tubing that fits snugly on the syringe nozzle and valve stem.
- Valve Stem Connector: A Presta or Schrader valve connector, depending on your bike’s inner tubes. You can salvage this from an old pump or buy one separately.
- Hose Clamps or Zip Ties: To secure the tubing to the syringe and valve connector.
- Epoxy or Strong Adhesive: To create airtight seals.
- Sandpaper: For preparing surfaces for gluing.
- Scissors or Utility Knife: For cutting the tubing.
Step-by-Step Guide: Building Your Mini Air Pump

Follow these steps carefully to assemble your DIY mini air pump:
Step 1: Prepare the Syringe
Start by cleaning the syringe thoroughly. Remove the plunger and wash both the barrel and plunger with soap and water. Dry them completely.
Step 2: Attach the Tubing to the Syringe
Cut a length of tubing long enough to comfortably reach from the syringe to your bike’s valve stem. Attach one end of the tubing to the syringe nozzle. Secure it tightly with a hose clamp or zip tie to ensure an airtight seal. Use epoxy around the connection point for added security.
Step 3: Prepare the Valve Stem Connector
If you’re using a salvaged valve stem connector, clean it thoroughly. If you bought a new one, make sure it’s compatible with your bike’s valve type (Presta or Schrader). Lightly sand the surface where the tubing will attach to create a better bonding surface.
Step 4: Attach the Tubing to the Valve Stem Connector
Attach the other end of the tubing to the valve stem connector. Again, use a hose clamp or zip tie to secure it. Apply epoxy around the connection for an airtight seal. Allow the epoxy to dry completely according to the manufacturer’s instructions.
Step 5: Test Your Mini Air Pump
Once the epoxy is fully cured, test your pump. Insert the syringe plunger and connect the valve stem connector to your bike’s tire valve. Slowly push the plunger to inflate the tire. Check for any air leaks around the connections. If you find leaks, apply more epoxy to seal them.
Alternative Design: Using a Check Valve
For a more advanced design, consider adding a check valve. This allows air to flow only in one direction, making pumping more efficient.
What You’ll Need:
- All the materials from the basic design.
- A small check valve (available at most hardware stores).
- Additional short length of tubing.
Instructions:
- Cut the tubing attached to the syringe.
- Insert the check valve into the tubing, ensuring the arrow on the valve points towards the tire valve connector.
- Use the additional short length of tubing to connect the check valve to the tire valve connector.
- Secure all connections with hose clamps and epoxy.
Troubleshooting Your DIY Pump
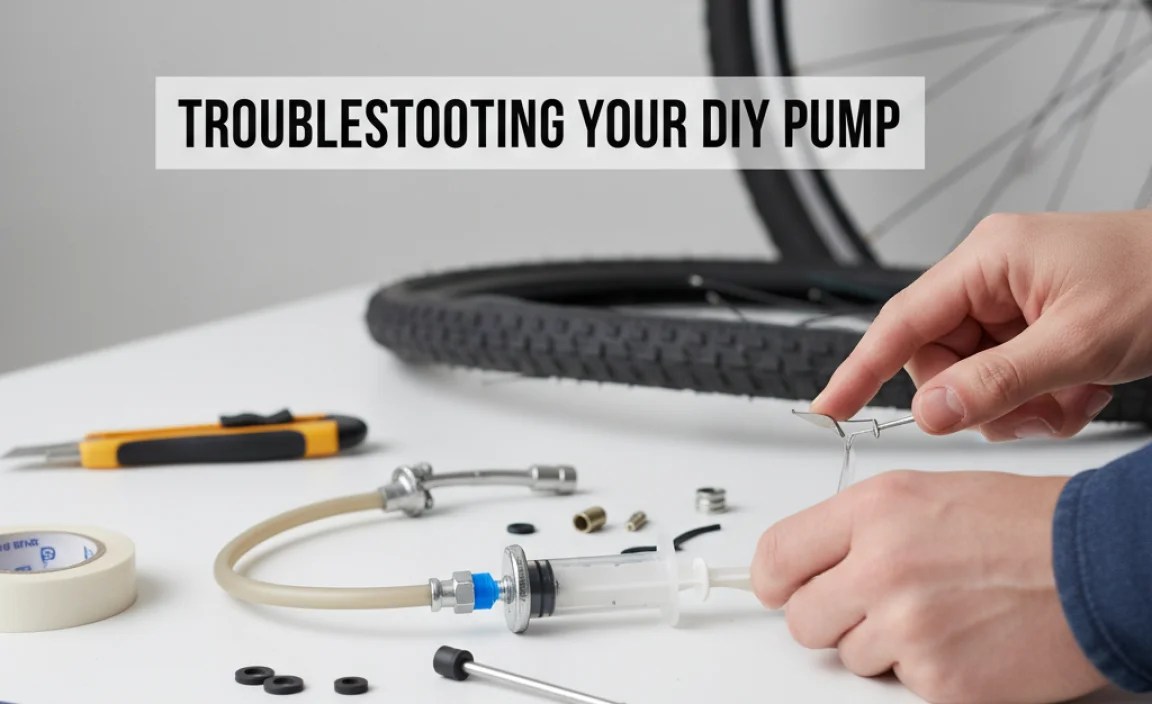
Even with careful construction, issues can arise. Here’s how to troubleshoot common problems:
- Air Leaks: Check all connections and apply more epoxy where needed.
- Low Pumping Power: Ensure the syringe plunger is moving smoothly and creating a good seal.
- Valve Connector Issues: Make sure the valve connector is properly engaging with the tire valve.
Tips for Improving Your Mini Air Pump
Here are some additional tips to enhance the performance and durability of your homemade pump:
- Use High-Quality Materials: Investing in better tubing and connectors will improve the pump’s lifespan.
- Reinforce Connections: Add extra layers of epoxy or use stronger clamps for a more secure seal.
- Regular Maintenance: Clean the syringe and check for wear and tear regularly.
- Consider a Handle: Attach a small handle to the syringe plunger for easier pumping.
Comparing DIY Pump Designs
Here’s a table comparing the basic and check valve designs to help you decide which one is best for you:
| Feature | Basic Design | Check Valve Design |
|---|---|---|
| Complexity | Simple | More Complex |
| Efficiency | Less Efficient | More Efficient |
| Cost | Lower | Slightly Higher |
| Materials | Fewer | More |
| Ease of Use | Easy | Slightly Easier |
Safety Considerations
When building and using your DIY mini air pump, keep these safety tips in mind:
- Wear Safety Glasses: Protect your eyes when cutting tubing or using adhesives.
- Work in a Well-Ventilated Area: Epoxy fumes can be harmful.
- Use Gloves: Protect your hands from adhesives and sharp tools.
- Test Before Relying On: Always test your pump at home before taking it on a ride.
Maintaining Your Mini Air Pump
To keep your mini air pump in good working condition, follow these maintenance tips:
- Clean Regularly: Wipe down the syringe and tubing to remove dirt and debris.
- Check for Cracks: Inspect the tubing and connectors for cracks or damage.
- Replace Worn Parts: Replace any worn or damaged parts immediately.
- Store Properly: Store the pump in a clean, dry place.
Alternative Mini Pump Solutions
If the DIY route isn’t for you, here are some excellent store-bought mini pump options:
- Lezyne Micro Floor Drive HP: A compact pump with a foot pad for easy inflation.
- Topeak Mini Dual DXG: A dual-action pump that inflates tires quickly.
- Crankbrothers Sterling S: A lightweight and durable pump with a built-in pressure gauge.
- Blackburn Core Mini-Pump: A reliable pump with a comfortable handle.
The Importance of Tire Pressure
Maintaining proper tire pressure is crucial for a safe and efficient ride. Here’s why:
- Reduced Rolling Resistance: Properly inflated tires roll faster and require less effort.
- Improved Handling: Correct tire pressure provides better grip and control.
- Puncture Prevention: Underinflated tires are more prone to pinch flats.
- Comfort: Proper inflation ensures a smoother and more comfortable ride.
Refer to your tire sidewall for the recommended PSI (pounds per square inch). A tire pressure gauge can help you achieve the optimal pressure.
Understanding Valve Types: Presta vs. Schrader
Bicycles use two main types of valves: Presta and Schrader. Knowing the difference is essential for using the correct pump or adapter.
Presta Valves
- Slimmer Design: Presta valves are narrower and typically found on high-performance bikes.
- Requires Unlocking: You need to unscrew the valve tip before inflating.
- Higher Pressure: Generally better for higher tire pressures.
Schrader Valves
- Wider Design: Similar to car tire valves.
- Self-Sealing: A spring-loaded pin seals the valve.
- Easy to Inflate: Simple to use with standard pumps.
Make sure your DIY pump’s valve connector matches your bike’s valve type.
Essential Tools for Bike Maintenance
Besides a mini air pump, here are some other essential tools every cyclist should have:
- Multi-Tool: Includes Allen wrenches, screwdrivers, and other useful tools.
- Tire Levers: For removing tires from the rim.
- Patch Kit: For repairing punctured inner tubes.
- Chain Tool: For breaking and rejoining the chain.
- Adjustable Wrench: For tightening bolts and nuts.
Having these tools on hand can help you handle most common roadside repairs.
Advanced Techniques: Tubeless Tire Inflation
If your bike has tubeless tires, inflating them can be a bit more challenging. Tubeless tires require a tight seal between the tire and rim to hold air. Here are some tips for inflating tubeless tires:
- Use a Tubeless-Specific Pump: These pumps deliver a large volume of air quickly.
- Remove the Valve Core: This allows more air to flow into the tire initially.
- Use a Tire Setter: A device that helps seat the tire bead on the rim.
- Apply Tire Sealant: Sealant fills small gaps and helps maintain air pressure.
Tubeless tires offer several benefits, including lower rolling resistance and reduced risk of pinch flats. Learn more about tubeless tire systems from reputable sources like BikeRadar.
FAQ: Your Mini Air Pump Questions Answered
Here are some frequently asked questions about building and using mini air pumps:
- Can I use any type of syringe for this project?
- A larger syringe (50-60cc) is recommended because it moves more air per pump. Make sure it’s clean and in good working condition.
- What kind of tubing should I use?
- Flexible, durable tubing that fits snugly on both the syringe nozzle and the valve stem connector is best. Vinyl or rubber tubing works well.
- How do I know if my connections are airtight?
- After assembling the pump, test it by trying to inflate a tire. Listen for air leaks and check the connections. Apply more epoxy if needed.
- Is a check valve necessary?
- No, but it makes pumping more efficient by preventing air from flowing backward. It’s a worthwhile addition if you want a more advanced pump.
- Can I use this pump for high-pressure tires?
- While it can work, a DIY mini pump is best for topping off tires or emergencies. For high-pressure tires, a dedicated floor pump is more efficient.
- What if the valve stem connector doesn’t fit my tire valve?
- Make sure you have the correct type of connector (Presta or Schrader) for your bike’s valves. You can also use an adapter if needed.
- How often should I maintain my DIY mini air pump?
- Check it regularly for wear and tear, especially the tubing and connections. Clean it as needed to remove dirt and debris.
Conclusion
Building your own mini air pump for your bike is a rewarding project that can save you from frustrating flats on the road. With simple materials and a bit of effort, you can create a reliable and compact pump tailored to your needs. Whether you choose the basic design or add a check valve for increased efficiency, you’ll gain a valuable tool and a deeper understanding of your bike’s mechanics. So, gather your materials, follow the steps, and get ready to enjoy worry-free rides, knowing you’re prepared for anything. Happy cycling!
“`


