
How to Replace Gauge on Shock Pump: Easy Fix!
Have you ever pumped up a tire and wondered if the gauge was right? A gauge tells you the air pressure. What if it breaks? Do you need a new pump? No! You can learn how to replace gauge on shock pump. It’s easier than you think. Let’s find out how.
Air shocks need the right air pressure to work well. A broken gauge can cause problems. You might add too much or too little air. This can make your ride bumpy or unsafe. Luckily, you can fix it yourself.
Changing the gauge is a simple fix. It saves you money. You do not need to buy a new pump. With a few tools, you can do it. Let’s learn how to do it step by step.
Key Takeaways
- Replacing a gauge saves money versus buying a whole new shock pump.
- Gather the right tools, like a wrench and new gauge, before starting.
- Knowing how to replace gauge on shock pump ensures accurate pressure readings.
- Always release air pressure from the pump before you start any work.
- Take your time and follow each step carefully to avoid mistakes.
Understanding Your Shock Pump Gauge

Before learning how to replace gauge on shock pump, let’s understand the gauge. The gauge shows the air pressure in your shocks. It’s measured in PSI or BAR. PSI means pounds per square inch. BAR is another unit for pressure. A good gauge gives you the right reading. This helps your bike or car work well. A bad gauge gives wrong readings. This can damage your shocks. It can also make your ride unsafe. Knowing how a gauge works helps you fix it. You can check if the new gauge is working right. Always be careful when working with air pressure. Make sure to release the air before you start.
- Gauges measure air pressure.
- PSI and BAR are common units.
- Accurate readings are important.
- Bad readings can cause damage.
- Release air before working on the pump.
Different types of gauges exist. Some are digital. These show the pressure on a screen. Others are analog. These have a needle that points to the pressure. Digital gauges are usually more accurate. But they need batteries. Analog gauges don’t need batteries. They are simple to use. When choosing a new gauge, pick one that fits your pump. Make sure it shows the right pressure range. Also, check if it’s easy to read. A good gauge makes it easier to keep your shocks in good shape. This keeps your rides smooth and safe.
Fun Fact or Stat: Did you know that the first air pressure gauges were invented in the mid-1800s for steam engines? They helped engineers make sure the engines didn’t explode!
Why Accurate Readings Matter?
Why is it important to have accurate readings? Imagine you are inflating a basketball. If you add too much air, it could pop! If you don’t add enough, it won’t bounce well. The same goes for your shocks. Accurate pressure keeps them working right. Too much air can damage the shock. Too little air makes the ride bumpy. Using a good gauge helps you get the pressure just right. This makes your ride safer and more fun. Always double-check your readings. Make sure your gauge is working well. Knowing the right pressure for your shocks is key.
Analog vs. Digital Gauges: Which Is Best?
Which type of gauge should you pick? Analog gauges are simple. They don’t need batteries. They show the pressure with a needle. Digital gauges use a screen. They often show the pressure more exactly. They can also show other information. But they need batteries. Some people like analog gauges because they are easy to use. Others like digital gauges because they are more accurate. Think about what is important to you. Do you want something simple? Or do you want the most accurate reading? Your choice depends on what you need and like.
Troubleshooting Common Gauge Problems
Sometimes gauges stop working right. They might show the wrong pressure. Or the needle might be stuck. Digital gauges might have a dead battery. Before you replace gauge on shock pump, try to fix it. Check the battery in digital gauges. Make sure the gauge is clean. Sometimes dirt can cause problems. If you have an analog gauge, gently tap it. This might help the needle move. If nothing works, it’s time to replace the gauge. Knowing these tips can save you time. It can also help you decide when to get a new gauge.
Tools Needed to Replace the Gauge
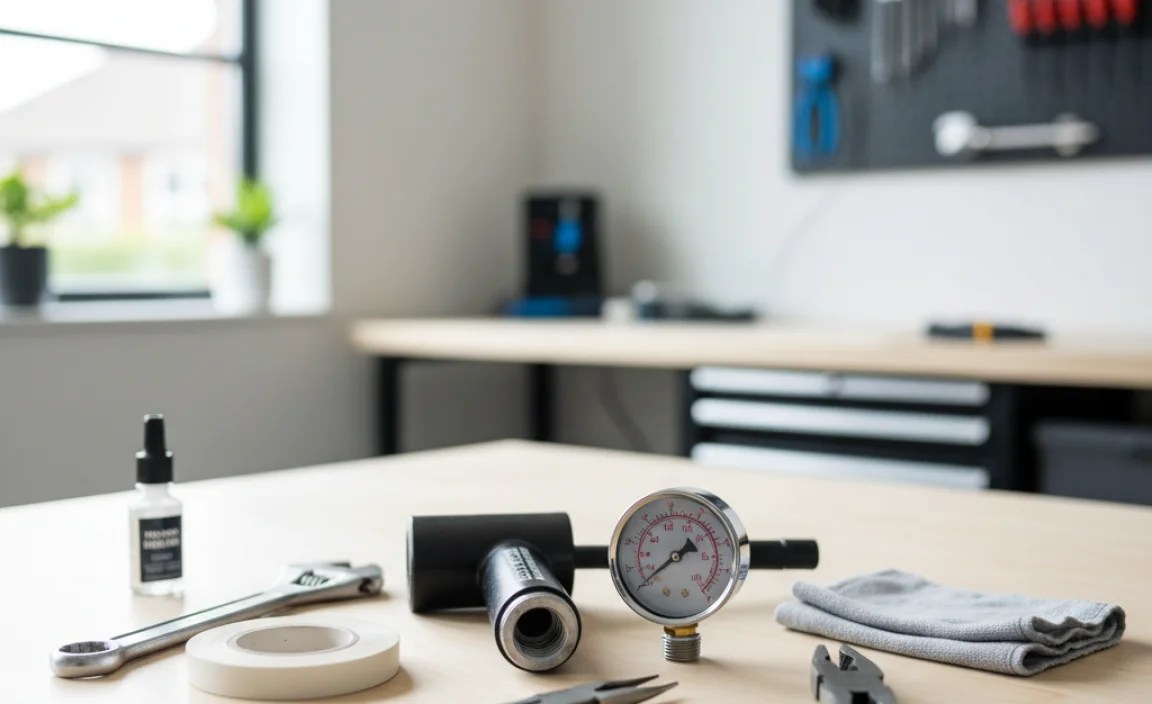
To replace gauge on shock pump, you need some tools. First, get a new gauge. Make sure it fits your pump. You will also need a wrench. The wrench helps you take off the old gauge. A small screwdriver might be useful too. It can help with small parts. You might want some Teflon tape. This tape helps seal the new gauge. It stops air from leaking. A clean cloth is also good to have. It helps you wipe off any dirt. Having all these tools ready makes the job easier. It also makes it faster. So, before you start, gather everything you need.
- New gauge that fits your pump.
- Wrench to remove old gauge.
- Small screwdriver for small parts.
- Teflon tape to seal the new gauge.
- Clean cloth to wipe off dirt.
- Safety glasses to protect your eyes.
Safety is very important. Wear safety glasses. This protects your eyes from dirt and small parts. Also, make sure to release all the air from the pump. This stops the air from shooting out. Work in a clean area. This helps you see all the parts. It also stops you from losing anything. Take your time. Don’t rush. If you are not sure about something, ask for help. There are many videos online that show you how to do it. Following these tips keeps you safe. It also helps you do the job right. Replacing a gauge is simple. But safety always comes first.
Fun Fact or Stat: Teflon tape, also known as plumber’s tape, was invented in 1969 by Robert Gore. It’s used to create airtight seals in plumbing and other applications!
Choosing the Right Replacement Gauge
Choosing the right gauge is important. Look for a gauge that matches your old one. Check the size and how it connects. Make sure it shows the right pressure range. Some gauges are better than others. Read reviews online. See what other people say. A good gauge will last longer. It will also give you accurate readings. Don’t just buy the cheapest one. Think about quality. A better gauge is worth the extra money. It will save you problems later. Always check the specifications before you buy.
Essential Tools for a Smooth Replacement
Having the right tools makes the job easier. A good wrench is important. It should fit the gauge. A small screwdriver can help with small screws. Teflon tape is a must. It stops air leaks. A clean cloth keeps things tidy. Don’t forget safety glasses. These protect your eyes. A well-lit workspace helps you see better. If you have all these tools, you are ready. Replacing the gauge will be smooth. You won’t have to stop and look for things. This saves you time and makes the job safer.
Safety Precautions Before You Start
Before you start, think about safety. Always release the air pressure. This stops accidents. Wear safety glasses. These protect your eyes. Work in a clean area. This helps you see everything. Don’t rush. Take your time. If you are not sure, ask for help. There are many videos online. These show you how to do it safely. Keep kids and pets away. They might get hurt. Following these steps keeps you safe. Replacing a gauge is easy if you are careful. Safety should always be your first thought.
Step-by-Step Guide: Removing the Old Gauge

Now, let’s talk about how to replace gauge on shock pump. First, make sure all the air is out of the pump. Use the release valve. Turn it until no more air comes out. Next, find the old gauge. Look at how it’s connected. Usually, it screws into the pump. Get your wrench. Put it on the nut of the gauge. Turn the wrench to loosen the gauge. Turn it the right way. It might be tight. Be careful not to break anything. Once it’s loose, you can unscrew it by hand. Take the old gauge off completely. Now, you are ready to put on the new one.
- Release all air from the pump.
- Locate the old gauge on the pump.
- Use a wrench to loosen the gauge nut.
- Unscrew the gauge by hand.
- Remove the old gauge completely.
Sometimes the old gauge is stuck. If it’s hard to turn, don’t force it. Try using some penetrating oil. Spray it on the threads. Wait a few minutes. This helps loosen the gauge. You can also try using a heat gun. Gently heat the area around the gauge. This can help loosen the seal. Be careful not to overheat it. If it still won’t budge, ask for help. A professional can remove it without breaking anything. Remember, patience is important. Don’t rush. Taking your time helps you avoid mistakes. Replacing a gauge can be easy if you are careful.
Fun Fact or Stat: Penetrating oil works by seeping into tiny spaces and dissolving rust and corrosion, making it easier to loosen stuck parts!
Safely Depressurizing the Shock Pump
Before you do anything, release the air. Find the release valve. It’s usually a small button or knob. Push it or turn it slowly. Listen for the air coming out. Make sure all the air is gone. You can check the gauge. It should read zero. If it doesn’t, there might be a problem. Try releasing the air again. If it still doesn’t work, get help. It’s important to get all the air out. This stops accidents. It also makes it easier to remove the gauge. Always take this step seriously. Safety is the most important thing.
Loosening a Stubborn Old Gauge
Sometimes, the gauge won’t come off easily. It might be stuck. Don’t force it. This can break something. Try using penetrating oil. Spray it on the threads. Wait a few minutes. This helps loosen it. You can also use heat. Gently heat the area around the gauge. Be careful not to overheat it. Try the wrench again. Turn it slowly. If it still won’t move, get help. A professional can remove it safely. Remember, patience is important. Taking your time helps you avoid damage. It’s better to be safe than sorry.
Avoiding Damage During Removal
Be careful when you remove the gauge. Don’t use too much force. This can damage the pump. Use the right size wrench. Make sure it fits well. This stops it from slipping. Turn the wrench slowly. If it feels too tight, stop. Try penetrating oil or heat. If something breaks, don’t panic. You can usually fix it. But it’s better to avoid damage. Taking your time and being careful helps. Replacing a gauge is easy if you are gentle. Remember, slow and steady wins the race.
Installing the New Gauge: A Detailed Walkthrough

Now, let’s put on the new gauge. First, clean the threads on the pump. Use a clean cloth. Make sure there is no dirt. Next, get your Teflon tape. Wrap it around the threads of the new gauge. Wrap it a few times. This helps seal the connection. Now, screw the new gauge into the pump. Turn it by hand until it’s snug. Then, use the wrench to tighten it. Don’t tighten it too much. Just enough to make it secure. Make sure the gauge is facing the right way. Now, you are done. You have a new gauge!
- Clean the threads on the pump.
- Wrap Teflon tape around the gauge threads.
- Screw the new gauge in by hand.
- Tighten with a wrench (not too tight).
- Make sure the gauge faces the right way.
After you install the new gauge, test it. Pump some air into the shock. Watch the gauge. Does it show the pressure correctly? If it does, great! If not, check the connections. Make sure everything is tight. If it still doesn’t work, the gauge might be bad. You might need to get another one. Always test your work. This makes sure everything is working right. It also keeps you safe. Replacing a gauge is easy. But testing it is just as important. This helps you catch any problems early.
Fun Fact or Stat: Teflon tape is so effective that it can seal threads even at extremely high pressures and temperatures!
Preparing the Threads with Teflon Tape
Teflon tape is your friend. It helps stop leaks. Wrap it around the threads of the gauge. Wrap it the right way. Usually, you wrap it clockwise. Wrap it a few times. Make sure it covers all the threads. Don’t use too much tape. Too much can make it hard to tighten. Just enough to cover the threads is good. Teflon tape is easy to use. It makes a big difference. It keeps your connections tight. This stops air from leaking out. Always use Teflon tape when you screw things together.
Tightening the Gauge to the Correct Torque
Tightening the gauge is important. Don’t make it too tight. This can damage the pump. Don’t make it too loose. This can cause leaks. Use a wrench to tighten it. Turn it until it’s snug. Then, turn it a little more. Just enough to make it secure. You don’t need to use a lot of force. If you are not sure, ask for help. A professional can show you how tight to make it. Getting the tightness right is important. It keeps your pump working well. It also stops problems later.
Ensuring Proper Alignment and Orientation
Make sure the gauge is facing the right way. You want to be able to read it easily. Look at how the old gauge was positioned. Put the new one in the same way. If it’s not facing the right way, loosen it. Turn it until it’s right. Then, tighten it again. Getting the alignment right is important. It makes it easier to use the pump. It also looks better. Taking the time to align it correctly is worth it. It shows you care about doing a good job.
Testing and Calibrating the New Gauge

After you replace gauge on shock pump, you need to test it. Pump some air into the shock. Watch the gauge. Does it show the right pressure? Compare it to another gauge. If you have another pump, use it. Check if both gauges show the same reading. If they don’t, one of them might be wrong. If the new gauge is wrong, check the connections. Make sure everything is tight. If it’s still wrong, you might need a new gauge. Testing is important. It makes sure your gauge is accurate. It also keeps you safe.
- Pump air into the shock.
- Compare the reading to another gauge.
- Check connections if the reading is wrong.
- Consider a new gauge if it’s still inaccurate.
- Test at different pressure levels.
Calibrating a gauge means making it accurate. Some gauges can be adjusted. Look for a small screw on the back. Turn the screw to adjust the reading. Compare it to a known accurate gauge. Adjust it until both gauges show the same pressure. If your gauge can’t be adjusted, you might need to replace it. Accurate readings are important. They keep your shocks working well. They also keep you safe. Taking the time to test and calibrate your gauge is worth it. It gives you peace of mind.
Fun Fact or Stat: Some high-end pressure gauges are calibrated using a deadweight tester, which uses precisely measured weights to apply known pressures!
Comparing Readings with Another Gauge
The best way to test your gauge is to compare it. Use another pump with a good gauge. Pump air into your shock. Check the reading on both gauges. They should be close. If they are far apart, one of them is wrong. Try testing at different pressures. This helps you see if the gauge is accurate across the range. Comparing readings is simple. It gives you confidence in your gauge. It also helps you find problems early. Always double-check your readings.
Adjusting the Gauge for Accuracy
Some gauges can be adjusted. Look for a small screw on the back. Use a small screwdriver to turn it. Watch the reading on the gauge. Compare it to a known accurate gauge. Turn the screw until both gauges show the same pressure. This is called calibrating. It makes your gauge more accurate. Not all gauges can be adjusted. If yours can’t, you might need to replace it. Accurate readings are important. They keep your shocks working well. Adjusting your gauge is worth the effort.
Identifying and Correcting Inconsistencies
Sometimes, your gauge might be inconsistent. It might show different readings at different times. This can be caused by loose connections. Check all the connections. Make sure they are tight. It can also be caused by a bad gauge. If your gauge is inconsistent, you might need to replace it. Don’t trust a gauge that gives different readings. It’s better to be safe. Get a new gauge. Accurate readings are important. They keep you safe. Always check for inconsistencies.
Common Problems and Solutions
When you replace gauge on shock pump, you might have problems. One problem is leaks. If air is leaking, check the connections. Make sure everything is tight. Use Teflon tape to seal the threads. Another problem is the gauge not working. If the gauge doesn’t show a reading, it might be bad. Try a different gauge. Sometimes the gauge is hard to remove. Use penetrating oil or heat. Be careful not to break anything. Knowing these problems and solutions helps. It makes the job easier. It also keeps you safe.
- Leaks: Check connections and use Teflon tape.
- Gauge not working: Try a different gauge.
- Hard to remove: Use penetrating oil or heat.
- Gauge is inaccurate: Calibrate or replace it.
- Pump is damaged: Seek professional help.
Sometimes you might damage the pump. If you break something, don’t panic. You can usually fix it. Look for replacement parts online. If you can’t fix it, get help. A professional can repair the pump. It’s important to be careful. Don’t use too much force. Take your time. If you are not sure about something, ask for help. Replacing a gauge is simple. But it’s important to do it right. This keeps your pump working well. It also keeps you safe.
Fun Fact or Stat: Many common household problems, like leaky faucets, can be fixed with simple tools and a bit of Teflon tape!
Dealing with Leaks After Replacement
Leaks are annoying. They can happen after you replace the gauge. Check all the connections. Make sure they are tight. Use Teflon tape to seal the threads. Wrap the tape the right way. Make sure it covers all the threads. If the leak is still there, tighten the connections more. Be careful not to over-tighten them. If the leak won’t stop, you might need to replace the fittings. Leaks can cause problems. They can make your pump less effective. Fixing them quickly is important.
Troubleshooting Inaccurate Readings
If your gauge shows the wrong reading, don’t trust it. Compare it to another gauge. If it’s still wrong, try calibrating it. Some gauges have a small screw on the back. Turn the screw to adjust the reading. If your gauge can’t be calibrated, you might need to replace it. Inaccurate readings can be dangerous. They can cause you to over-inflate your shocks. This can damage them. Always check your gauge for accuracy. Replace it if needed.
Preventing Future Problems with Maintenance
To keep your pump working well, do some maintenance. Clean it regularly. Wipe off any dirt or grime. Check the connections. Make sure they are tight. Store the pump in a safe place. Keep it away from extreme temperatures. Don’t drop it. These simple steps can help. They keep your pump working longer. They also prevent problems. Taking care of your pump is easy. It’s worth the effort. It saves you money in the long run.
When to Seek Professional Help
Sometimes, how to replace gauge on shock pump is too hard. If you are not comfortable doing it, get help. If you break something, get help. If you are not sure what to do, get help. A professional can fix the pump for you. They have the right tools and skills. They can also make sure it’s done safely. Don’t be afraid to ask for help. It’s better to be safe than sorry. Replacing a gauge is simple. But sometimes it’s better to leave it to the experts.
- You are not comfortable doing it.
- You break something during the process.
- You are unsure about what to do next.
- The pump is complex or expensive.
- You want to ensure it’s done correctly.
Finding a good professional is important. Ask your friends for recommendations. Read reviews online. Check their qualifications. Make sure they have experience with shock pumps. Get a quote before they start work. This helps you avoid surprises. A good professional will explain everything to you. They will also answer your questions. Don’t be afraid to ask questions. It’s important to understand what they are doing. Getting professional help can save you time and money. It can also give you peace of mind.
Fun Fact or Stat: The first bicycle repair shops were opened in the late 1800s, as bicycles became more popular and people needed places to get them fixed!
Recognizing Your Limits and Skills
It’s important to know what you can do. If you are good with tools, you can try to replace the gauge. If you are not, it’s better to get help. Don’t try to do something that is too hard for you. You might break something. You might also hurt yourself. Be honest with yourself. Know your limits. It’s okay to ask for help. Everyone needs help sometimes. Knowing your skills helps you make good choices. It keeps you safe. It also helps you get the job done right.
Finding a Qualified Technician
When you need help, find a good technician. Ask your friends for recommendations. Read reviews online. Check their qualifications. Make sure they have experience with shock pumps. A good technician will be honest with you. They will explain what they are doing. They will also answer your questions. Don’t be afraid to ask questions. It’s important to understand what they are doing. Finding a qualified technician is important. It gives you peace of mind. It also ensures the job is done right.
Understanding Repair Costs and Benefits
Before you get help, ask about the cost. Get a quote. This helps you avoid surprises. Compare the cost to buying a new pump. Sometimes it’s cheaper to buy a new pump. Sometimes it’s cheaper to fix the old one. Think about the benefits. Fixing the pump keeps it out of the landfill. It also saves you money. But buying a new pump might be easier. Think about what is important to you. Then, make a decision. Understanding the costs and benefits helps you make the right choice.
Maintaining Your Shock Pump for Longevity
After you replace gauge on shock pump, take care of it. Clean it regularly. Wipe off any dirt or grime. Check the connections. Make sure they are tight. Store the pump in a safe place. Keep it away from extreme temperatures. Don’t drop it. These simple steps can help. They keep your pump working longer. They also prevent problems. Taking care of your pump is easy. It’s worth the effort. It saves you money in the long run.
- Clean the pump regularly.
- Check connections for tightness.
- Store the pump in a safe place.
- Avoid extreme temperatures and drops.
- Replace worn parts as needed.
Sometimes parts wear out. The hose might crack. The seals might leak. Replace these parts when needed. You can buy replacement parts online. Or you can get them from a bike shop. Replacing worn parts keeps your pump working well. It also prevents bigger problems. Don’t wait until something breaks. Check your pump regularly. Replace parts as needed. This keeps your pump in good shape. It also saves you money in the long run.
Fun Fact or Stat: Properly maintained tools can last for decades, saving you money and reducing waste!
Regular Cleaning and Inspection Tips
Clean your pump regularly. Wipe it down with a clean cloth. Remove any dirt or grime. Check the hose for cracks. Check the connections. Make sure they are tight. Look for leaks. If you see any problems, fix them right away. Regular cleaning and inspection help. They keep your pump working well. They also prevent problems. It’s easy to clean your pump. It only takes a few minutes. But it makes a big difference.
Proper Storage to Prevent Damage
Store your pump in a safe place. Keep it away from extreme temperatures. Don’t leave it in the sun. Don’t leave it in the cold. Store it in a dry place. This prevents rust. Don’t drop it. This can damage the gauge. Store it where it won’t get damaged. Proper storage helps. It keeps your pump working longer. It also prevents problems. Taking care of your pump is easy. It’s worth the effort. It saves you money in the long run.
Replacing Worn Parts for Optimal Performance
Sometimes parts wear out. The hose might crack. The seals might leak. Replace these parts when needed. You can buy replacement parts online. Or you can get them from a bike shop. Replacing worn parts keeps your pump working well. It also prevents bigger problems. Don’t wait until something breaks. Check your pump regularly. Replace parts as needed. This keeps your pump in good shape. It also saves you money in the long run.
Summary
Learning how to replace gauge on shock pump is simple. First, get the right tools. You need a new gauge and a wrench. Release the air from the pump. Remove the old gauge. Put on the new one. Use Teflon tape to seal the threads. Tighten the new gauge. Test it to make sure it works. If you have problems, get help. Taking care of your pump is important. Clean it regularly. Store it in a safe place. Replace worn parts. This keeps your pump working well.
Replacing a gauge saves money. You don’t need to buy a new pump. It also keeps your shocks working well. Accurate pressure is important for a smooth ride. Follow these steps. You can easily replace the gauge on your shock pump. Remember to be careful. Safety is always the most important thing. Enjoy your smooth rides!
Conclusion
You now know how to replace gauge on shock pump. It is a simple task. Gather the right tools. Follow each step carefully. Test the new gauge. This ensures it works correctly. Regular maintenance is key. Clean and store your pump properly. This extends its life. Replacing the gauge yourself saves money. It also ensures accurate shock pressure. Enjoy your smoother, safer rides!
Frequently Asked Questions
Question No 1: Why is it important to replace the gauge on my shock pump?
Answer: It’s important to replace the gauge because an inaccurate gauge can lead to incorrect air pressure in your shocks. Too much air can damage the shock, while too little can make your ride uncomfortable and unsafe. Replacing the gauge ensures you get accurate readings, which helps you maintain the proper air pressure for optimal performance and safety. It also saves you from guessing and potentially causing damage.
Question No 2: What tools do I need to replace the gauge on my shock pump?
Answer: You will need a few basic tools. First, get a new gauge that fits your pump. You’ll also need a wrench to remove the old gauge and tighten the new one. A small screwdriver can be helpful for small parts. Don’t forget Teflon tape to seal the threads and prevent air leaks. A clean cloth will help you wipe off any dirt. Safety glasses are important to protect your eyes. Having these tools ready makes the job much easier.
Question No 3: How do I know if my shock pump gauge needs to be replaced?
Answer: There are a few signs that your gauge needs replacing. If the gauge is showing inconsistent readings, or if it’s stuck and not moving, it’s likely faulty. Another sign is if the gauge is significantly different from another gauge when measuring the same pressure. If you notice any of these issues, it’s time to replace gauge on shock pump to ensure accurate pressure readings and prevent damage to your shocks.
Question No 4: Can I replace the gauge on any type of shock pump?
Answer: Yes, you can usually replace the gauge on most types of shock pumps. However, it’s important to choose a replacement gauge that is compatible with your specific pump. Check the size and type of connection to ensure it fits properly. Some pumps may have proprietary gauges, so you might need to purchase a gauge from the pump manufacturer. Always double-check compatibility before you buy.
Question No 5: What should I do if I have trouble removing the old gauge?
Answer: If the old gauge is stuck and difficult to remove, don’t force it. This can damage the pump. Try using penetrating oil. Spray it on the threads and let it sit for a few minutes to loosen the gauge. You can also try using a heat gun to gently heat the area around the gauge. Be careful not to overheat it. If it still won’t budge, seek professional help to avoid damaging the pump.
Question No 6: How can I ensure the new gauge is accurate after I replace it?
Answer: After you replace gauge on shock pump, it’s important to test its accuracy. Use another pump with a known accurate gauge to compare readings. Pump air into the shock and check if both gauges show the same pressure. If the new gauge is inaccurate, check the connections and make sure everything is tight. Some gauges can be calibrated using a small screw on the back. If it’s still inaccurate, you may need to get a different gauge.


