
How to Set Up Bike Suspension for Trail Riding With a Shock Pump: Easy Guide
Do you love riding your bike on trails? Does it feel bumpy and hard to control? Maybe your bike’s suspension needs a little help. Learning how to set up bike suspension for trail riding with a shock pump can make a huge difference.
Imagine flying over rocks and roots with ease. Your bike soaks up all the bumps. You feel more confident and in control. It’s like having a magic carpet under your wheels! Let’s learn how to make that happen.
A shock pump is a special tool. It lets you add or remove air from your bike’s suspension. This changes how soft or stiff the suspension feels. Getting it just right means more fun on the trail. Ready to get started?
Key Takeaways
- Proper setup ensures a smoother, more controlled ride on any trail.
- A shock pump is essential for fine-tuning your bike’s suspension.
- Setting sag correctly improves traction and comfort.
- Adjusting rebound damping prevents a bouncy or sluggish feel.
- Understanding how to set up bike suspension for trail riding with a shock pump increases confidence.
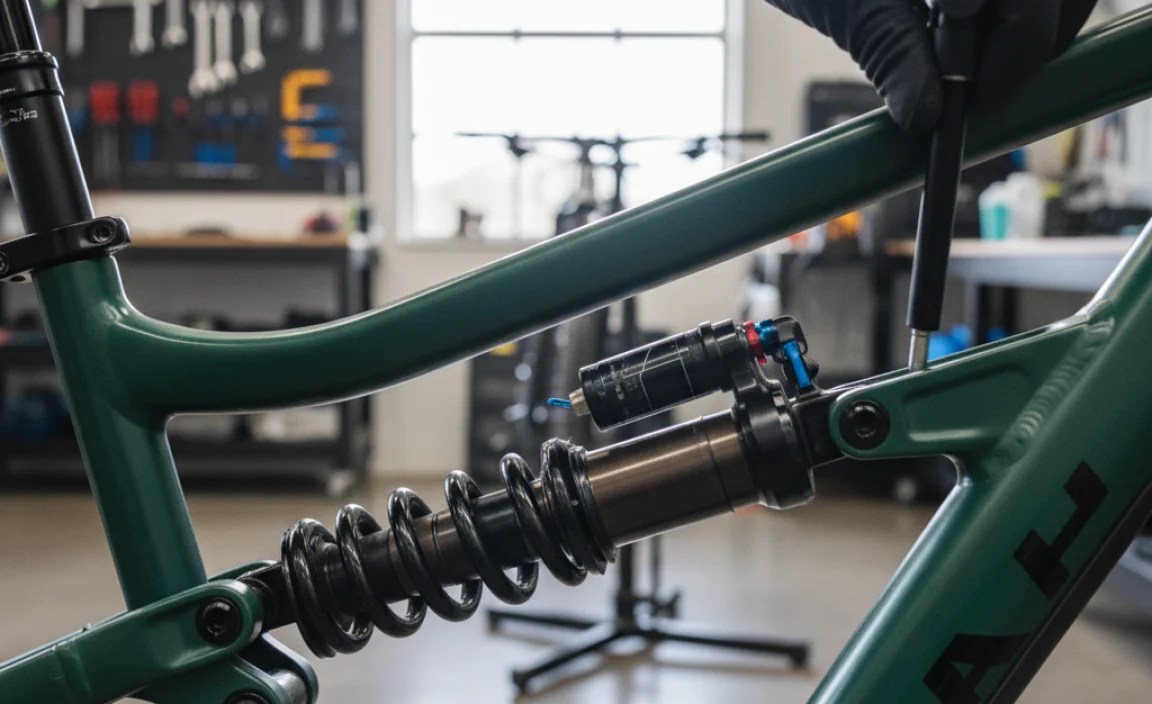
Understanding Suspension and Your Bike

Bike suspension is like the springs in a car. It helps your bike absorb bumps. This keeps you comfortable and in control. There are two main types of suspension. Front suspension is in the fork. Rear suspension is in the shock. The fork absorbs bumps from the front wheel. The shock absorbs bumps from the rear wheel. Together, they make your ride smoother. Different bikes have different amounts of suspension travel. Travel is how much the suspension can move. More travel is good for bigger bumps. Less travel is good for smoother trails. Knowing your bike’s suspension type and travel is the first step. This helps you understand how to set up bike suspension for trail riding with a shock pump.
- Front suspension is in the fork.
- Rear suspension is in the shock.
- Travel is how much the suspension moves.
- More travel for bigger bumps.
- Less travel for smoother trails.
Setting up your suspension is important for several reasons. First, it improves comfort. A properly set up suspension soaks up bumps. This means less stress on your body. Second, it improves control. When your suspension works well, your tires stay on the ground. This gives you better traction. Third, it improves efficiency. A good suspension setup lets you pedal more smoothly. This means you can ride faster and farther. Finally, it prevents damage. Proper suspension settings protect your bike from hard impacts. Learning about suspension helps you enjoy your rides more. It keeps you safe and comfortable on the trails. This is why knowing how to set up bike suspension for trail riding with a shock pump matters.
Why Does Suspension Matter?
Have you ever ridden a bike with flat tires? It feels bumpy and slow, right? Suspension works like inflated tires. It cushions you from the trail. Without it, every rock and root would send a jolt through your body. Good suspension absorbs these shocks. It keeps your wheels planted on the ground. This gives you more control. It also reduces fatigue. Imagine riding a long trail with a stiff, unforgiving bike. You’d be tired and sore very quickly. Suspension helps you ride longer and with more enjoyment. It makes the trail feel smoother and faster. This is why understanding suspension is so important for trail riding. Suspension improves comfort, control, and overall riding experience. Learning how to set up bike suspension for trail riding with a shock pump can make a huge difference.
What is Suspension Travel?
Imagine your bike’s suspension is like a ruler. Suspension travel is how long that ruler is. It measures how much your suspension can move up and down. Bikes designed for rough trails have more travel. Bikes for smoother trails have less. More travel lets you absorb bigger hits. It’s like having a bigger cushion. Less travel is lighter and more efficient for pedaling. It’s like having a firmer platform. Knowing your bike’s travel helps you choose the right trails. It also helps you set up your suspension properly. If you have a lot of travel, you can set it up softer. This will absorb more bumps. If you have less travel, you might want to set it up stiffer. This will prevent it from bottoming out. Understanding travel is key to understanding suspension.
Types of Suspension Systems
Bike suspension systems come in different flavors. Some bikes have only front suspension. These are called hardtails. Some bikes have both front and rear suspension. These are called full-suspension bikes. Hardtails are lighter and simpler. They are good for smoother trails and climbing. Full-suspension bikes are more comfortable and capable. They are better for rough trails and descending. Within each type, there are different designs. Some use air springs, while others use coil springs. Air springs are lighter and more adjustable. Coil springs are more sensitive and consistent. The best type for you depends on your riding style and the trails you ride. Full suspension is generally better for technical trails. Hardtails are often preferred for cross-country riding. Ultimately, the choice is yours. Learning how to set up bike suspension for trail riding with a shock pump works with both.
Fun Fact or Stat: Full-suspension bikes can improve your average speed on rough trails by up to 15%!
Gathering Tools and Information for Setup
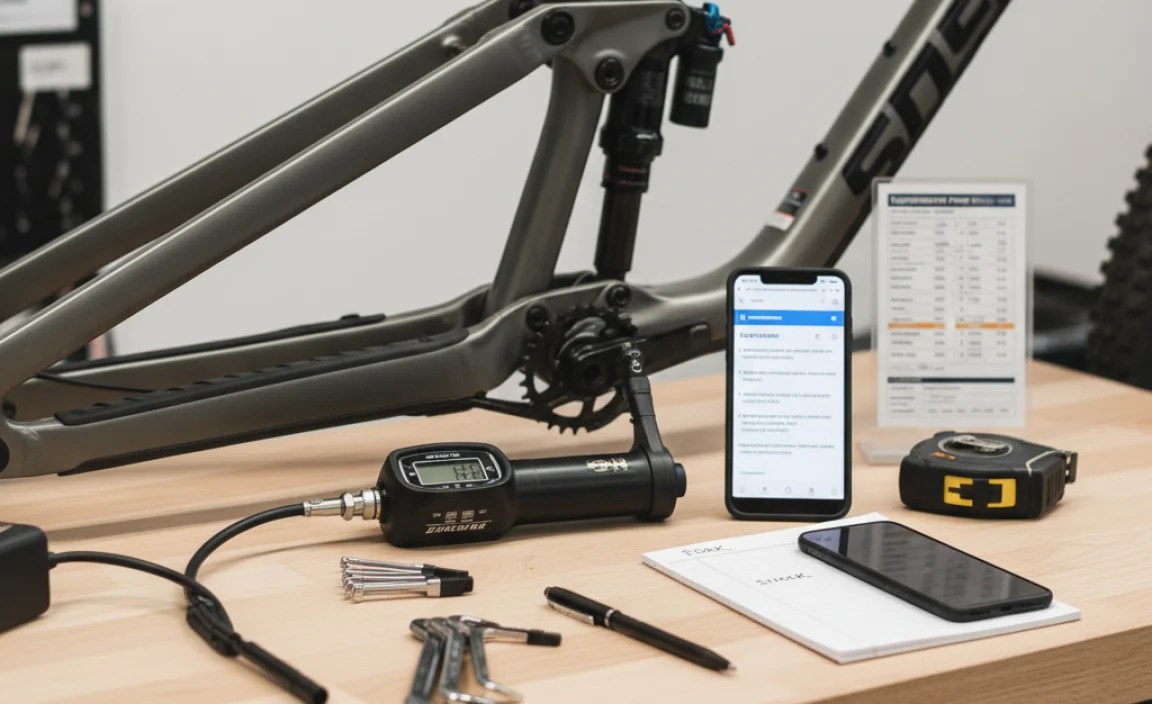
Before you start, you need a few things. First, you need a shock pump. This is a special pump for adjusting air pressure. It has a gauge to show the pressure. Second, you need a tape measure or ruler. This is for measuring sag. Third, you need your bike’s suspension manual. This has important information about your suspension. It tells you the recommended air pressure range. It also tells you how to adjust rebound damping. Fourth, you need a friend. They can help you measure sag. Fifth, you need your riding gear. Wear your helmet, shoes, and any other gear you normally wear. This will give you an accurate measurement of sag. Finally, you need a pen and paper. This is for writing down your settings. Knowing how to set up bike suspension for trail riding with a shock pump starts with preparation.
- Get a shock pump with a gauge.
- Use a tape measure or ruler.
- Find your suspension manual.
- Ask a friend for help.
- Wear your riding gear.
- Take notes of your settings.
Your bike’s suspension manual is a goldmine of information. It tells you the recommended air pressure range for your weight. It also tells you how to adjust rebound damping. Rebound damping controls how quickly the suspension returns after a bump. Too little rebound damping and your bike will feel bouncy. Too much rebound damping and your bike will feel sluggish. The manual will also tell you about any special features of your suspension. Some suspensions have adjustable compression damping. Compression damping controls how stiff the suspension feels. The manual will help you understand these features. It will also help you troubleshoot any problems. Always read the manual carefully before making any adjustments. This will help you get the most out of your suspension. You will also know how to set up bike suspension for trail riding with a shock pump.
Understanding Air Pressure Ranges
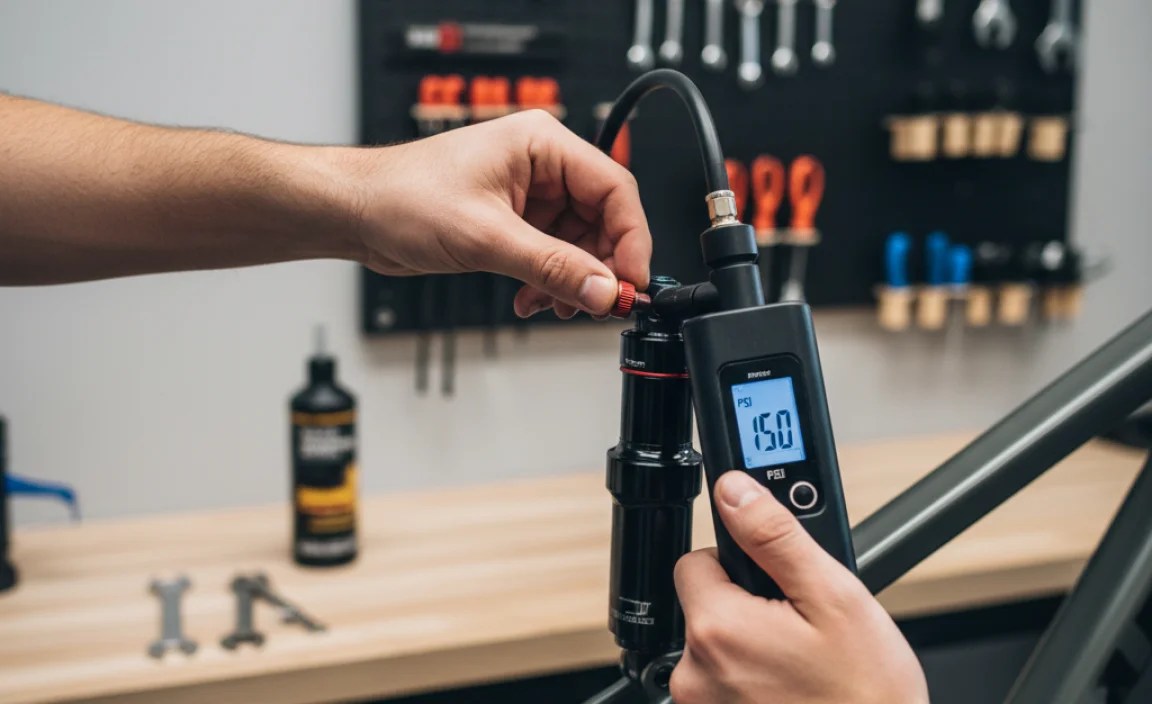
Imagine your suspension is like a balloon. If you don’t put enough air in it, it will be soft and squishy. If you put too much air in it, it will be hard and stiff. The air pressure range is like the sweet spot. It’s the amount of air that makes your suspension work best. The manual tells you the recommended range for your weight. Start with the recommended pressure. Then, adjust it based on how the bike feels. If it feels too soft, add more air. If it feels too stiff, remove some air. Small adjustments can make a big difference. Always use a shock pump to adjust air pressure. A regular pump won’t work. A shock pump has a gauge that shows the pressure accurately. This is important for getting the right setup.
Finding Your Bike’s Suspension Manual
Losing your suspension manual is like losing the instructions to a new toy. Don’t worry, you can usually find it online. Go to the website of the suspension manufacturer. Look for the support or downloads section. Enter your suspension model number. You should find a PDF of the manual. If you can’t find it online, contact the manufacturer. They can usually email you a copy. Keep the manual in a safe place. You’ll need it whenever you want to adjust your suspension. The manual has important information about air pressure, rebound damping, and other settings. It’s also a good idea to watch videos online. Many websites and YouTube channels have tutorials on suspension setup. Combining the manual with videos can help you learn quickly. Soon you’ll be an expert on how to set up bike suspension for trail riding with a shock pump.
Why Use a Shock Pump?
A shock pump is like a special tool for your bike’s suspension. Regular pumps won’t work. They don’t have the right kind of connection. They also don’t have a gauge that shows the pressure accurately. A shock pump lets you add or remove small amounts of air. This is important for fine-tuning your suspension. The gauge on the shock pump shows the pressure in PSI (pounds per square inch). This lets you set the pressure exactly where you want it. Without a shock pump, you’re just guessing. You won’t be able to get your suspension dialed in. A shock pump is an essential tool for any serious mountain biker. It allows you to precisely adjust your suspension. It makes a big difference in ride quality. With a shock pump, you’re in control of your ride.
Fun Fact or Stat: A shock pump can inflate your suspension to pressures over 300 PSI!
Setting Sag for Optimal Performance
Sag is how much your suspension compresses when you sit on the bike. It’s important to set sag correctly. This allows the suspension to absorb bumps properly. Too little sag and the suspension will feel harsh. Too much sag and the suspension will bottom out easily. To measure sag, first, set the O-ring on the suspension stanchion. The stanchion is the shiny part of the suspension that slides in and out. Then, carefully sit on the bike in your normal riding position. Have a friend hold the bike steady. Once you’re sitting still, get off the bike. Measure how far the O-ring has moved. This is your sag measurement. Compare it to the recommended sag in your suspension manual. Adjust the air pressure in the suspension until the sag is correct. Learning how to set up bike suspension for trail riding with a shock pump includes proper sag adjustment.
- Set the O-ring on the stanchion.
- Sit on the bike carefully.
- Have a friend hold the bike.
- Measure how far the O-ring moved.
- Compare to the manual.
- Adjust air pressure.
Different bikes and riding styles require different amounts of sag. Cross-country bikes usually have less sag. This makes them more efficient for pedaling. Trail bikes usually have more sag. This makes them more comfortable for rough trails. Downhill bikes usually have the most sag. This makes them better at absorbing big hits. The recommended sag is usually a percentage of the suspension travel. For example, if your bike has 100mm of travel, and the recommended sag is 20%, you would set the sag to 20mm. Experiment with different sag settings to find what works best for you. A little bit of adjustment can make a big difference. Fine-tuning your sag will help you feel how to set up bike suspension for trail riding with a shock pump.
Finding the Right Sag Percentage
Imagine your suspension is like a diving board. If you stand too far back, it won’t bounce you very high. If you stand too far forward, it will feel stiff and uncomfortable. The right sag percentage is like finding the perfect spot on the diving board. It lets your suspension work its best. The suspension manual usually recommends a sag percentage. Start with that number. Then, adjust it based on your riding style and the trails you ride. If you ride mostly smooth trails, you might want less sag. If you ride mostly rough trails, you might want more sag. Experiment until you find what feels right. Remember to write down your settings. This way, you can always go back to them if you don’t like the new ones.
Measuring Sag Accurately
Measuring sag can be tricky. It’s important to be accurate. Otherwise, your suspension won’t work properly. First, make sure your tires are properly inflated. Then, find a flat surface to measure on. Wear your normal riding gear. This will give you an accurate weight. When you sit on the bike, try to sit still. Don’t bounce or move around. Have a friend hold the bike steady. They can also help you read the tape measure. Measure the sag several times. Take the average of the measurements. This will give you a more accurate result. If you’re having trouble, watch some videos online. There are many good tutorials on how to measure sag. Practice makes perfect. Soon you’ll be a sag-measuring expert.
How Sag Affects Your Ride
Sag affects your ride in many ways. Too little sag can make your ride harsh and uncomfortable. You’ll feel every bump in the trail. It can also reduce traction. Your tires won’t stay on the ground as well. Too much sag can make your bike feel sluggish and unresponsive. It can also cause the suspension to bottom out easily. Bottoming out is when the suspension reaches the end of its travel. This can damage your suspension. It can also be dangerous. The right amount of sag will give you a smooth, comfortable ride. It will also improve traction and control. You’ll be able to ride faster and with more confidence. This is why setting sag is so important. You’ll know how to set up bike suspension for trail riding with a shock pump like a pro.
Fun Fact or Stat: Professional mountain bikers often adjust their sag by as little as 1-2mm for different race courses!
Adjusting Rebound Damping for Control
Rebound damping controls how quickly your suspension returns after a bump. Too little rebound damping and your bike will feel bouncy. Too much rebound damping and your bike will feel sluggish. To adjust rebound damping, find the rebound adjuster on your suspension. It’s usually a small knob with a picture of a rabbit or turtle. The rabbit represents faster rebound. The turtle represents slower rebound. Turn the knob towards the rabbit to speed up the rebound. Turn the knob towards the turtle to slow down the rebound. Start with the rebound in the middle setting. Then, adjust it based on how the bike feels. Ride over some bumps and see how the suspension reacts. If it feels bouncy, slow down the rebound. If it feels sluggish, speed up the rebound. This is an important step in how to set up bike suspension for trail riding with a shock pump.
- Find the rebound adjuster.
- Turn towards the rabbit for faster rebound.
- Turn towards the turtle for slower rebound.
- Start in the middle.
- Ride over bumps.
- Adjust until it feels right.
Rebound damping is like the brakes on your suspension. It prevents the suspension from bouncing uncontrollably. Without rebound damping, your bike would feel like a pogo stick. Too little rebound damping and your bike will bounce you off the trail. Too much rebound damping and your bike will pack up. Packing up is when the suspension doesn’t return to its full travel before the next bump. This makes the suspension less effective. The right amount of rebound damping will keep your tires on the ground. It will also give you a smooth, controlled ride. Experiment with different settings to find what works best for you. Pay attention to how the bike feels on different types of terrain. Soon you’ll be a rebound damping expert. You’ll know how to set up bike suspension for trail riding with a shock pump.
Understanding Rebound Speeds
Imagine your suspension is like a spring. When you compress it, it wants to bounce back. Rebound damping controls how fast it bounces back. Fast rebound means the suspension returns quickly. This is good for small, fast bumps. Slow rebound means the suspension returns slowly. This is good for big, slow bumps. If the rebound is too fast, the bike will feel bouncy. If the rebound is too slow, the bike will feel sluggish. The goal is to find the right balance. You want the suspension to return quickly enough to absorb the next bump. But you don’t want it to bounce you off the trail. Experiment with different rebound speeds. See how they affect the way your bike feels. Start with the recommended setting in the manual. Then, adjust it based on your personal preference.
Testing Rebound on Different Trails
The best way to test rebound damping is to ride on different trails. Smooth trails require different settings than rough trails. On smooth trails, you might want faster rebound. This will make the bike feel more responsive. On rough trails, you might want slower rebound. This will keep the bike more stable. Find a trail with a variety of bumps and jumps. Pay attention to how the suspension feels. Does it feel bouncy? Does it feel sluggish? Adjust the rebound damping until it feels just right. Remember to write down your settings. This way, you can easily change them when you ride on different trails. Testing on different trails will help you fine-tune your suspension. You will also learn how to set up bike suspension for trail riding with a shock pump.
How Rebound Affects Traction
Rebound damping affects traction in a big way. If the rebound is too fast, the tire can bounce off the ground. This reduces traction. If the rebound is too slow, the tire can pack up. This also reduces traction. The right rebound setting will keep the tire on the ground. This maximizes traction. More traction means more control. You’ll be able to corner faster and climb steeper hills. Pay attention to how the bike feels when you’re cornering. Does it feel like the tire is slipping? Adjust the rebound damping until you feel confident in the corners. Traction is key to riding fast and safely. Getting your rebound dialed in will improve your traction. You’ll know how to set up bike suspension for trail riding with a shock pump.
Fun Fact or Stat: Too little rebound damping can cause “wheel hop” on braking bumps, making it harder to control your bike!
Fine-Tuning Compression Damping (If Available)

Compression damping controls how stiff your suspension feels when it compresses. Not all suspensions have adjustable compression damping. If yours does, it’s another way to fine-tune your ride. More compression damping makes the suspension feel stiffer. Less compression damping makes the suspension feel softer. To adjust compression damping, find the compression adjuster on your suspension. It’s usually a small knob or lever. Some suspensions have low-speed and high-speed compression adjusters. Low-speed compression affects how the suspension feels on slow bumps. High-speed compression affects how the suspension feels on big hits. Start with the compression damping in the middle setting. Then, adjust it based on how the bike feels. If it feels too soft, add more compression damping. If it feels too stiff, remove some compression damping. Learning how to set up bike suspension for trail riding with a shock pump can include this step.
- Find the compression adjuster.
- More damping for a stiffer feel.
- Less damping for a softer feel.
- Some have low-speed and high-speed adjusters.
- Start in the middle.
- Adjust until it feels right.
Compression damping is like the firmness of your mattress. A firm mattress provides more support. A soft mattress provides more comfort. The right amount of compression damping depends on your riding style and the trails you ride. If you ride mostly smooth trails, you might want less compression damping. This will make the suspension feel more plush. If you ride mostly rough trails, you might want more compression damping. This will prevent the suspension from bottoming out. Experiment with different settings to find what works best for you. Pay attention to how the bike feels on different types of bumps. Soon you’ll be a compression damping expert. You’ll know how to set up bike suspension for trail riding with a shock pump.
Low-Speed vs. High-Speed Compression
Imagine hitting a small bump versus a big jump. Low-speed compression affects how the suspension reacts to small bumps. High-speed compression affects how it reacts to big hits. Low-speed compression helps with pedaling efficiency. It prevents the suspension from bobbing when you pedal. High-speed compression helps with absorbing big impacts. It prevents the suspension from bottoming out. Adjust low-speed compression for smooth trails and climbing. Adjust high-speed compression for rough trails and jumps. Some suspensions have separate adjusters for each. Others have a single adjuster that affects both. Experiment with different settings. See how they affect the way your bike feels. Low-speed compression is like the firmness of your chair. High-speed compression is like the thickness of your crash pad.
When to Adjust Compression Damping
Adjust compression damping when you want to fine-tune the feel of your suspension. If your suspension feels too soft, add more compression damping. This will make it feel firmer and more supportive. If your suspension feels too stiff, remove some compression damping. This will make it feel plusher and more comfortable. Adjust compression damping based on the terrain you’re riding. On smooth trails, you might want less compression damping. On rough trails, you might want more. Also, adjust compression damping based on your riding style. If you’re an aggressive rider, you might want more compression damping. If you’re a more conservative rider, you might want less. Compression damping is like the volume knob on your radio. Turn it up for more intensity, turn it down for more relaxation.
How Compression Affects Pedal Efficiency
Compression damping can affect how well your bike pedals. Too little compression damping can cause the suspension to bob when you pedal. This wastes energy and makes it harder to climb. Too much compression damping can make the suspension feel harsh. This reduces comfort and traction. The right amount of compression damping will minimize bobbing. It will also maintain good traction and comfort. Adjust low-speed compression damping to improve pedal efficiency. This will make it easier to climb hills. Experiment with different settings. See how they affect the way your bike feels when you’re pedaling. A little bit of adjustment can make a big difference. Soon you’ll be climbing like a pro. You’ll be happy you learned how to set up bike suspension for trail riding with a shock pump.
Fun Fact or Stat: Some professional downhill racers use almost no compression damping to maximize small-bump sensitivity!
Maintaining Your Suspension for Longevity
Your bike’s suspension needs regular maintenance. This keeps it working properly. It also extends its lifespan. First, clean your suspension after every ride. Use a soft cloth and mild soap and water. Don’t use a pressure washer. This can damage the seals. Second, lubricate your suspension regularly. Use a special suspension lubricant. Apply it to the stanchions after cleaning. Third, check your suspension for damage. Look for cracks, leaks, or other problems. Fourth, get your suspension serviced regularly. A professional mechanic can clean and inspect the internals. They can also replace worn parts. Fifth, store your bike properly. Keep it out of direct sunlight and extreme temperatures. Proper maintenance will keep your suspension working like new. It also helps you know how to set up bike suspension for trail riding with a shock pump.
- Clean after every ride.
- Lubricate regularly.
- Check for damage.
- Get it serviced.
- Store your bike properly.
Proper cleaning is essential for suspension maintenance. Dirt and grime can damage the seals. This can cause leaks and reduce performance. Always clean your suspension after riding in muddy or dusty conditions. Use a soft brush to remove dirt from hard-to-reach areas. Be careful not to scratch the stanchions. After cleaning, dry your suspension with a soft cloth. Then, apply a small amount of suspension lubricant to the stanchions. This will keep them smooth and prevent wear. Regular cleaning will help your suspension last longer. It will also keep it working at its best. This is important for enjoying your rides. Cleaning will help you remember how to set up bike suspension for trail riding with a shock pump.
Cleaning and Lubricating Your Suspension
Imagine your suspension is like a car engine. It needs regular oil changes to run smoothly. Cleaning and lubricating your suspension is like giving it an oil change. Use a soft cloth to wipe down the stanchions. Remove any dirt or grime. Then, apply a small amount of suspension lubricant. Use a lubricant specifically designed for suspension. Don’t use WD-40 or other household lubricants. These can damage the seals. Cycle the suspension a few times to distribute the lubricant. Wipe off any excess lubricant. Repeat this process after every ride. This will keep your suspension working smoothly. It will also prevent premature wear. Clean suspension is happy suspension.
Checking for Leaks and Damage
Leaks and damage are like warning signs that your suspension needs attention. Check your suspension regularly for any signs of trouble. Look for oil leaks around the seals. This could indicate a damaged seal. Look for cracks in the stanchions or lowers. This could indicate a serious problem. If you see any leaks or damage, take your bike to a professional mechanic. They can diagnose the problem and repair it. Don’t try to repair your suspension yourself. This can be dangerous. Regular inspections will help you catch problems early. This can prevent costly repairs. It will also keep you safe on the trails. Your suspension will thank you.
When to Get Professional Servicing
Professional servicing is like taking your bike to the doctor for a checkup. It’s important to get your suspension serviced regularly. A professional mechanic can disassemble your suspension. They can clean and inspect the internals. They can also replace worn parts. The recommended service interval depends on how often you ride. If you ride a lot, you might need to get your suspension serviced more often. A good rule of thumb is to get it serviced every year. Ask your local bike shop for recommendations. They can tell you what kind of service your suspension needs. Professional servicing will keep your suspension working like new. It will also extend its lifespan. Regular check-ups help you remember how to set up bike suspension for trail riding with a shock pump.
| Maintenance Task | Frequency | Why |
|---|---|---|
| Cleaning | After every ride | Removes dirt that can damage seals |
| Lubrication | After cleaning | Keeps stanchions smooth |
| Inspection | Monthly | Checks for leaks and damage |
| Professional Service | Annually | Replaces worn parts and maintains performance |
Fun Fact or Stat: Regularly serviced suspension can last twice as long as neglected suspension!
Summary
Learning how to set up bike suspension for trail riding with a shock pump can greatly improve your riding experience. Understanding your suspension type and travel is the first step. Then, you need to gather the right tools. A shock pump, tape measure, and your suspension manual are essential. Setting sag correctly allows the suspension to absorb bumps properly. Adjusting rebound damping controls how quickly the suspension returns. If available, fine-tuning compression damping can further improve your ride. Remember to maintain your suspension. Clean and lubricate it regularly. Check for damage and get it serviced professionally.
By following these steps, you can dial in your suspension for optimal performance. This will result in a smoother, more comfortable, and more controlled ride. Take the time to experiment with different settings. Find what works best for you and the trails you ride. Proper suspension setup will boost your confidence. You will also enjoy your rides more. So grab your shock pump and hit the trails!
Conclusion
Setting up your bike’s suspension might seem tricky. With a little practice, you can master it. A shock pump is your best friend for this task. Understanding sag, rebound, and compression is important. Don’t be afraid to experiment. Find the settings that work best for you. Regular maintenance will keep your suspension working well. Enjoy the smoother, more controlled ride. Now you know how to set up bike suspension for trail riding with a shock pump.
Frequently Asked Questions
Question No 1: What is a shock pump and why do I need it?
Answer: A shock pump is a special pump designed for adjusting the air pressure in your bike’s suspension. It’s different from a regular tire pump. A shock pump delivers small amounts of air. This allows you to fine-tune the suspension. It also has a gauge. This shows the exact pressure in PSI (pounds per square inch). You need a shock pump because regular pumps cannot accurately adjust suspension. They can also damage the suspension. A shock pump is essential for setting sag and adjusting air pressure. This will give you the best possible ride quality. It will also allow you to properly know how to set up bike suspension for trail riding with a shock pump.
Question No 2: How often should I check and adjust my suspension?
Answer: You should check your suspension before every ride. Look for any leaks or damage. Adjust your suspension based on the terrain you’ll be riding. If you’re riding on smooth trails, you might not need to adjust it. If you’re riding on rough trails, you might want to add more air pressure or slow down the rebound. It’s also a good idea to adjust your suspension based on your weight. If you’ve gained or lost weight, you might need to adjust the air pressure. Regular adjustments will keep your suspension working properly. It’s also important to know that how to set up bike suspension for trail riding with a shock pump is important.
Question No 3: What does sag mean and why is it important?
Answer: Sag is the amount your suspension compresses when you sit on your bike. It’s important because it allows the suspension to absorb bumps properly. Too little sag can make the ride harsh. Too much sag can cause the suspension to bottom out. To measure sag, set the O-ring on the suspension stanchion. Then, carefully sit on the bike. Have a friend hold the bike steady. Measure how far the O-ring has moved. Compare it to the recommended sag in your suspension manual. Adjust the air pressure until the sag is correct. Setting sag correctly is essential for a comfortable and controlled ride. It is also part of knowing how to set up bike suspension for trail riding with a shock pump.
Question No 4: What is rebound damping and how do I adjust it?
Answer: Rebound damping controls how quickly your suspension returns after a bump. Too little rebound damping makes the bike feel bouncy. Too much rebound damping makes it feel sluggish. To adjust rebound damping, find the rebound adjuster. It is usually a small knob with a picture of a rabbit or turtle. Turn the knob towards the rabbit to speed up the rebound. Turn the knob towards the turtle to slow down the rebound. Start with the rebound in the middle setting. Then, adjust it based on how the bike feels. Experiment to find the right setting for different trails. This is a key part of how to set up bike suspension for trail riding with a shock pump.
Question No 5: Can I damage my suspension if I use the shock pump incorrectly?
Answer: Yes, you can damage your suspension if you use the shock pump incorrectly. Always read the instructions in your suspension manual before using a shock pump. Be careful not to over-inflate your suspension. This can damage the seals. Also, be careful not to use too much force when attaching the shock pump. This can damage the valve. If you’re not sure how to use a shock pump, ask a professional mechanic for help. Learning the proper techniques for knowing how to set up bike suspension for trail riding with a shock pump will prevent damage.
Question No 6: Where can I find more information about setting up my suspension?
Answer: There are many resources available to help you learn more about setting up your suspension. First, read your suspension manual carefully. This has important information about your specific suspension model. Second, watch videos online. Many websites and YouTube channels have tutorials on suspension setup. Third, ask your local bike shop for advice. A professional mechanic can help you dial in your suspension. Fourth, experiment with different settings. The best way to learn is to try things out for yourself. Fifth, talk to other riders. They can share their experiences and tips. Remember, how to set up bike suspension for trail riding with a shock pump is a journey.


![How to Use Shock Pump on Tubeless Tyre? [Easy Guide]](https://i2.wp.com/bicyclepumper.com/wp-content/uploads/2026/01/how-to-use-shock-pump-on-tubeless-tyre-easy-guide-768x469.webp)

