
How to Repair Hand Pump Hose: Easy Fix!
Quick Summary: Repairing a hand pump hose involves identifying the damage (cracks, leaks, or detachment), acquiring the necessary tools and replacement parts (hose clamps, hose sections), and carefully reassembling or replacing the damaged section. By following these steps, you can extend the life of your pump and avoid the cost of a new one.
Is your trusty hand pump letting you down? A damaged hose can render even the best pump useless, leaving you stranded with a flat tire. Don’t worry, you don’t need to rush out and buy a new pump just yet! Fixing a hand pump hose is often a straightforward process that can save you time and money. In this guide, I’ll walk you through the steps to diagnose the problem, gather the right tools, and get your pump back in action. Let’s get pumping!
Understanding Hand Pump Hose Problems
Before you start tearing things apart, let’s figure out exactly what’s wrong. Here are the most common issues you might encounter with your hand pump hose:
- Cracks or Splits: These are often visible and can cause air to leak out during inflation.
- Leaks at Connections: Air escaping where the hose connects to the pump body or the valve connector.
- Detachment: The hose completely separating from the pump or valve connector.
- Kinks or Blockages: Although less common, a severely kinked hose can restrict airflow.
Tools and Materials You’ll Need

Having the right tools on hand will make the repair process much smoother. Here’s what you’ll likely need:
- Replacement Hose: Purchase a hose that matches the diameter and material of your original hose. You can find these at most bike shops or online retailers.
- Hose Clamps: These secure the hose to the pump and valve connector. Make sure you get the right size for your hose.
- Screwdrivers: You’ll need these to tighten or loosen hose clamps. A flathead or Phillips head screwdriver may be required, depending on the type of clamp.
- Utility Knife or Scissors: For cutting the replacement hose to the correct length.
- Heat Gun or Hair Dryer (Optional): Applying heat can make it easier to slide the hose onto the connectors.
- Pliers (Optional): For removing old hose clamps or gripping the hose.
- Soapy Water: To help lubricate the hose during installation.
Step-by-Step Guide to Repairing Your Hand Pump Hose

Now, let’s get down to the nitty-gritty. Follow these steps to repair your hand pump hose:
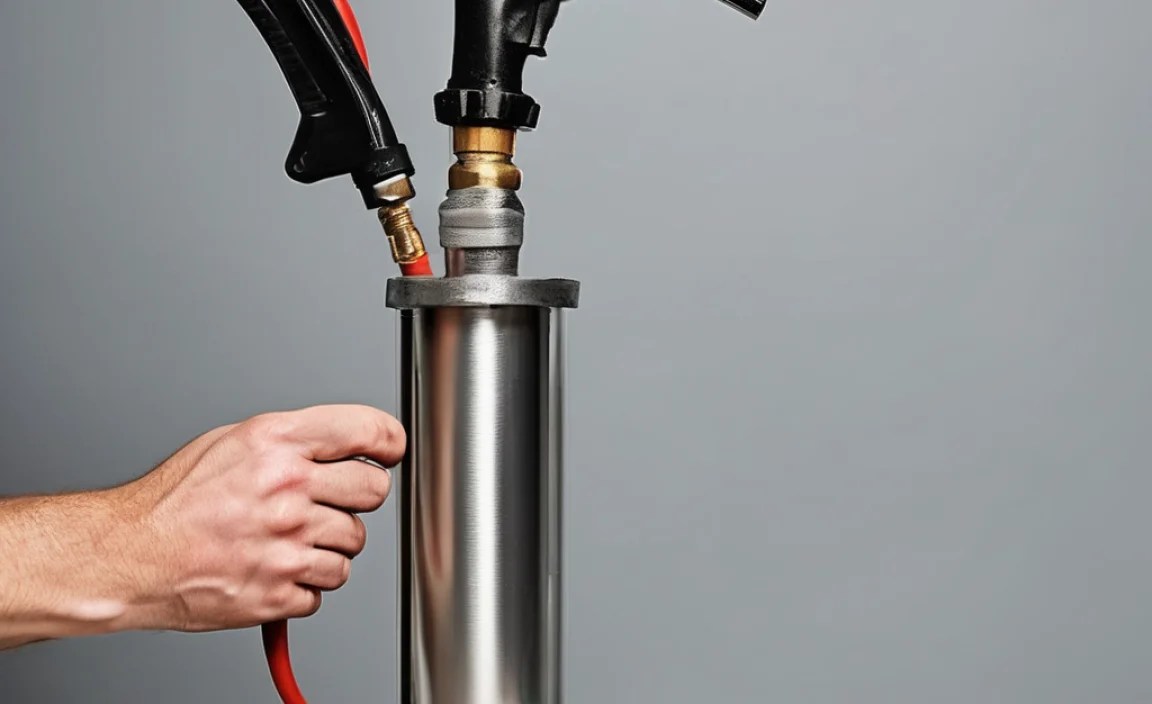
Step 1: Assess the Damage
Carefully examine the hose to identify the location and extent of the damage. Look for cracks, splits, or leaks. If the hose is detached, inspect the connection points for damage.
Step 2: Disconnect the Hose
If the hose is still attached, you’ll need to disconnect it from the pump body and the valve connector. Loosen the hose clamps using a screwdriver. If the hose is stuck, you can try gently twisting it or applying a bit of soapy water to help it slide off. If the hose is brittle, carefully cut it off to avoid damaging the connectors.
Step 3: Measure and Cut the Replacement Hose
Measure the length of the old hose (or the remaining section if it’s broken). Cut the replacement hose to the same length using a utility knife or scissors. Make sure the cut is clean and straight.
Step 4: Install Hose Clamps
Slide hose clamps onto both ends of the replacement hose. Ensure the clamps are positioned so you can easily access the screw to tighten them later.
Step 5: Attach the Hose to the Pump Body
Slide one end of the replacement hose onto the pump body connector. You may need to apply some force or use a heat gun or hair dryer to soften the hose and make it easier to slide on. Make sure the hose is fully seated on the connector.
Step 6: Attach the Hose to the Valve Connector
Slide the other end of the replacement hose onto the valve connector. Again, you may need to use some force or heat to get it on. Ensure the hose is fully seated on the connector.
Step 7: Tighten the Hose Clamps
Position the hose clamps so they are securely gripping the hose at the connection points. Tighten the clamps using a screwdriver. Be careful not to overtighten, as this can damage the hose or the connectors. The goal is to create a tight seal that prevents air leaks.
Step 8: Test the Repair
Connect the valve connector to a tire valve and try inflating the tire. Listen for air leaks at the connection points. If you hear any leaks, tighten the hose clamps further. If the leaks persist, double-check that the hose is fully seated on the connectors and that the clamps are properly positioned.
Dealing with Specific Hose Problems
Sometimes, the problem isn’t just a simple crack or detachment. Here’s how to handle some specific situations:
Leaky Connections
If you’re experiencing leaks at the connections, even after tightening the hose clamps, try these solutions:
- Check for Damage: Inspect the connectors for cracks or damage. If they are damaged, you may need to replace them.
- Use Teflon Tape: Wrap Teflon tape around the threads of the connectors to create a tighter seal.
- Replace the Hose Clamps: Old or worn-out hose clamps may not provide enough clamping force. Replace them with new ones.
Kinked or Blocked Hoses
A kinked or blocked hose can restrict airflow, making it difficult to inflate tires. Here’s how to deal with this problem:
- Straighten the Hose: Try to straighten the kink by gently bending the hose in the opposite direction.
- Use a Heat Gun: Applying heat to the kinked area can make the hose more pliable and easier to straighten.
- Replace the Hose: If the kink is severe or the hose is permanently damaged, it’s best to replace it.
Choosing the Right Replacement Hose

Selecting the right replacement hose is crucial for a successful repair. Consider these factors when choosing a replacement hose:
- Material: Choose a hose made of durable material that can withstand high pressure and temperature. Common materials include rubber, PVC, and polyurethane.
- Diameter: The replacement hose must have the same inner diameter as the original hose to ensure a proper fit.
- Length: Cut the replacement hose to the same length as the original hose.
- Compatibility: Make sure the hose is compatible with your pump and valve connector.
Maintaining Your Hand Pump Hose
Proper maintenance can extend the life of your hand pump hose and prevent future problems. Here are some tips:
- Store Your Pump Properly: Store your pump in a cool, dry place away from direct sunlight and extreme temperatures.
- Avoid Kinking the Hose: Be careful not to kink the hose when using or storing the pump.
- Inspect the Hose Regularly: Check the hose for cracks, splits, or leaks on a regular basis.
- Replace Worn-Out Hoses: If you notice any signs of wear or damage, replace the hose immediately.
Troubleshooting Common Issues
Even with the best instructions, you might run into snags. Here’s some troubleshooting advice:
| Problem | Possible Cause | Solution |
|---|---|---|
| Air leaking from connections | Loose hose clamps, damaged connectors, incorrect hose size | Tighten clamps, replace connectors, use correct hose |
| Hose difficult to attach | Hose too stiff, connector too large | Use heat gun to soften hose, check connector size |
| Pump not inflating tire | Blockage in hose, valve connector not engaging | Check for kinks, ensure proper valve connection |
| Hose cracking quickly | Exposure to UV light, low-quality hose material | Store pump indoors, use high-quality hose |
When to Replace vs. Repair
Sometimes, the damage is too extensive, and repair isn’t the best option. Here’s a quick guide:
- Repair if:
- The hose has a small crack or leak.
- The hose has detached from the connector.
- You have the tools and materials needed for the repair.
- Replace if:
- The hose is severely damaged or brittle.
- The connectors are damaged beyond repair.
- The pump is old and has other issues.
Cost Considerations
Repairing a hand pump hose is generally much cheaper than replacing the entire pump. Here’s a breakdown of the costs involved:
| Item | Estimated Cost |
|---|---|
| Replacement Hose | $5 – $15 |
| Hose Clamps | $2 – $5 |
| Tools (if needed) | $10 – $30 |
| New Hand Pump | $20 – $100+ |
As you can see, repairing the hose can save you a significant amount of money.
Advanced Techniques
For more experienced DIYers, here are some advanced techniques for repairing hand pump hoses:
- Using a Heat Shrink Tubing: Heat shrink tubing can provide an extra layer of protection and reinforcement to the hose connections.
- Creating a Custom Hose: If you can’t find a replacement hose that fits your pump, you can create a custom hose using flexible tubing and fittings.
- Reinforcing the Hose: Wrap the hose with electrical tape or fiberglass tape to increase its durability and resistance to damage.
Hand Pump Hose Repair: Dos and Don’ts
Keep these points in mind when repairing your hand pump hose.
| Do | Don’t |
|---|---|
| Use the correct size hose and clamps. | Overtighten hose clamps. |
| Clean the connectors before assembly. | Use damaged or worn-out parts. |
| Test the repair thoroughly. | Use excessive force when attaching the hose. |
| Store your pump properly. | Leave your pump exposed to extreme weather. |
1. What type of hose is best for a hand pump?
A hose made of durable rubber or reinforced PVC is ideal. Look for hoses specifically designed for high-pressure applications.
2. How do I know what size hose clamp to use?
Measure the outer diameter of the hose when it’s connected to the pump or valve. Choose a hose clamp that fits snugly around this diameter.
3. Can I use any type of glue to repair a cracked hose?
No, regular glue won’t work for high-pressure applications. If the crack is small, you might try using a flexible sealant designed for rubber or plastic, but replacement is always better.
4. How often should I replace my hand pump hose?
It depends on usage and storage conditions. Inspect the hose regularly and replace it if you notice any signs of wear, cracking, or leaks.
5. What can I do to prevent my hand pump hose from cracking?
Store your pump indoors, away from direct sunlight and extreme temperatures. Avoid kinking the hose, and inspect it regularly for signs of wear.
6. Is it worth repairing a hand pump hose, or should I just buy a new pump?
Repairing is almost always cheaper and more environmentally friendly, assuming the pump itself is still in good working order.
7. Can I use a car tire inflator hose on my bike pump?
Generally, no. The fittings and pressure requirements are different. Stick to hoses designed for bike pumps.
Conclusion
Repairing a hand pump hose is a simple and cost-effective way to keep your tires inflated and your bike rides smooth. By following these steps and taking proper care of your pump, you can extend its lifespan and avoid the expense of buying a new one. So, the next time your hand pump hose gives you trouble, don’t despair! With a little bit of know-how and the right tools, you can get it back in action in no time.


