
CO2 Inflator Kit for Mountain Bike Tubeless Setup: Ride Easy!
Have you ever gotten a flat tire on your bike? It can be a bummer. Especially when you’re far from home. A CO2 inflator kit for mountain bike tubeless setup can help. It’s like a magic tool for your tires. It can get you back on the trail fast.
Imagine you’re riding your mountain bike. The sun is shining. Suddenly, your tire goes flat. What do you do? A CO2 inflator kit can be your best friend. It’s small and easy to carry. It can quickly fill your tire with air.
Do you want to learn more about these kits? They are super useful for mountain bikers. Let’s explore how they work. We’ll also see why they are so important. Let’s get started!
Key Takeaways
- A CO2 inflator kit for mountain bike tubeless setup provides rapid tire inflation on the trail.
- These kits are compact and easy to carry, a must for mountain bikers.
- Using a CO2 inflator is faster than a hand pump, saving valuable time.
- Practice using your CO2 inflator kit at home before heading out on a ride.
- Always carry spare CO2 cartridges to be prepared for multiple flat tires.
Understanding CO2 Inflator Kit For Mountain Bike

A CO2 inflator kit for mountain bike tubeless setup is a game-changer. It lets you fix a flat tire super fast. These kits usually have a CO2 cartridge, an inflator head, and sometimes a protective sleeve. The CO2 cartridge holds compressed carbon dioxide gas. The inflator head controls the release of the gas into your tire. The sleeve helps protect your hands from the cold cartridge. Tubeless tires are special because they don’t use an inner tube. Instead, they seal directly to the rim. This helps prevent flat tires. But, when a tubeless tire does get a flat, you need a quick way to re-inflate it. That’s where a CO2 inflator kit comes in handy. It’s small enough to fit in your backpack or a saddlebag. This means you can always have it with you on your rides. Using a CO2 inflator is much faster than using a hand pump. This saves you time and energy. It lets you get back to enjoying your ride as soon as possible.
- CO2 inflator kits are small and easy to pack.
- They quickly inflate tubeless mountain bike tires.
- Kits include a CO2 cartridge and inflator head.
- Some kits have sleeves to protect your hands.
- Tubeless tires seal directly to the rim.
Think of a CO2 inflator kit like a tiny, powerful air pump. It uses compressed gas to fill your tire in seconds. This is especially useful when you’re on a long ride. Imagine you’re racing your friends and get a flat. You don’t want to waste time pumping air by hand. A CO2 inflator gets you back in the race fast. Before you use a CO2 inflator, make sure you know how it works. Practice at home, so you’re ready when you need it on the trail. Always carry extra CO2 cartridges. This way, you’re prepared for more than one flat tire. With a little practice, you’ll be a pro at fixing flats with your CO2 inflator kit.
Fun Fact or Stat: Did you know that CO2 inflators can inflate a tire in under 30 seconds? That’s faster than most hand pumps!
What Comes in a CO2 Inflator Kit?
Have you ever wondered what’s inside a CO2 inflator kit for mountain bike tubeless setup? Most kits come with a few important parts. First, there’s the CO2 cartridge. This is a small metal container filled with compressed carbon dioxide gas. Next, you’ll find the inflator head. This screws onto the cartridge and controls the flow of gas. Some inflator heads have a button or lever to release the CO2. Others are fully automatic. You might also get a small sleeve or cover. This protects your hands from the cold cartridge. CO2 gets very cold when it’s released. Some kits also include a small patch kit. This can help you fix small punctures in your tire. It’s always a good idea to check your kit before you go on a ride. Make sure you have everything you need. Knowing what’s in your kit will help you fix a flat quickly and easily.
Why Are CO2 Inflators Good for Tubeless Tires?
Why are CO2 inflator kits so great for tubeless tires? Tubeless tires need a quick burst of air to seal properly. When you get a flat, the tire bead might come unseated from the rim. A hand pump might not be able to provide enough air quickly enough. A CO2 inflator, on the other hand, can blast air into the tire. This helps the tire bead snap back into place. It creates a tight seal against the rim. This is super important for tubeless setups. Also, CO2 inflators are small and lightweight. This makes them easy to carry on your rides. They don’t take up much space in your backpack or saddlebag. So, if you have tubeless tires on your mountain bike, a CO2 inflator is a must-have tool. It will help you get back on the trail in no time.
How to Use a CO2 Inflator Safely
Using a CO2 inflator kit for mountain bike tubeless setup is easy. But, you need to be careful. First, always wear gloves. The CO2 cartridge gets very cold when you release the gas. This can hurt your hands if you touch it directly. Next, make sure the inflator head is properly attached to the cartridge. You don’t want any gas to leak out. Then, attach the inflator head to your tire valve. Make sure it’s secure. Slowly release the CO2 into the tire. Don’t release it all at once. This can damage the tire. Check the tire pressure as you fill it. You don’t want to overinflate it. Once the tire is at the right pressure, remove the inflator head. Be careful when handling the used CO2 cartridge. It will be very cold. Dispose of it properly. With a little practice, you’ll be able to use a CO2 inflator safely and efficiently.
Choosing The Right CO2 Inflator Kit

Choosing the right CO2 inflator kit for mountain bike tubeless setup can feel tricky. There are many options available. Think about what matters most to you. Do you want a super lightweight kit? Or one that is easy to use? Some kits come with extra features. These might include a pressure gauge or a built-in storage compartment. Consider the size of the CO2 cartridges. Larger cartridges will inflate your tire faster. But they also take up more space. Look for a kit that is compatible with your tire valves. Some inflators only work with Presta valves. Others work with both Presta and Schrader valves. Read reviews from other mountain bikers. See what they say about different kits. A good CO2 inflator kit will be reliable and easy to use. It will give you peace of mind on the trail.
- Consider the weight and size of the kit.
- Look for compatibility with your tire valves.
- Read reviews from other mountain bikers.
- Think about extra features like a pressure gauge.
- Choose a kit that is easy to use and reliable.
- Check the size of the CO2 cartridges.
Imagine you’re at the bike shop. You see a wall full of CO2 inflator kits. How do you pick the right one? Start by thinking about your needs. Are you a racer who needs the fastest inflation possible? Or are you a casual rider who wants something simple and reliable? Consider the type of riding you do. If you ride in remote areas, you might want a kit with extra cartridges. If you mostly ride near home, a smaller kit might be enough. Don’t be afraid to ask the bike shop staff for advice. They can help you find a kit that fits your needs and budget. With a little research, you’ll find the perfect CO2 inflator kit for your mountain bike.
Fun Fact or Stat: Some CO2 inflator kits come with a pressure gauge. This helps you inflate your tire to the perfect pressure!
Valve Compatibility Matters
Valve compatibility is super important when choosing a CO2 inflator kit for mountain bike tubeless setup. There are two main types of valves: Presta and Schrader. Presta valves are thin and have a small nut at the top. They are common on high-end mountain bikes. Schrader valves are wider and look like the valves on car tires. Some CO2 inflators only work with one type of valve. Others work with both. Before you buy a kit, check your bike’s valves. Make sure the inflator is compatible. If you have Presta valves, you’ll need an inflator that works with them. If you have Schrader valves, you’ll need a different inflator. Some inflators come with adapters. These let you use them with both types of valves. Choosing the right inflator will make it easier to fix a flat on the trail.
Size and Weight Considerations
When you’re picking out a CO2 inflator kit, think about size and weight. You don’t want something bulky and heavy. Especially if you’re racing or riding long distances. Look for a kit that is small and lightweight. It should fit easily in your backpack or saddlebag. Some kits are smaller than a candy bar! The weight of the kit depends on the size of the CO2 cartridges. Larger cartridges weigh more. But they also inflate your tire faster. Find a balance between size, weight, and performance. A lightweight kit will be easier to carry. It won’t slow you down on the trail. But make sure it has enough CO2 to inflate your tires properly.
Durability and Reliability
Durability and reliability are key when choosing a CO2 inflator kit for mountain bike tubeless setup. You want a kit that will last. It should work when you need it most. Look for inflators made from strong materials. Metal inflators are usually more durable than plastic ones. Check the reviews to see what other riders say. Do they have problems with the inflator breaking or leaking? A reliable inflator will have a tight seal. It won’t let any CO2 escape when you’re inflating your tire. It should also be easy to use. Even when your hands are cold or wet. A durable and reliable CO2 inflator will give you peace of mind on the trail.
How To Use A CO2 Inflator Correctly

Knowing how to use a CO2 inflator kit for mountain bike tubeless setup is vital. It’s not enough to just have the kit. You need to know how to use it properly. First, find a safe place to stop. Get off the trail and away from traffic. Remove the flat tire from your bike. Check the tire for any sharp objects. Remove the object if you find one. Make sure the tire bead is seated properly on the rim. Attach the CO2 inflator head to the tire valve. Hold the inflator and CO2 cartridge securely. Slowly release the CO2 into the tire. Check the tire pressure as you inflate it. Don’t overinflate the tire. Once the tire is inflated, check for leaks. Reinstall the tire on your bike. Make sure it’s secure. With practice, you’ll be able to fix a flat quickly and easily.
- Find a safe place to stop and fix your tire.
- Remove the flat tire and check for sharp objects.
- Attach the CO2 inflator head to the tire valve.
- Slowly release the CO2 into the tire.
- Check the tire pressure as you inflate it.
- Reinstall the tire on your bike securely.
Imagine you’re in the middle of a race. Your tire goes flat. You need to fix it fast. Knowing how to use your CO2 inflator kit correctly can save you time. Practice using your kit at home. This way, you’ll be ready when you need it on the trail. Watch videos and read instructions. The more you practice, the easier it will be. Remember to be careful when handling the CO2 cartridge. It gets very cold. Wear gloves to protect your hands. With a little practice, you’ll be a pro at fixing flats with your CO2 inflator.
Fun Fact or Stat: Professional mountain bikers can change a flat tire using a CO2 inflator in under a minute!
Preparing Your Tire Before Inflation
Before you use a CO2 inflator kit for mountain bike tubeless setup, prep your tire. This will help you get a good seal. First, remove any debris from the tire. This includes thorns, glass, or rocks. Check the tire for cuts or punctures. If the cut is small, sealant might fix it. If it’s large, you might need a tire boot. Make sure the tire bead is seated properly on the rim. This is key for tubeless setups. If the bead isn’t seated, the tire won’t hold air. You can use your hands to push the bead into place. Or you can use a tire lever. Once the tire is prepped, you’re ready to inflate it with your CO2 inflator.
The Inflation Process Step-By-Step
Let’s walk through the inflation process with a CO2 inflator kit. First, attach the inflator head to the CO2 cartridge. Make sure it’s secure. Then, attach the inflator head to your tire valve. Twist it until it’s snug. Hold the inflator and cartridge firmly. Slowly release the CO2 gas. Some inflators have a button or lever. Others release the gas automatically. Watch the tire pressure as it inflates. Stop when it reaches the recommended pressure. Don’t overinflate the tire. This can cause it to explode. Once the tire is inflated, remove the inflator head. Check for leaks. If you see any leaks, try reseating the tire bead. You might need to add more sealant.
Post-Inflation Checks and Adjustments
After you inflate your tire with a CO2 inflator kit for mountain bike tubeless setup, do some checks. Make sure the tire pressure is correct. Use a tire gauge to check it. Adjust the pressure if needed. Check the tire for any leaks. Listen for hissing sounds. Look for bubbles in the sealant. If you find a leak, try to seal it. You can add more sealant or use a tire plug. Spin the wheel to make sure it’s running true. The tire shouldn’t wobble from side to side. If it does, the tire bead might not be seated properly. Readjust the tire until it runs true. Once you’re happy with everything, you’re ready to ride.
Maintaining Your CO2 Inflator Kit

Taking care of your CO2 inflator kit for mountain bike tubeless setup helps it last longer. Proper maintenance ensures it works when you need it. After each use, inspect the inflator head. Look for any dirt or debris. Clean it with a cloth or brush. Check the threads on the inflator head. Make sure they are not damaged. Store the CO2 cartridges in a cool, dry place. Avoid exposing them to extreme temperatures. Replace the cartridges after each use. Even if they are not completely empty. The gas can leak out over time. Check the O-rings on the inflator head. These small rubber rings help create a seal. Replace them if they are worn or cracked. Keep your CO2 inflator kit in a safe place. Protect it from damage.
- Clean the inflator head after each use.
- Store CO2 cartridges in a cool, dry place.
- Replace CO2 cartridges after each use.
- Check the O-rings for wear and tear.
- Store the kit in a safe place.
Imagine you’re getting ready for a big race. You pull out your CO2 inflator kit. But, it’s all dirty and the O-rings are cracked. You’re in trouble! Taking a few minutes to maintain your kit can prevent this. Wipe down the inflator head after each ride. This removes dirt and grime. Check the CO2 cartridges for dents or damage. Replace them if needed. Store your kit in a small bag or box. This keeps everything together and protects it from the elements. A little maintenance goes a long way. It will ensure your CO2 inflator kit is ready when you need it most.
Fun Fact or Stat: O-rings on CO2 inflators should be replaced every six months to ensure a good seal.
Cleaning and Inspection Tips
Regular cleaning and inspection are key for your CO2 inflator kit. After each use, wipe down the inflator head. Use a clean cloth to remove dirt and debris. Pay special attention to the threads and nozzle. Check for any signs of damage. Look for cracks, bends, or broken parts. Inspect the CO2 cartridges for dents or rust. Discard any damaged cartridges. Check the O-rings for wear and tear. Replace them if they are cracked or flattened. Use a small brush to clean the inside of the inflator head. This will remove any buildup of sealant or dirt. Store your kit in a clean, dry place. This will help prevent corrosion and damage.
Proper Storage Guidelines
Proper storage is important for your CO2 inflator kit for mountain bike tubeless setup. Store the CO2 cartridges in a cool, dry place. Avoid direct sunlight and extreme temperatures. Heat can cause the cartridges to leak or explode. Keep the inflator head clean and dry. Store it in a separate bag or container. This will protect it from dirt and damage. Keep the kit away from children and pets. CO2 cartridges can be dangerous if swallowed or misused. Store the kit in a place where you can easily find it. This way, you’ll be ready to fix a flat quickly.
Replacing Cartridges and O-Rings
Replacing cartridges and O-rings is part of maintaining your CO2 inflator kit. Always replace the CO2 cartridge after each use. Even if it’s not completely empty. The gas can leak out over time. To replace the cartridge, unscrew the old one from the inflator head. Dispose of the old cartridge properly. Screw a new cartridge into the inflator head. Make sure it’s tight. Check the O-rings regularly. Replace them if they are cracked, worn, or flattened. Use a small tool to remove the old O-ring. Install a new O-ring in its place. Lubricate the O-ring with a small amount of grease. This will help it seal properly.
Troubleshooting Common Issues
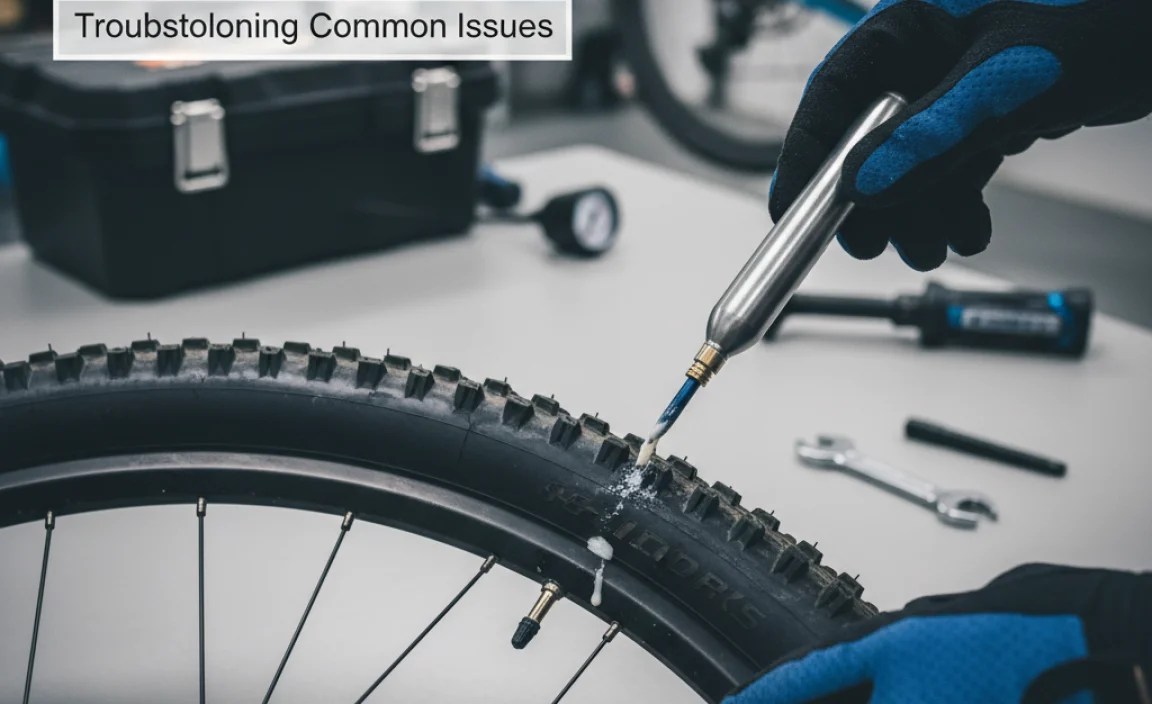
Sometimes, you might run into problems with your CO2 inflator kit for mountain bike tubeless setup. Knowing how to troubleshoot common issues can save you time and frustration. One common problem is a leaking inflator head. This can happen if the O-rings are worn or damaged. Replace the O-rings to fix this issue. Another problem is a frozen inflator head. This can happen when the CO2 gas cools down the metal. Wear gloves to protect your hands. Let the inflator head warm up before using it again. Sometimes, the tire won’t inflate properly. This can happen if the tire bead isn’t seated correctly. Try reseating the tire bead. Add more sealant if needed. If you’re still having problems, consult the kit’s instructions.
- Leaking inflator head: replace the O-rings.
- Frozen inflator head: wear gloves and let it warm up.
- Tire won’t inflate: reseat the tire bead.
- Check the kit’s instructions for more help.
- Make sure the CO2 cartridge is not empty.
Imagine you’re on a long ride. Your tire goes flat. You pull out your CO2 inflator kit. But, it’s not working! Don’t panic. Take a deep breath and try to figure out the problem. Is the inflator head leaking? Are the O-rings damaged? Is the CO2 cartridge empty? By troubleshooting the issue, you can often find a solution. Carry extra O-rings and CO2 cartridges with you. This way, you’ll be prepared for any problems. With a little patience, you’ll be able to fix your flat and get back on the trail.
Fun Fact or Stat: Most CO2 inflator problems are caused by worn O-rings or empty cartridges.
Inflator Head Leaks
Inflator head leaks are a common problem with CO2 inflator kits. The leak often happens where the inflator head connects to the CO2 cartridge. Or where it connects to the tire valve. The most common cause is a worn or damaged O-ring. Replace the O-ring to fix the leak. Make sure the inflator head is securely tightened. But don’t over-tighten it. This can damage the threads. Check the tire valve for damage. A damaged valve can also cause a leak. If the valve is damaged, you might need to replace it. Sometimes, sealant can clog the inflator head. Clean the inflator head with a small brush.
Frozen Inflator Head
A frozen inflator head can be painful when using a CO2 inflator kit for mountain bike tubeless setup. The CO2 gas cools down the metal very quickly. This can cause the inflator head to freeze. It can even stick to your skin. Always wear gloves when using a CO2 inflator. This will protect your hands from the cold. If the inflator head freezes, stop inflating. Let it warm up for a few seconds. Don’t try to force it. This can damage the inflator head or the tire valve. Once the inflator head has warmed up, you can continue inflating the tire.
Tire Not Inflating Properly
If your tire isn’t inflating properly with your CO2 inflator kit, check a few things. First, make sure the CO2 cartridge is full. An empty cartridge won’t inflate the tire. Next, check the tire bead. Make sure it’s seated properly on the rim. If the bead isn’t seated, the tire won’t hold air. Try reseating the tire bead. You can use your hands or a tire lever. Check the tire valve for damage. A damaged valve can prevent air from entering the tire. Add more sealant to the tire. This can help seal any small leaks. If you’re still having trouble, consult a bike mechanic.
Summary
A CO2 inflator kit for mountain bike tubeless setup is super handy. It helps you fix flat tires quickly on the trail. These kits include a CO2 cartridge, an inflator head, and sometimes a protective sleeve. They are small and easy to carry. Knowing how to use the kit is important. Practice at home before you need it on the trail. Choose the right kit for your needs. Consider valve compatibility, size, and durability. Regular maintenance will keep your kit in good shape. This includes cleaning, inspection, and replacing cartridges and O-rings. Troubleshooting common issues will help you solve problems quickly. With a CO2 inflator kit, you can get back to riding faster.
Conclusion
A CO2 inflator kit for mountain bike tubeless setup is a must-have for mountain bikers. It provides a fast and easy way to fix flat tires. These kits are small, lightweight, and easy to use. They are a valuable tool for any rider. Knowing how to use and maintain your kit is key. It will keep you rolling on the trails. So, get yourself a CO2 inflator kit. Be prepared for any flat tire. Happy riding!
Frequently Asked Questions
Question No 1: What is a CO2 inflator kit for mountain bikes?
Answer: A CO2 inflator kit for mountain bike tubeless setup is a tool used to quickly inflate tires. It uses compressed carbon dioxide gas. The kit usually includes a CO2 cartridge, an inflator head, and sometimes a protective sleeve. It is much faster than using a hand pump. This makes it great for fixing flats on the trail. Many mountain bikers carry these kits. They are small and easy to pack.
Question No 2: How do I choose the right CO2 inflator kit?
Answer: When choosing a CO2 inflator kit, think about a few things. Consider the size and weight of the kit. Make sure it is compatible with your tire valves. Read reviews from other mountain bikers. Look for a kit that is durable and reliable. Some kits come with extra features. These might include a pressure gauge. Choose a kit that fits your needs and budget.
Question No 3: How do I use a CO2 inflator safely?
Answer: Using a CO2 inflator kit is easy, but be careful. Always wear gloves. The CO2 cartridge gets very cold. Attach the inflator head to the tire valve. Slowly release the CO2 gas. Check the tire pressure as you inflate it. Don’t overinflate the tire. Dispose of the used cartridge properly. Practice using the kit at home before you need it on the trail.
Question No 4: How do I maintain my CO2 inflator kit?
Answer: To maintain your CO2 inflator kit for mountain bike tubeless setup, clean it regularly. After each use, wipe down the inflator head. Store the CO2 cartridges in a cool, dry place. Replace the cartridges after each use. Check the O-rings for wear and tear. Replace them if needed. Store the kit in a safe place. This will keep it in good condition.
Question No 5: What are some common problems with CO2 inflator kits?
Answer: Some common problems include a leaking inflator head. This is often caused by worn O-rings. A frozen inflator head can also be an issue. This happens when the CO2 cools down the metal. Sometimes, the tire won’t inflate properly. This can be due to a bad tire seat. Always make sure your CO2 inflator kit is in good working order.
Question No 6: Can I use a CO2 inflator kit on any type of bike tire?
Answer: A CO2 inflator kit can be used on most bike tires. But, you need to make sure the inflator is compatible with your tire valves. Some inflators only work with Presta valves. Others work with both Presta and Schrader valves. Check your bike’s valves before buying a kit. Also, make sure the CO2 cartridge is the right size for your tire. Some tires need more CO2 to inflate properly.


