
How to Mount Bike Bell on Narrow Handlebar: Easy Guide
Have you ever tried to put a bike bell on your bike? Was the handlebar too skinny? Many bikes have narrow handlebars. This can make it hard to attach things. You might wonder how to mount a bike bell on a narrow handlebar. Don’t worry! It is easier than you think.
Bike bells are important for safety. They help you tell people you are coming. Let’s learn how to put a bike bell on your bike, even if the handlebar is thin. This will keep you safe and sound while riding.
Sometimes, bike bells don’t fit well. The clamp might be too big. This can be frustrating. But, there are ways to fix this. You can use special tools or tricks. We will show you some easy steps. Soon, your bike bell will be safe and secure!
Key Takeaways
- Mounting a bike bell on a narrow handlebar ensures safer bike rides.
- Use rubber shims or tape to thicken the handlebar for a snug fit.
- Choose bike bells with adjustable clamps to fit various handlebar sizes.
- Properly tightening the bell prevents it from moving during rides.
- Knowing how to mount a bike bell on a narrow handlebar is simple with the right tools.
How to Mount a Bike Bell on a Narrow Handlebar: Easy Guide for a Secure Fit

Have you ever tried to attach a bike bell only to find your handlebar is too thin? It can feel frustrating at first, but the good news is that fixing this problem is simple. With a few easy steps and basic tools, you can securely mount a bike bell even on a narrow handlebar. This guide is designed to help beginners and everyday riders understand the process without confusion. A properly installed bell is not just an accessory—it is an important safety tool that helps you alert others while riding. By learning the right method, you can avoid slipping, rattling, or loose fittings. Whether you ride in busy streets or quiet paths, having a well-mounted bell makes your journey safer and more enjoyable every time you get on your bike.
How to Choose the Right Bike Bell
- Consider the loudness of the bell for different environments.
- Check the clamp size to ensure it fits your handlebar.
- Read reviews to see what other people think about the bell.
- Make sure the bell is easy to ring quickly when needed.
- Choose a bell made of durable materials for long-lasting use.
Bike bells come in many styles. Some are classic and simple. Others are modern and colorful. You can find bells that match your bike. Some bells have fun designs. They might have animals or patterns on them. Think about what you like. Choose a bell that makes you happy. A fun bell can make riding even more enjoyable. It is also important to think about how easy the bell is to install. Some bells are easy to put on. Others might need special tools. If you are not sure, ask for help at a bike shop. They can help you choose the right bell and put it on your bike. Having the right bike bell makes a big difference.
What Type of Sound Do You Want?
Bike bells make different sounds. Some ring loudly. Others chime softly. Do you want a bell that shouts? Or one that whispers? Think about where you ride. A loud bell is good for busy streets. People will hear you coming. A soft bell is nice for quiet paths. It won’t scare animals or people. Try out different bells. See which sound you like best. Some bells have adjustable sounds. You can make them louder or softer. This is a good option if you ride in different places. The sound of your bell is important. It helps you stay safe and be polite.
How Durable Is the Bell?
Think about how tough the bell is. Will it break easily? Or will it last a long time? A good bell should be able to handle bumps and rain. Look for bells made of metal. Metal bells are usually stronger than plastic ones. Check the clamp too. Make sure it is strong and won’t break. Read reviews to see what other people say. Do they say the bell breaks easily? Or that it lasts a long time? A durable bell is worth the extra money. You won’t have to replace it often. This saves you time and money in the long run. A strong bell keeps you safe on your rides.
Is the Bell Easy to Install?
How easy is it to put the bell on your bike? Some bells are very simple. You just tighten a screw. Others are more complicated. They might need special tools. If you are not good at fixing things, choose an easy bell. Look for bells with clear instructions. Watch videos online if you need help. If you are not sure, ask a grown-up to help you. A bike shop can also put the bell on for you. It’s better to get help than to break something. An easy-to-install bell makes life easier. You can get back to riding your bike sooner.
Fun Fact or Stat: Did you know the first bike bell was invented in the late 1800s? It was much simpler than the bells we have today!
Gathering the Right Tools and Materials

Before you start, get everything ready. This makes the job easier. First, you need a bike bell. Make sure it is the right size for your handlebar. You might need a screwdriver. Check what kind of screws the bell uses. A Phillips head or a flat head screwdriver might be needed. Get some rubber or tape. This will help if your handlebar is too thin. The rubber or tape makes the handlebar thicker. This helps the bell fit better. You might also need a small knife or scissors. This is for cutting the rubber or tape. Have a clean cloth nearby. This is for wiping down the handlebar. A clean handlebar helps the bell stick better. Make sure you have good light. You want to see what you are doing. Having everything ready makes the job go smoothly.
- Gather a bike bell that fits your handlebar type.
- Prepare a screwdriver that matches the bell’s screws.
- Have rubber shims or tape to thicken thin handlebars.
- Keep a knife or scissors ready for cutting materials.
- Use a clean cloth to wipe down the handlebar.
Think about where you will work. Choose a flat surface. This makes it easier to work on your bike. Make sure you have enough space. You don’t want to bump into things. If you are working outside, choose a dry day. You don’t want your tools to get wet. Keep your tools organized. This makes it easier to find what you need. Put the screws in a small dish. This way, you won’t lose them. Having a good workspace makes a big difference. It helps you do the job right. It also makes it more enjoyable. Take your time and be careful. You will have your bike bell on in no time.
What Kind of Screwdriver Do You Need?
Look at the screws on your bike bell. Do they have a cross shape? If so, you need a Phillips head screwdriver. Do they have a straight line? Then you need a flat head screwdriver. Make sure the screwdriver fits the screw. If it is too big or too small, it won’t work well. You might even damage the screw. If you don’t have the right screwdriver, ask a grown-up. They can help you find one. Using the right tool is important. It makes the job easier and safer. A good screwdriver is a useful tool to have.
What Type of Rubber or Tape Is Best?
You can use different things to make your handlebar thicker. Rubber bands work well. You can wrap them around the handlebar. Electrical tape is another good choice. It sticks well and is easy to use. You can also use old bicycle inner tubes. Cut them into strips and wrap them around the handlebar. Make sure the material is clean. You don’t want to get dirt on your handlebar. Choose a material that is easy to cut. You might need to trim it to fit. Experiment to see what works best. The goal is to make the handlebar thicker so the bell fits tightly.
Where Should You Work on Your Bike?
Pick a good spot to work on your bike. A garage or shed is a good choice. You will have plenty of space and light. If you don’t have a garage, work outside. Choose a flat, dry spot. Make sure you have enough room to move around. You don’t want to trip over anything. Put down a blanket or tarp. This will protect your bike and the ground. Keep your tools close by. You don’t want to have to walk far to get them. A good workspace makes the job easier and more fun. It also helps you stay safe and organized.
Fun Fact or Stat: Some professional cyclists use special handlebar tape to improve their grip. This tape can also help mount accessories!
Preparing the Handlebar for Mounting
Before you put on the bell, clean the handlebar. Use a clean cloth to wipe off any dirt. Dirt can make the bell slip. Make sure the handlebar is dry. Water can also make the bell slip. If your handlebar is metal, check for rust. Rust can make it hard for the bell to stick. You can use a special cleaner to remove rust. If your handlebar is too thin, add rubber or tape. This will make it thicker. Cut the rubber or tape to the right size. Wrap it around the handlebar where you want to put the bell. Make sure it is smooth and even. This will help the bell fit better. Preparing the handlebar is important for a safe and secure fit.
- Clean the handlebar to remove dirt and grime.
- Ensure the handlebar is dry before mounting.
- Check for and remove any rust on metal handlebars.
- Add rubber or tape to thicken narrow handlebars.
- Wrap the material smoothly and evenly for a better fit.
Think about where you want to put the bell. Choose a spot that is easy to reach. You want to be able to ring the bell quickly. Make sure the bell doesn’t get in the way of your hands. You should still be able to hold the handlebar comfortably. Check that the bell is facing the right way. You want the sound to go forward. This will help people hear you coming. If you have brakes or gears on your handlebar, make sure the bell doesn’t block them. You need to be able to use your brakes and gears easily. Take your time to find the perfect spot for your bell. This will make riding safer and more fun.
Why Is Cleaning the Handlebar Important?
Dirt and grime can make the bell slip. This is not safe. You want the bell to stay in place. Cleaning the handlebar helps the bell grip better. Use a clean cloth and some water. You can also use a special bike cleaner. Make sure to dry the handlebar after cleaning it. Water can also make the bell slip. A clean handlebar is important for safety. It helps the bell stay secure. Take a few minutes to clean your handlebar. It will make a big difference. Your bell will stay in place and you can ride safely.
How Much Rubber or Tape Should You Add?
This depends on how thin your handlebar is. Start with a small amount of rubber or tape. Wrap it around the handlebar. Try to put the bell on. Does it fit tightly? If not, add more rubber or tape. Keep adding until the bell fits snugly. Make sure the rubber or tape is smooth. You don’t want any bumps. Bumps can make the bell wobbly. Use enough material to make the handlebar thicker. But don’t use too much. You still want to be able to hold the handlebar comfortably. Experiment to find the right amount. A good fit is important for safety.
Where Is the Best Place to Position the Bell?
Think about where your hands go on the handlebar. You want the bell to be easy to reach. You should be able to ring it without moving your hand too much. Don’t put the bell where your hand normally goes. This will make it uncomfortable to hold the handlebar. Make sure the bell doesn’t block your brakes or gears. You need to be able to use them quickly. Try different spots on the handlebar. See which one feels best. A good position is important for safety. It makes it easy to ring the bell when you need to.
Fun Fact or Stat: Some bike bells are designed to be aerodynamic. This means they help reduce wind resistance and make you go faster!
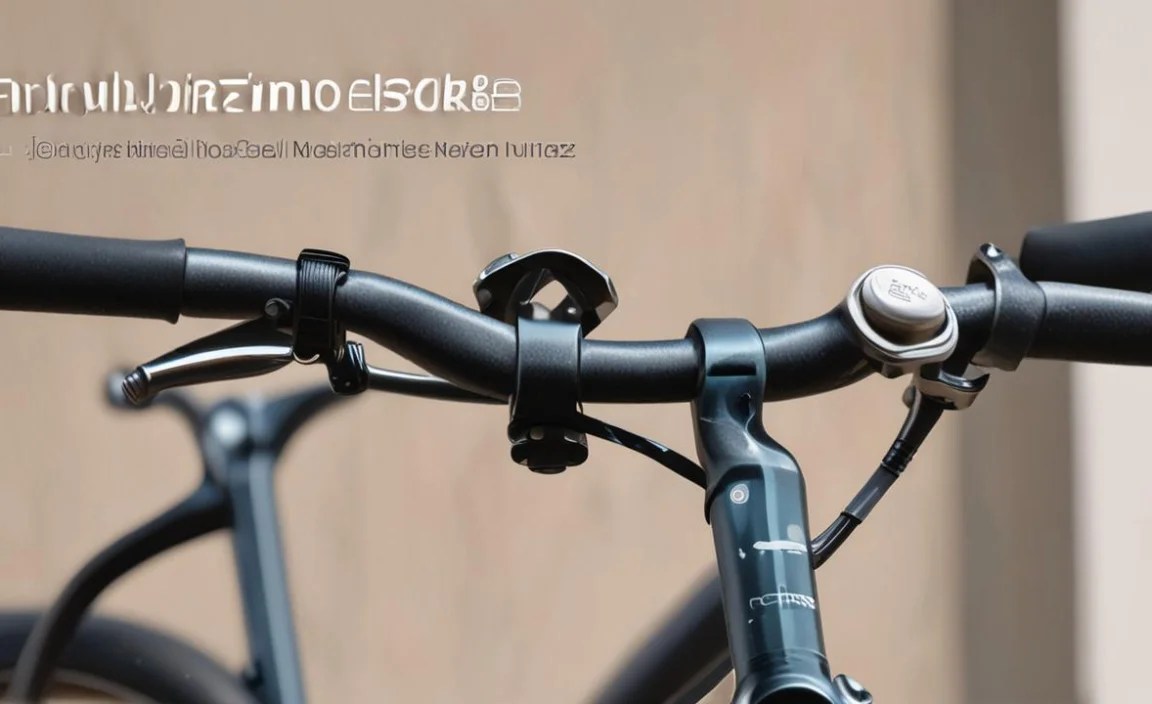
Mounting the Bike Bell on the Handlebar
Now it’s time to put the bell on. Open the clamp on the bell. Place the bell on the handlebar where you want it. Make sure the clamp is around the handlebar. If you used rubber or tape, make sure it is under the clamp. Close the clamp and tighten the screws. Use the right screwdriver for the screws. Don’t tighten the screws too much at first. You want to be able to adjust the bell. Make sure the bell is facing the right way. The sound should go forward. Test the bell to see if it rings. If it doesn’t, adjust the position. Once you are happy with the position, tighten the screws. Make sure they are tight, but not too tight. You don’t want to break the clamp.
- Open the bell clamp and place it on the handlebar.
- Ensure rubber or tape is under the clamp if used.
- Close the clamp and tighten the screws with a screwdriver.
- Adjust the bell’s position before fully tightening.
- Test the bell to ensure it rings properly.
Check that the bell is secure. Try to move it with your hand. It shouldn’t move easily. If it does, tighten the screws more. Be careful not to over-tighten them. This can break the clamp. Make sure the bell doesn’t block your brakes or gears. You need to be able to use them easily. Ring the bell a few times. Make sure it sounds clear and loud. If it doesn’t, adjust the position again. You want the bell to be easy to hear. Take your time and be careful. A well-mounted bell is important for safety. It helps you stay safe on your rides.
How Tight Should the Screws Be?
Tighten the screws until the bell is secure. It shouldn’t move when you push it. But don’t tighten them too much. Over-tightening can break the clamp. Start by tightening the screws a little bit. Then, test the bell. If it moves, tighten the screws a little more. Keep doing this until the bell is secure. Check the clamp. Make sure it is not bending or cracking. If it is, you are tightening the screws too much. Back off a little bit. A good balance is important. You want the bell to be secure, but you don’t want to break it.
What If the Bell Still Doesn’t Fit Tightly?
If the bell is still loose, add more rubber or tape. Take the bell off. Add another layer of rubber or tape to the handlebar. Make sure it is smooth and even. Then, put the bell back on. Tighten the screws. Test the bell again. Does it fit more tightly now? If not, add even more rubber or tape. Keep doing this until the bell fits snugly. You might need to try different types of rubber or tape. Some materials are thicker than others. A snug fit is important for safety. It keeps the bell from moving around.
How Do You Know If the Bell Is Facing the Right Way?
Look at the bell. It usually has a small opening. This is where the sound comes out. Make sure this opening is facing forward. This will help the sound travel in front of you. If the opening is facing backward, the sound will go behind you. This is not as helpful. You want people in front of you to hear the bell. Ring the bell and listen to where the sound goes. Does it go forward? If not, adjust the position of the bell. A well-positioned bell is important for safety. It helps people hear you coming.
Fun Fact or Stat: Some bike bells have different tones. Some are high-pitched, while others are low-pitched. Choose one that you like!
Securing the Bike Bell Properly
After you mount the bell, check it again. Make sure it is still tight. Try to move it with your hand. It shouldn’t move easily. If it does, tighten the screws again. But be careful not to over-tighten them. This can break the clamp. Look at the clamp. Make sure it is not bent or cracked. If it is, you might need a new bell. Check that the bell doesn’t block your brakes or gears. You need to be able to use them easily. Ring the bell a few times. Make sure it sounds clear and loud. If it doesn’t, adjust the position again. A secure bell is important for safety. It helps you stay safe on your rides. Learning how to mount bike bell on narrow handlebar is easy if you take your time.
| Checklist Item | Description | Action |
|---|---|---|
| Tightness | Bell should not move easily. | Tighten screws carefully. |
| Clamp Condition | Clamp should not be bent or cracked. | Replace bell if damaged. |
| Brake/Gear Clearance | Bell should not block brakes or gears. | Adjust bell position. |
| Sound Quality | Bell should sound clear and loud. | Readjust if necessary. |
Ride your bike around for a few minutes. See if the bell stays in place. If it moves, stop and tighten the screws. Keep checking the bell every few rides. This will help you make sure it stays secure. If you ride in bumpy places, the bell might come loose more often. Check it more often in these situations. A little bit of maintenance can keep your bell secure. This will help you stay safe on your rides. Taking care of your bike bell is easy. It just takes a few minutes of your time.
What If the Bell Starts to Rattle?
A rattling bell can be annoying. It can also mean that the bell is loose. Check the screws. Are they tight? If not, tighten them. If the screws are tight and the bell still rattles, check the clamp. Is it cracked? If so, you might need a new bell. Sometimes, the bell rattles because something is loose inside. You can try to fix it. But it might be easier to just get a new bell. A quiet bell is important. It means that the bell is secure and working properly.
How Often Should You Check the Bell?
Check the bell before every ride. This only takes a few seconds. Just make sure the screws are tight. Also, check the clamp. Make sure it is not damaged. If you ride often, check the bell more often. If you ride in bumpy places, check it even more. A quick check can prevent problems. It can also keep you safe. Make checking the bell part of your routine. This will help you stay safe on every ride.
What Should You Do If the Clamp Breaks?
If the clamp breaks, you need a new bell. A broken clamp cannot hold the bell securely. Do not try to fix the clamp with glue or tape. This is not safe. The bell could fall off while you are riding. This could cause an accident. Get a new bell with a strong clamp. Make sure it fits your handlebar. A good clamp is important for safety. It keeps the bell in place. Replace the bell as soon as possible. This will help you stay safe on your rides.
Fun Fact or Stat: Some bike bells are powered by electricity and can make very loud sounds. These are often used on electric bikes!
Troubleshooting Common Problems
Sometimes, things don’t go as planned. The bell might not fit right. Or it might not ring properly. Don’t worry, there are solutions. If the bell is too loose, add more rubber or tape. This will make the handlebar thicker. If the bell is too tight, loosen the screws a little bit. Make sure you don’t loosen them too much. If the bell doesn’t ring, check the clapper. This is the part that hits the bell. Make sure it can move freely. Sometimes, it gets stuck. You can try to clean it or adjust it. If the bell still doesn’t ring, you might need a new bell. Don’t give up. Learning how to mount bike bell on narrow handlebar might take a little practice.
- Add more rubber or tape if the bell is too loose.
- Loosen the screws slightly if the bell is too tight.
- Check the clapper if the bell doesn’t ring.
- Clean or adjust the clapper if it’s stuck.
- Consider replacing the bell if problems persist.
If the bell keeps coming loose, check the screws. Make sure they are tight. You might need to use a different screwdriver. Some screwdrivers work better than others. If the screws are stripped, you need a new bell. Stripped screws cannot hold the bell securely. If the bell is vibrating too much, try moving it to a different spot. Some spots on the handlebar vibrate more than others. Experiment to find a spot that is more stable. Troubleshooting can be frustrating. But it is important to get the bell working properly. A well-mounted bell is important for safety.
What If the Bell Is Too Loose Even With Rubber?
Sometimes, even with rubber or tape, the bell is still too loose. This can be frustrating. Try using thicker rubber or tape. You can also try using a combination of materials. For example, you can use rubber bands and electrical tape. Wrap the rubber bands around the handlebar first. Then, wrap the electrical tape over the rubber bands. This will create a thicker layer. Make sure the material is smooth and even. You don’t want any bumps. A tight fit is important for safety. Keep experimenting until you find a solution.
Why Is the Bell Not Ringing Properly?
If the bell is not ringing properly, check the clapper. This is the small piece that hits the bell. Make sure it can move freely. Sometimes, it gets stuck or bent. You can try to straighten it with your fingers. Be careful not to break it. Also, check for dirt or grime. Clean the clapper with a clean cloth. If the bell still doesn’t ring, try adjusting the position of the bell. Sometimes, the bell needs to be in a certain position to ring properly. Experiment to find the right position. A ringing bell is important for safety.
What Can You Do About Stripped Screws?
Stripped screws are a problem. They cannot hold the bell securely. Unfortunately, there is not much you can do about stripped screws. You need a new bell. Do not try to glue the screws in place. This is not safe. The bell could fall off while you are riding. Get a new bell with good screws. Make sure the screws fit properly. A good set of screws is important for safety. It keeps the bell in place. Replace the bell as soon as possible. This will help you stay safe on your rides.
Fun Fact or Stat: Some bike bells have a lifetime warranty. This means the company will replace the bell if it breaks!
Picking the right bike bell is important. Not all bells are the same. Some are louder than others. Some fit better on narrow handlebars. Think about where you ride your bike. If you ride in busy places, get a loud bell. If you ride on quiet paths, a gentle bell is fine. Look at the size of the bell’s clamp. Make sure it can adjust to fit your handlebar. Read reviews to see what other people think. Choose a bell that is easy to ring. You want to be able to use it quickly when you need it. Check if the bell is made of strong stuff. You want it to last a long time. A good bike bell makes riding safer and more fun. It helps you share the road with others.
Summary
Putting a bike bell on a narrow handlebar can seem tricky. But it’s really not that hard. First, you need the right bell. Choose one with an adjustable clamp. Then, get your tools ready. You’ll need a screwdriver and some rubber or tape. Clean the handlebar and add rubber or tape if it’s too thin. This will help the bell fit better. Place the bell on the handlebar and tighten the screws. Make sure the bell is secure and doesn’t block your brakes. Test the bell to make sure it rings. If it doesn’t, adjust the position. With a little patience, you can easily mount a bike bell on a narrow handlebar.
Conclusion
Adding a bike bell to your bike is a smart move. It keeps you safe and helps others know you are there. Even if your bike has a narrow handlebar, you can still do it. Just follow these simple steps. Choose the right bell, prepare the handlebar, and tighten the screws. Remember to check the bell regularly. A well-mounted bell will make your rides safer and more enjoyable. You’ll feel good knowing you are doing your part to stay safe on the road. Learning how to mount bike bell on narrow handlebar is a valuable skill for any cyclist.
Frequently Asked Questions
Question No 1: What if my bike bell keeps falling off?
Answer: If your bike bell keeps falling off, there are a few things you can check. First, make sure the screws are tight. Use a screwdriver to tighten them as much as you can without breaking the clamp. If the screws are tight and the bell still falls off, the handlebar might be too thin. Try adding some rubber or tape under the clamp. This will make the handlebar thicker and give the bell something to grip. Also, make sure you are using the right size bell for your handlebar. Some bells are too big or too small. Finding the right fit is important. Making sure you know how to mount bike bell on narrow handlebar is crucial for a safe ride.
Question No 2: Can I use any type of tape for the handlebar?
Answer: You can use different types of tape for the handlebar. Electrical tape is a good choice because it is sticky and durable. It will stay in place and won’t come loose easily. You can also use handlebar tape. This is special tape that is made for bikes. It is soft and comfortable to grip. It also comes in different colors and designs. If you don’t have electrical tape or handlebar tape, you can use duct tape. But duct tape is not as comfortable or durable. It might also leave a sticky residue on your handlebar. Choose a tape that is strong and easy to use. This will help you mount a bike bell on a narrow handlebar safely.
Question No 3: How do I know if the bike bell is loud enough?
Answer: To check if your bike bell is loud enough, try ringing it in different places. Ring it on a quiet street. Ring it on a busy street. Ring it near people. Can you hear it clearly? Can other people hear it? If not, the bell might not be loud enough. You can also ask a friend to stand a short distance away. Have them listen while you ring the bell. Can they hear it clearly? If not, you might need a louder bell. A loud bell is important for safety. It helps people know you are coming. When considering how to mount bike bell on narrow handlebar, remember that its audibility is key.
Question No 4: What if I don’t have a screwdriver?
Answer: If you don’t have a screwdriver, you can try using a different tool. A small knife or a coin might work. But be careful. You don’t want to damage the screws or hurt yourself. If you can, borrow a screwdriver from a friend or neighbor. You can also buy a screwdriver at a hardware store. Screwdrivers are not expensive. They are useful tools to have. Using the right tool is important. It makes the job easier and safer. If you’re wondering how to mount bike bell on narrow handlebar without the right tools, it’s best to wait until you have them to avoid damaging anything.
Question No 5: Can I put the bike bell on the brake lever?
Answer: You should not put the bike bell on the brake lever. The brake lever needs to move freely. If you put the bell on the brake lever, it might block the lever. This could make it hard to stop your bike. It is very dangerous. Always put the bell on the handlebar. Choose a spot that is easy to reach. Make sure the bell doesn’t block anything. Safety is the most important thing. Understanding how to mount bike bell on narrow handlebar correctly ensures you don’t compromise your bike’s functionality.
Question No 6: How can I make sure the bell stays in good condition?
Answer: To keep your bike bell in good condition, clean it regularly. Use a clean cloth to wipe off any dirt or grime. Check the screws. Make sure they are tight. If the bell gets wet, dry it off. Water can cause rust. If you live in a wet place, you can use a special spray to protect the bell from rust. Also, be careful not to drop the bell. Dropping it can damage it. A little bit of care can keep your bell working well for a long time. This makes sure your bike bell stays in good shape so you can safely mount bike bell on narrow handlebar.


