
How to Attach Bike Chuck to Presta Valve: Easy Guide
Quick Summary: To attach a bike chuck to a Presta valve, first, unscrew the valve nut. Then, firmly press the chuck straight onto the valve, ensuring a tight seal. If using a lever-style chuck, lock it down. Inflate to your desired pressure and carefully remove the chuck to avoid air loss. Finally, screw the valve nut back on to protect the valve.
Ever struggled to pump up your bike tires because the chuck just won’t stay on the Presta valve? It’s a common frustration for cyclists of all levels. Presta valves, with their slender design, can be a bit finicky compared to Schrader valves. But don’t worry! Getting a secure connection is easier than you think. This guide will walk you through each step, so you can inflate your tires quickly and get back on the road. We’ll cover different types of chucks, troubleshooting tips, and best practices to ensure a perfect seal every time. Let’s get started and make flat tires a thing of the past!
Understanding Presta Valves and Bike Chucks

Before diving into the how-to, let’s quickly cover the basics. Knowing the different types of valves and chucks will help you choose the right tools and techniques for your bike.
What is a Presta Valve?
A Presta valve is a type of bicycle tire valve that is commonly found on high-performance road, mountain, and gravel bikes. Here are some key features:
- Narrower Design: Presta valves are narrower than Schrader valves, which means they require a smaller hole in the rim. This can make wheels lighter and stronger.
- Valve Nut: They have a valve nut that needs to be unscrewed before inflation and screwed back on afterward.
- Higher Pressure: Presta valves are generally better at handling higher pressures, making them ideal for road bikes.
Types of Bike Chucks
A bike chuck is the part of your pump that attaches to the valve. There are two main types:
- Thread-On Chucks: These screw onto the Presta valve. They provide a very secure connection but can be slower to attach and detach.
- Lever-Style Chucks: These press onto the valve and use a lever to create a tight seal. They are quick and easy to use but require careful positioning to avoid leaks.
Understanding these basics sets the stage for a smooth inflation process. Now, let’s get into the step-by-step guide.
Step-by-Step Guide: Attaching a Bike Chuck to a Presta Valve

Follow these steps to securely attach your bike chuck to a Presta valve and inflate your tires with confidence.
Step 1: Prepare the Presta Valve
Before you attach the chuck, you need to prepare the Presta valve. This ensures a good connection and prevents air leaks.
- Locate the Valve Nut: Find the small nut at the tip of the Presta valve.
- Unscrew the Valve Nut: Turn the nut counterclockwise until it’s completely loose. Don’t remove it entirely; just loosen it enough to allow airflow.
- Tap the Valve: Gently tap the valve tip to ensure it isn’t stuck. A small puff of air should escape. This step is crucial if the valve hasn’t been used in a while.
Step 2: Choose the Right Chuck
Select the appropriate chuck for your pump and valve type. Most pumps come with dual-head chucks that can accommodate both Presta and Schrader valves.
- Identify the Correct Side: If using a dual-head chuck, make sure you’re using the Presta valve side. It’s usually smaller than the Schrader side.
- Inspect the Chuck: Check the chuck for any debris or damage. A clean, undamaged chuck will provide a better seal.
Step 3: Attach the Chuck (Thread-On)
If you’re using a thread-on chuck, follow these steps:
- Align the Chuck: Carefully align the chuck with the Presta valve.
- Thread it On: Gently screw the chuck onto the valve. Make sure it’s snug but not overly tight. Overtightening can damage the valve.
- Check the Seal: Ensure there are no hissing sounds, which indicate a leak.
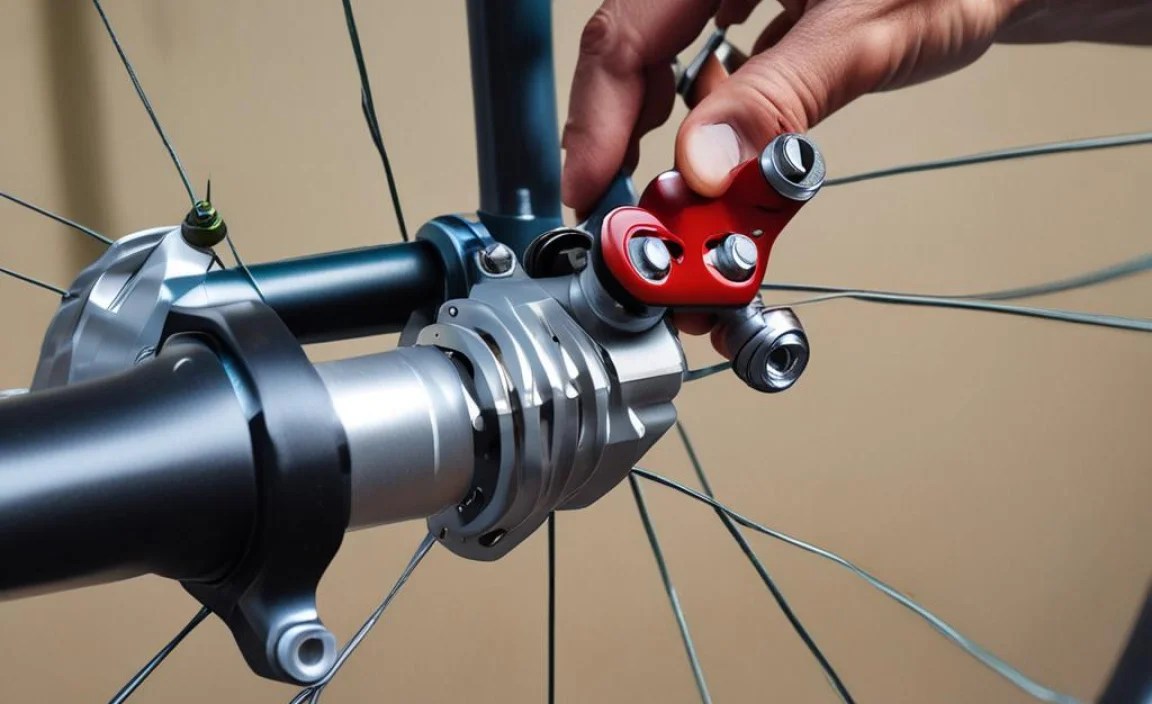
Step 4: Attach the Chuck (Lever-Style)
For lever-style chucks, the process is slightly different:
- Position the Chuck: Place the chuck head squarely over the Presta valve.
- Press Firmly: Press the chuck straight onto the valve with a firm, even pressure.
- Engage the Lever: Flip the lever to lock the chuck in place. You should feel a secure connection.
- Check the Seal: Listen for any leaks. If you hear hissing, reposition the chuck and try again.
Step 5: Inflate the Tire
Now that the chuck is securely attached, you can inflate the tire to the desired pressure.
- Use a Pump with a Gauge: A pump with a built-in pressure gauge is essential for accurate inflation.
- Inflate Gradually: Pump in short, controlled bursts.
- Monitor the Pressure: Keep an eye on the pressure gauge and stop when you reach the recommended PSI (pounds per square inch) or BAR (metric pressure unit) indicated on the tire sidewall.
Step 6: Detach the Chuck
Detaching the chuck carefully is just as important as attaching it. This prevents air loss and protects the valve.
- Disengage the Lever (Lever-Style): If using a lever-style chuck, flip the lever to release it.
- Remove the Chuck: Pull the chuck straight off the valve. Avoid bending or twisting the valve.
- Thread-Off (Thread-On): Unscrew the chuck carefully.
Step 7: Secure the Valve Nut
Finally, secure the valve nut to protect the valve and prevent dirt from entering.
- Tighten the Valve Nut: Screw the valve nut clockwise until it’s snug. Again, avoid overtightening.
Troubleshooting Common Issues
Sometimes, things don’t go as planned. Here are some common issues and how to fix them.
Air Leaks
Air leaks are a common problem when inflating Presta valves. Here’s how to address them:
- Reposition the Chuck: The chuck might not be seated correctly. Try repositioning it and re-engaging the lever (if applicable).
- Check the Valve Core: The valve core (the inner part of the valve) might be loose. Use a valve core tool to tighten it.
- Inspect the Chuck: The chuck’s rubber seal might be worn or damaged. Replace the chuck if necessary.
Stuck Valve
If the valve is stuck, it won’t allow air to flow. Here’s what to do:
- Tap the Valve: Gently tap the valve tip to loosen it.
- Use Pliers (Carefully): If tapping doesn’t work, use needle-nose pliers to gently wiggle the valve tip. Be careful not to damage it.
Damaged Valve
A damaged valve can be difficult to inflate. If you notice any of the following, it might be time to replace the tube or valve core:
- Bent Valve Stem: A bent stem can prevent a good seal.
- Cracked Valve Base: Cracks can cause leaks.
- Stripped Threads: Stripped threads on the valve nut can make it impossible to secure.
Tips for Maintaining Your Bike Pump and Chuck

Proper maintenance will keep your bike pump and chuck in good working condition for years.
- Clean Regularly: Wipe down the pump and chuck with a clean cloth after each use.
- Lubricate Moving Parts: Apply a small amount of silicone-based lubricant to the pump’s moving parts to keep them smooth.
- Store Properly: Store the pump in a dry place to prevent rust and corrosion.
- Replace Worn Parts: Replace worn or damaged parts, such as the chuck’s rubber seal, as needed.
Recommended Tools and Accessories

Having the right tools and accessories can make tire inflation easier and more efficient.
- Bike Pump with Gauge: A reliable pump with an accurate pressure gauge is essential.
- Valve Core Tool: This tool is used to tighten or remove the valve core.
- Tire Levers: These are used to remove and install tires.
- Patch Kit: A patch kit allows you to repair punctures on the road.
- Floor Pump: A floor pump is great for at-home use, offering more power and stability.
- Mini Pump: A mini pump is compact and portable, perfect for carrying on rides.
Table: Comparing Thread-On and Lever-Style Chucks
Here’s a comparison table to help you decide which type of chuck is best for you:
| Feature | Thread-On Chuck | Lever-Style Chuck |
|---|---|---|
| Security | Very Secure | Secure, but can be prone to leaks if not positioned correctly |
| Ease of Use | Slower to attach and detach | Quick and easy to use |
| Best For | High-pressure tires, users who prioritize a secure connection | Everyday use, users who value speed and convenience |
| Potential Issues | Can damage valve if overtightened | May require repositioning to avoid leaks |
Table: Recommended Tire Pressure for Different Bikes
Here’s a table with recommended tire pressure for different types of bikes. Always check the tire sidewall for specific pressure recommendations.
| Bike Type | Recommended Tire Pressure (PSI) |
|---|---|
| Road Bike | 80-130 PSI |
| Mountain Bike | 25-35 PSI |
| Gravel Bike | 30-50 PSI |
| Hybrid Bike | 50-70 PSI |
External Resources for Further Reading
Here are some external resources that provide more in-depth information about bike maintenance and tire inflation:
- Park Tool Repair Help – A comprehensive resource for bike repair and maintenance.
- BikeRadar’s Guide to Bike Pumps – Reviews and recommendations for different types of bike pumps.
- REI Expert Advice on Bike Tires – Tips on choosing and maintaining bike tires.
FAQ: Attaching Bike Chuck to Presta Valve
1. Why is my bike pump not working on my Presta valve?
Ensure you’re using the correct side of the pump chuck for Presta valves. Also, make sure the Presta valve nut is fully unscrewed and the valve isn’t stuck. If the chuck has a lever, ensure it’s properly engaged to create a tight seal.
2. How do I know if my Presta valve is damaged?
Look for signs like a bent valve stem, cracks in the valve base, or stripped threads on the valve nut. If you notice any of these, it’s best to replace the tube or valve core.
3. What is the correct PSI for my bike tires?
The recommended PSI (pounds per square inch) is usually printed on the tire sidewall. Always inflate your tires within this range. Different bikes and riding conditions may require different pressures, so consult the table above or your bike/tire manufacturer’s recommendations.
4. Can I use a Schrader pump on a Presta valve?
Not directly. Schrader pumps have a different nozzle size and design. However, you can use an adapter that screws onto the Presta valve, allowing you to use a Schrader pump.
5. How often should I check my tire pressure?
It’s a good idea to check your tire pressure before every ride, especially if you haven’t ridden in a while. Tires can lose air over time, and maintaining the correct pressure improves performance and prevents flats.
6. What does it mean when my Presta valve is leaking after pumping?
A leak after pumping usually means the valve core isn’t fully tightened or the chuck wasn’t properly sealed during inflation. Try tightening the valve core with a valve core tool and ensure the chuck is correctly positioned next time.
7. Why is it so hard to attach the pump head to the Presta valve?
Difficulty attaching the pump head often stems from misalignment or a worn-out chuck. Ensure the chuck is clean and correctly aligned with the Presta valve. If using a lever-style chuck, make sure the lever is fully open before attaching, then firmly press the chuck onto the valve before engaging the lever.
Conclusion
Attaching a bike chuck to a Presta valve might seem tricky at first, but with the right technique and a little practice, it becomes second nature. Remember to prepare the valve, choose the right chuck, and attach it securely. By following these steps and troubleshooting tips, you’ll be able to inflate your tires quickly and get back to enjoying your ride. Regular maintenance of your pump and chuck will ensure they perform reliably for years to come. So, grab your pump, follow these guidelines, and keep those tires properly inflated for a smooth and enjoyable cycling experience!


