
How to Use a Floor Pump: Easy Guide for Perfect Pressure
Have you ever had a flat tire on your bike? It can be a big problem. You might be stuck far from home. Knowing how to use a floor pump can help. It can get you back on the road quickly. Let’s learn about this handy tool!
Floor pumps are very useful for bike owners. They help keep your tires properly inflated. This makes biking safer and more fun. Do you want to learn how? Keep reading to find out!
Key Takeaways
- Using a floor pump correctly keeps your tires inflated for a smoother ride.
- Knowing how to use a floor pump saves time and money on bike repairs.
- Always check the pressure gauge to avoid over or under-inflating your tires.
- Different valve types need specific floor pump head adjustments.
- Regularly check tire pressure before each ride to ensure safety.
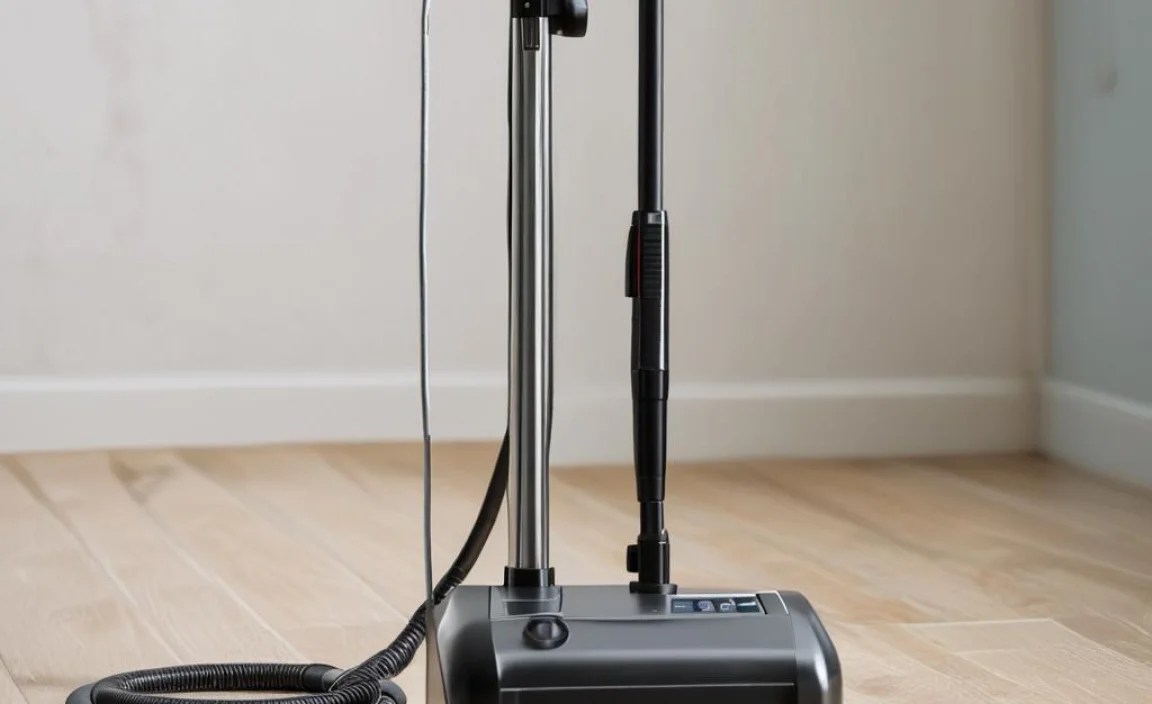
Understanding Your Floor Pump
A floor pump is a simple tool. It helps you put air into your bike tires. It has a handle, a hose, and a gauge. The handle helps you push air. The hose connects to your tire. The gauge shows how much air is in your tire. Floor pumps are better than small hand pumps. They are faster and easier to use. They also give you a more accurate reading of the tire pressure. This helps you avoid flat tires and makes your ride smoother. Learning about your floor pump is the first step. It will help you keep your bike in good shape.
- The handle helps you pump air.
- The hose connects to the tire valve.
- The gauge shows the tire pressure.
- Some pumps have dual heads for different valves.
- A stable base makes pumping easier.
Many people use floor pumps for their bikes. They keep their tires inflated. This makes biking more enjoyable. You can find floor pumps at bike stores. They come in different sizes and prices. Some are for specific types of bikes. Others can be used for any bike. Knowing your pump helps you use it well. This ensures your tires are always ready for a ride. It also helps you avoid problems on the road.
Fun Fact or Stat: The first bicycle pump was invented in the late 1800s, shortly after the invention of the pneumatic tire!
What is a Presta Valve?
Have you ever seen a bike tire valve that looks skinny? That might be a Presta valve. Presta valves are common on road bikes. They are longer and thinner than Schrader valves. To use a Presta valve, you must first unscrew the small nut on top. Then, push it in a little to free it up. This lets air flow in or out. Presta valves hold high pressure well. That’s why they are used on road bikes. Do you know what kind of valve your bike has? It’s good to check before you pump!
What is a Schrader Valve?
Schrader valves are like the ones on car tires. They are wider and shorter than Presta valves. To pump a Schrader valve, you just need to attach the pump head. No need to unscrew anything first. Schrader valves are common on mountain bikes and kids’ bikes. They are strong and easy to use. Schrader valves are very reliable. This makes them great for everyday bikes. Have you ever pumped up a car tire? It’s the same idea!
Why Check Valve Types?
It is important to know what type of valve your bike has. Using the wrong pump head can damage the valve. It can also make it hard to pump air. Most floor pumps have two sides. One side is for Presta valves. The other side is for Schrader valves. Some pumps have a head that adjusts. Knowing your valve type helps you choose the right side. This makes pumping easier and keeps your tires in good shape. Always double-check before you start!
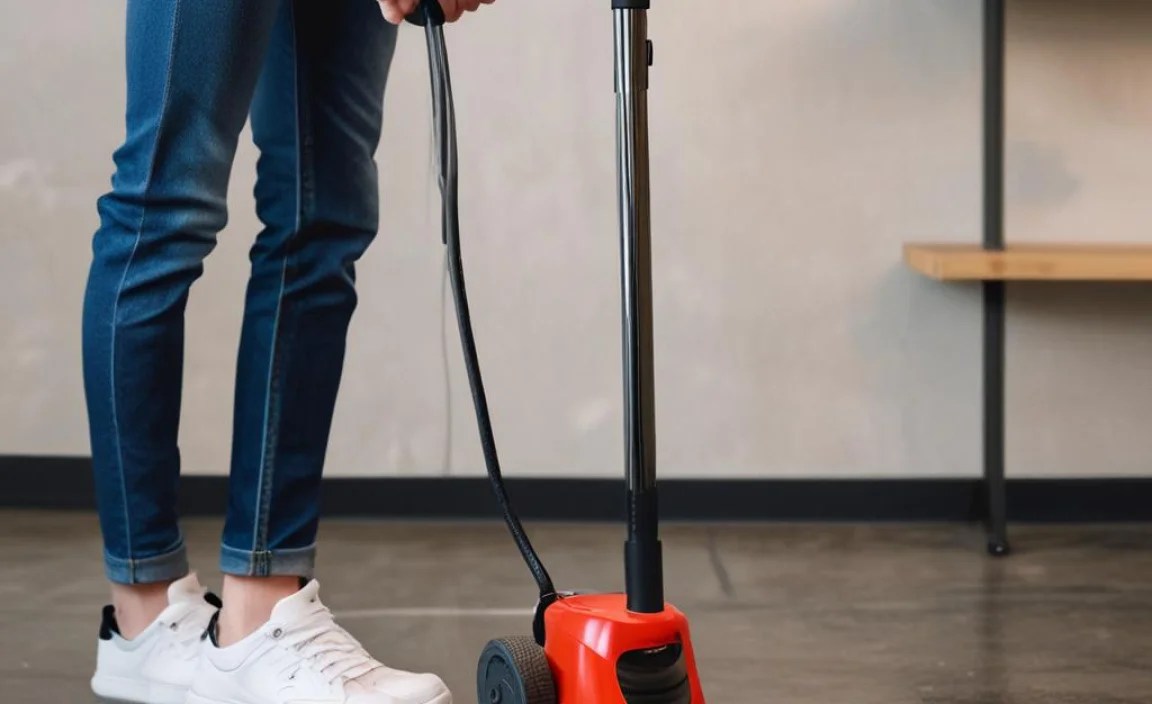
Connecting the Pump to Your Tire

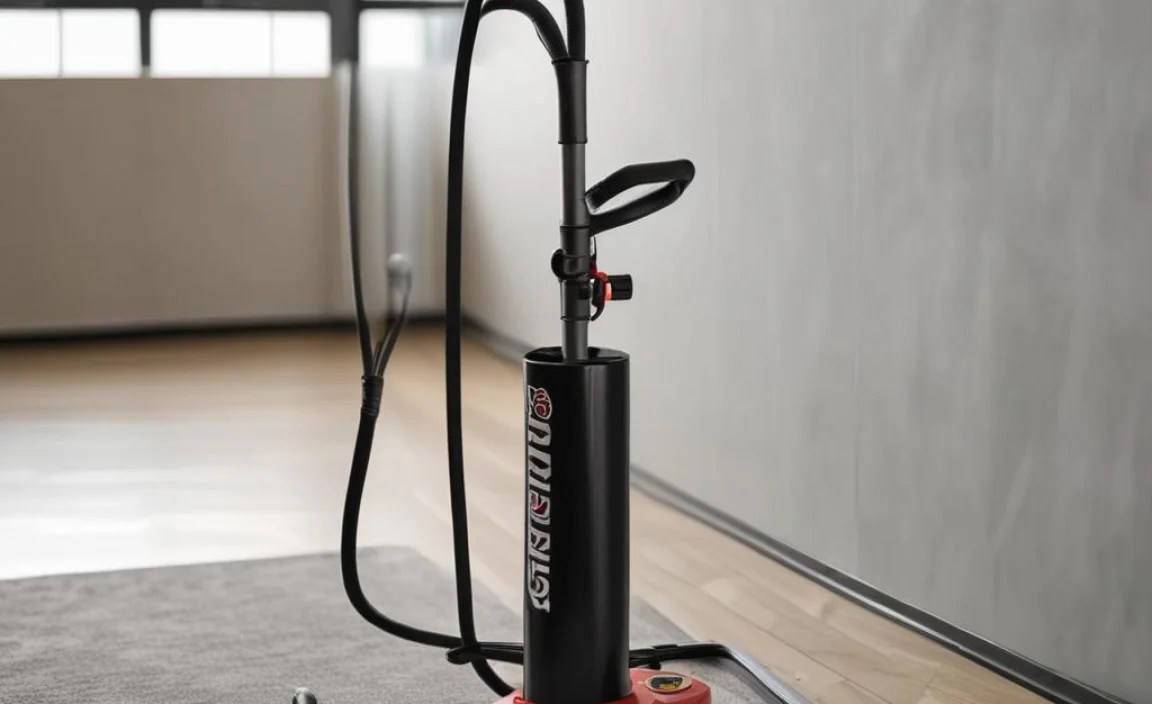
Connecting the pump correctly is very important. First, find the valve on your tire. Take off the valve cap. Now, look at the pump head. Make sure it is set for the right valve type. If you have a Presta valve, loosen the nut first. Then, push the pump head onto the valve. Make sure it is on tight. If it’s loose, air will leak out. Some pumps have a lever to lock the head in place. Close the lever to make a good seal. Now you are ready to start pumping! A good connection means no air leaks. This makes pumping much easier.
- Remove the valve cap first.
- Set the pump head for the right valve.
- Loosen Presta valve nuts before attaching.
- Push the pump head firmly onto the valve.
- Lock the lever to secure the connection.
- Listen for air leaks; adjust if needed.
Have you ever tried to pump a tire and felt air leaking? That means the connection is not tight. Air should only go into the tire. If you hear hissing, stop pumping. Check the connection again. Make sure the pump head is all the way on the valve. Tighten the lever if your pump has one. A secure connection makes pumping much easier. It also helps you get the right amount of air in your tire. Taking a moment to check saves you time and effort.
Fun Fact or Stat: Bicycle tires lose about 1-2 PSI (pounds per square inch) of air pressure each week, so regular pumping is important!
Using the Right Pump Head
Using the right pump head is very important. Most floor pumps have two options. One is for Schrader valves, like on car tires. The other is for Presta valves, which are skinnier. Look closely at your bike’s valve. Choose the pump head that matches. If you try to use the wrong one, it won’t fit well. You might even damage the valve. Using the right pump head makes inflating your tires easy. It also protects your bike.
Locking the Lever Securely
Many floor pumps have a lever on the pump head. This lever locks the pump head onto the valve. Once you push the pump head on, flip the lever closed. You should feel it tighten. If the lever is loose, air will leak out. Make sure the lever is fully closed. A secure lever makes pumping more efficient. It ensures all the air goes into your tire. It also keeps the pump head from popping off.
Avoiding Air Leaks
Air leaks can make pumping very hard. If you hear hissing, there’s a leak. Stop pumping and check the connection. Make sure the pump head is all the way on. The lever should be tight. Sometimes, the rubber inside the pump head wears out. If you still have leaks, you might need a new pump head. Preventing air leaks saves you time and energy. It also helps you get the right tire pressure.
Pumping Air into Your Tire

Now you are ready to pump air! Stand with your feet on the base of the pump. This keeps it steady. Grip the handle firmly. Push the handle down smoothly. Watch the gauge as you pump. It will show the tire pressure. Keep pumping until you reach the right pressure. Look for the recommended PSI on the side of your tire. Don’t over-inflate! Too much air can cause a blowout. Pumping should be easy and smooth. If it’s hard, check your connection. Pumping air is simple with the right technique. It keeps your tires in good shape.
- Stand on the pump’s base for stability.
- Grip the handle firmly with both hands.
- Push down smoothly and steadily.
- Watch the pressure gauge as you pump.
- Inflate to the recommended PSI on the tire.
- Avoid over-inflating the tire.
- Check the tire pressure often while pumping.
Have you ever pumped too much air into a tire? It can be dangerous! Over-inflating can cause the tire to burst. Always check the recommended PSI. It’s printed on the side of your tire. Use the gauge on the pump. Stop pumping when you reach the right pressure. It is better to under-inflate a little than over-inflate. Correct tire pressure makes your ride safer. It also helps your tires last longer.
Fun Fact or Stat: The ideal tire pressure affects your bike’s speed and comfort. Road bikes usually need higher pressure than mountain bikes!
Watching the Pressure Gauge
The pressure gauge is very important. It tells you how much air is in your tire. Watch the gauge as you pump. It shows the PSI (pounds per square inch). The right PSI is printed on your tire. Stop pumping when the needle reaches that number. The pressure gauge helps you avoid over-inflating. It also makes sure you have enough air for a safe ride.
Using Smooth, Steady Strokes
Pump the handle smoothly. Don’t pump too fast or too hard. Use steady strokes. This helps you control the air flow. It also makes pumping easier. If you pump too quickly, the pump can get hot. Smooth strokes are more efficient. They also help you avoid mistakes. Take your time and pump with control.
Avoiding Over-Inflation
Over-inflation can be dangerous. Too much air can cause the tire to burst. Always check the recommended PSI. It is printed on the tire’s sidewall. Stop pumping when you reach that number. If you accidentally over-inflate, let some air out. Avoiding over-inflation keeps you safe. It also protects your tires from damage.
Checking the Tire Pressure
Checking the tire pressure is a very important step. After pumping, take the pump head off the valve. Look at the gauge one more time. Make sure the pressure is still correct. Sometimes, air can leak out when you remove the pump head. If the pressure is too low, add a little more air. If it’s too high, let some out. Checking the pressure ensures a safe and smooth ride. Correct tire pressure is key to good performance. It also helps your tires last longer.
- Remove the pump head carefully.
- Check the gauge after removing the pump.
- Ensure the pressure matches the recommended PSI.
- Add air if the pressure is too low.
- Release air if the pressure is too high.
- Double-check before each ride.
Do you know why tire pressure is so important? It affects how your bike rides. Too little air makes it hard to pedal. It also increases the chance of a flat tire. Too much air makes the ride bumpy. It can also cause the tire to burst. The right tire pressure gives you the best of both worlds. It makes pedaling easy. It also keeps you safe and comfortable. Check your tires before every ride!
Fun Fact or Stat: Properly inflated tires reduce rolling resistance, which means you can ride faster with less effort!
Using a Separate Tire Gauge
Some people like to use a separate tire gauge. This can be more accurate than the gauge on the pump. Attach the gauge to the valve. It will show the tire pressure. Compare this to the recommended PSI. If they don’t match, adjust the air. A separate gauge gives you extra confidence. It helps you get the pressure just right.
Squeezing the Tire to Check
You can also check the tire pressure by squeezing the tire. This isn’t as accurate as a gauge. But it can give you a general idea. If the tire feels very soft, it needs more air. If it feels very hard, it might have too much air. Squeezing the tire is a quick way to check. But always use a gauge for best results.
Listening for Air Leaks
After pumping, listen for air leaks. Put your ear close to the valve. If you hear hissing, air is escaping. Check the valve and the pump head. Make sure everything is tight. If the leak continues, you might need a new valve. Listening for leaks helps you catch problems early. This prevents flat tires on the road.
Storing Your Floor Pump
Taking care of your floor pump helps it last longer. Store it in a dry place. This prevents rust and damage. Keep the hose untangled. This prevents cracks and leaks. Check the pump head regularly. Make sure it is clean and in good shape. A well-cared-for pump is always ready when you need it. Proper storage ensures your pump works well for years. It also saves you money on replacements.
- Store the pump in a dry place.
- Keep the hose untangled and free.
- Check the pump head for damage.
- Clean the pump regularly.
- Avoid storing in extreme temperatures.
Have you ever left your pump outside in the rain? It’s not a good idea! Water can damage the pump. It can also cause the metal parts to rust. Store your pump indoors. A garage or shed is a good place. Keep it away from direct sunlight too. Good storage habits keep your pump working well. They also prevent costly repairs. Treat your pump with care, and it will serve you well.
Fun Fact or Stat: A well-maintained floor pump can last for over 10 years, making it a great investment for any cyclist!
Keeping it Clean and Dry
Keep your floor pump clean. Wipe it down with a cloth regularly. This removes dirt and dust. Store it in a dry place. This prevents rust. Water can damage the pump’s internal parts. Keeping it clean and dry extends its life. It also keeps it working smoothly.
Avoiding Extreme Temperatures
Extreme temperatures can damage your floor pump. Don’t leave it in direct sunlight. The heat can damage the plastic parts. Don’t store it in freezing temperatures either. The cold can make the rubber brittle. Avoiding extreme temperatures prevents damage. It keeps your pump in good condition.
Checking for Wear and Tear
Check your floor pump regularly. Look for signs of wear and tear. Are there cracks in the hose? Is the pump head loose? Does the gauge work correctly? If you see any problems, fix them right away. Checking for wear prevents bigger problems later. It also keeps your pump safe to use.
Troubleshooting Common Issues
Sometimes, you might have problems with your floor pump. The most common issue is air leaking. This can happen if the pump head is not connected properly. Make sure it is pushed all the way on. The lever should be tight. If air is still leaking, check the rubber inside the pump head. It might be worn out. Another issue is a broken gauge. If the gauge doesn’t move, it needs to be fixed or replaced. Troubleshooting problems helps you keep your pump working well. It also saves you from frustration.
- Check for air leaks at the valve connection.
- Ensure the pump head is securely attached.
- Inspect the pump head for wear and tear.
- Check the pressure gauge for accuracy.
- Replace worn-out pump parts.
Have you ever tried to pump a tire and nothing happened? It can be frustrating! First, check the connection. Make sure the pump head is on tight. Then, check the valve on your tire. Make sure it is not blocked. If you still can’t pump, the pump itself might be broken. Solving pump problems can be easy. Just take it one step at a time. A working pump makes bike maintenance simple.
Fun Fact or Stat: Regularly lubricating the piston inside your floor pump can keep it working smoothly and efficiently!
Air Leaking from the Connection
Air leaking is a common problem. It usually happens at the connection. Make sure the pump head is pushed all the way on. The lever should be tight. If air is still leaking, the rubber inside the pump head might be worn out. You can buy a replacement pump head. Fixing air leaks makes pumping much easier. It also ensures you get the right tire pressure.
Gauge Not Working Correctly
If the gauge isn’t working, you won’t know the tire pressure. Check if the needle moves when you pump. If it doesn’t, the gauge is broken. You can buy a new gauge. Some pumps have replaceable gauges. If not, you might need a new pump. A working gauge is important for safe riding. It helps you avoid over-inflation.
Pump Handle is Hard to Push
If the pump handle is hard to push, the pump might need lubrication. Some pumps have a place to add oil. Check the instructions for your pump. A little oil can make the handle move more smoothly. A smooth handle makes pumping easier. It also prevents wear and tear on the pump.
Choosing the Right Floor Pump
Choosing the right floor pump is important. Think about what kind of bike you have. Road bikes need high pressure. Mountain bikes need lower pressure. Some pumps are better for high pressure. Others are better for high volume. Look for a pump with a good gauge. It should be easy to read. The pump head should be easy to use. Read reviews before you buy. The right pump makes bike maintenance easier. It also keeps your tires in top shape.
| Feature | High-Pressure Pump | High-Volume Pump |
|---|---|---|
| Tire Type | Road Bikes | Mountain Bikes |
| Pressure Needed | High (80-130 PSI) | Low (30-50 PSI) |
| Effort Required | More effort per pump | Less effort per pump |
| Inflation Speed | Slower inflation | Faster inflation |
- Consider the type of bike you have.
- Look for a pump with a clear gauge.
- Choose a pump head that is easy to use.
- Read reviews before buying.
- Consider the pump’s size and weight.
Have you ever used a pump that was hard to read? It can be frustrating! Look for a pump with a large, clear gauge. The numbers should be easy to see. The pump head should also be easy to use. Some pump heads are tricky to attach. A good pump makes inflating tires simple. It also saves you time and effort. Take your time and choose wisely!
Fun Fact or Stat: Some high-end floor pumps come with digital gauges for even more precise pressure readings!
Considering Bike Type
Think about what kind of bike you have. Road bikes need high pressure. Mountain bikes need lower pressure. A pump for road bikes might not work well for mountain bikes. Choose a pump that matches your bike type. The right pump makes inflating tires easier. It also ensures the correct pressure.
Reading Customer Reviews
Before you buy a pump, read customer reviews. See what other people say about it. Do they like the pump? Is it easy to use? Does it last a long time? Reviews can help you make a good choice. They can also warn you about problems.
Checking Gauge Accuracy
The gauge is very important. It tells you the tire pressure. Make sure the gauge is accurate. Some gauges are not very precise. This can lead to over-inflation or under-inflation. Look for a pump with a reliable gauge. An accurate gauge ensures safe riding. It also helps your tires last longer.
Summary
Knowing how to use a floor pump is a useful skill for any bike owner. A floor pump helps you keep your tires properly inflated. This makes your bike ride smoother and safer. First, understand the different parts of the pump. Then, connect the pump head to your tire valve. Pump air into the tire, watching the pressure gauge. Be sure to avoid over-inflating. After pumping, check the tire pressure again. Finally, store your pump in a dry place. This keeps it in good condition.
With a little practice, using a floor pump will become easy. You’ll be able to keep your tires in top shape. This will make your bike rides more enjoyable. Remember to always check your tire pressure before each ride. This helps you avoid flat tires and stay safe on the road.
Conclusion
Learning how to use a floor pump is a great skill. It keeps your tires inflated. This makes your bike rides safer and more fun. Remember to connect the pump correctly. Watch the pressure gauge. Store your pump in a safe place. With practice, you will become a pro. Enjoy your smooth and safe bike rides!
Frequently Asked Questions
Question No 1: Why is it important to use a floor pump instead of a hand pump?
Answer: Floor pumps are better than hand pumps for several reasons. Floor pumps are more efficient. They let you put more air into your tire with each pump. Floor pumps also have a gauge. This helps you see the tire pressure. Hand pumps are smaller. They are good for emergencies on the road. But a floor pump is best for regular inflation at home. Knowing how to use a floor pump ensures accurate tire pressure, which improves your ride.
Question No 2: How do I know what PSI my tires should be inflated to?
Answer: The correct PSI (pounds per square inch) for your tires is very important. Look on the side of your tire. You should see a range of numbers. This shows the minimum and maximum PSI. Choose a number within that range. Road bikes usually need higher PSI than mountain bikes. If you’re not sure, start with a lower number. You can always add more air. Knowing how to use a floor pump to reach the right PSI makes your ride safer and more comfortable.
Question No 3: What should I do if the pump head won’t attach to my tire valve?
Answer: First, make sure you are using the correct side of the pump head. Some pumps have two sides. One is for Schrader valves. The other is for Presta valves. If it still doesn’t fit, check the valve on your tire. Make sure it is not damaged. Sometimes, dirt can block the valve. Clean it gently. If the pump head is damaged, you might need a new one. Understanding how to use a floor pump involves knowing how to troubleshoot these common issues.
Question No 4: How often should I check my tire pressure?
Answer: You should check your tire pressure before every ride. Tires lose air over time. Even if you don’t see a flat, the pressure can drop. Low tire pressure makes it harder to pedal. It also increases the risk of a flat tire. Taking a few minutes to check your tires is worth it. It makes your ride safer and more enjoyable. Knowing how to use a floor pump and checking your tires regularly will keep you riding smoothly.
Question No 5: Can I use a floor pump for other things besides bike tires?
Answer: Some floor pumps can be used for other things. Some have adapters for inflating sports balls. Others can inflate air mattresses. However, most floor pumps are designed for bike tires. Using them for other things might damage the pump. Check the instructions for your pump. See what it is designed to inflate. Knowing how to use a floor pump for its intended purpose will help it last longer and work better.
Question No 6: What should I do if my tire keeps losing air after I pump it up?
Answer: If your tire keeps losing air, you might have a leak. Check the valve first. Make sure it is tight. Then, check the tire for punctures. Look for small holes or cuts. You can also put the tire in water. Bubbles will show where the leak is. If you find a leak, you need to fix it. You might need a new tube or tire. Knowing how to use a floor pump is only part of bike maintenance; addressing leaks is also essential.


