
CO2 Inflator: How to Test if Head is Leaking Before Ride – Smart Tip!
Did you ever get a flat tire on your bike? It can be a real bummer. Especially if you are far from home. A CO2 inflator can help you fix it fast. But, how do you know it will work when you need it? Let’s learn how to test if the CO2 inflator head is leaking before a ride. This way, you won’t be stuck with a flat and no air.
Using a CO2 inflator is like magic. It quickly fills your tire with air. But, sometimes, the head of the inflator can leak. This means the air escapes before it gets into your tire. Imagine trying to blow up a balloon with a hole in it. It’s frustrating! So, it’s important to check your CO2 inflator. You want to be sure it is ready to go before you start your bike ride.
Key Takeaways
- Always inspect your CO2 inflator for damage before each bike ride.
- Listen for hissing sounds; these could indicate a leak in the inflator head.
- Check the cartridge connection to ensure a tight, secure fit.
- Practice using your CO2 inflator at home to get familiar with it. Learn how to test if the CO2 inflator head is leaking before a ride.
- Carry spare CO2 cartridges and a hand pump as a backup.
Why Test CO2 Inflator Head for Leaks

Imagine you are cycling on a long trail. Suddenly, you feel your tire go flat. You pull out your CO2 inflator, ready to save the day. But, when you use it, you hear a hissing sound. All the CO2 is escaping from the head. Your tire is still flat! This is why testing for leaks is very important. It can save you from being stranded. You need to know your equipment will work. It gives you peace of mind.
- Avoid getting stranded with a flat tire.
- Ensure your CO2 inflator works when you need it most.
- Save time and energy on your bike rides.
- Maintain your tires at the correct pressure.
- Increase your safety while cycling.
Testing your CO2 inflator head for leaks is easy. Before each ride, take a few seconds to check it. Attach a CO2 cartridge and listen closely. Do you hear any hissing? If you do, the head might be leaking. Also, feel around the connection point. Can you feel air escaping? If so, don’t use that inflator. Get a new one or fix the leak. Knowing your CO2 inflator is working correctly is vital. A little check can prevent a big problem on your ride.
Fun Fact or Stat: A leaking CO2 inflator can empty a full cartridge in under 10 seconds!
Check for Visible Damage
Have you ever dropped your CO2 inflator? Sometimes, drops can cause damage. Look closely at the head of the inflator. Are there any cracks or dents? Even small damage can cause leaks. Check the threads where the CO2 cartridge screws in. If they are bent, the cartridge might not seal properly. The CO2 could leak out. Also, look at the rubber seals. If they are worn or cracked, they won’t work. Replace any damaged parts before you ride. This will help ensure your CO2 inflator works when you need it.
Listen for Hissing Sounds
Imagine you are in a quiet park. You attach the CO2 cartridge to the inflator. Suddenly, you hear a faint hissing sound. That sound could mean a leak. CO2 is escaping from the head. Listen very carefully around the connection points. If you hear a hiss, the seal is not tight. The inflator might not work when you need it. Try tightening the cartridge more. If the hissing continues, the head is likely leaking. You should replace the inflator or the seals. Always listen for these sounds before you leave for a ride.
Feel for Escaping Air
Close your eyes and imagine this. You attach the CO2 cartridge to the inflator. You don’t hear any hissing. But, you still want to be sure. Gently put your finger near the connection. Can you feel any air escaping? Even a tiny leak can empty the cartridge. If you feel air, the head is not sealing correctly. Check the threads and seals again. If you still feel air escaping, replace the inflator. Feeling for escaping air is a simple way to check. It can help you avoid problems on your bike ride.
Fun Fact or Stat: Regular inspection of your CO2 inflator can prevent up to 80% of roadside flat tire emergencies!
Step-by-Step: How to Test If Head is Leaking

So, how do you test your CO2 inflator head for leaks? First, gather your tools. You will need your CO2 inflator, a CO2 cartridge, and some water. Start by attaching the cartridge to the inflator. Listen closely for any hissing sounds. If you hear any, the head is leaking. If you don’t hear anything, continue to the next step. Put a few drops of water around the connection. If bubbles form, air is escaping. This means the head is leaking. If there are no bubbles, your inflator is likely working. Remember to do this before every ride.
- Gather your CO2 inflator and a CO2 cartridge.
- Attach the cartridge to the inflator.
- Listen for hissing sounds around the head.
- Apply water to the connection point.
- Look for bubbles indicating a leak.
- If no leaks, your inflator is ready to use.
Testing your CO2 inflator is a quick and easy process. It can save you a lot of trouble on the road. Always remember to check for leaks before you leave. This simple step can ensure your inflator works when you need it. By following these steps, you can avoid getting stranded. A little preparation goes a long way. It helps you enjoy your bike ride without worries. Keep your tires inflated and ride safely!
Fun Fact or Stat: Professional cyclists test their CO2 inflators before every race to ensure optimal performance!
Gather Your Tools
Before you start, make sure you have everything you need. First, grab your CO2 inflator. Make sure it is the one you plan to use on your ride. Next, find a CO2 cartridge. It should be full and ready to go. You will also need a small cup of water. This will help you see any leaks. Finally, have a cloth nearby. You can use it to wipe up any spills. Having all your tools ready makes the testing process easier. It also ensures you don’t have to stop and search for something later.
Attach the Cartridge and Listen
Now it’s time to attach the CO2 cartridge. Screw it into the head of the inflator. Do it slowly and carefully. As you tighten the cartridge, listen closely. Can you hear any hissing sounds? A hiss means air is escaping. If you hear a hiss, stop tightening. The head is likely leaking. Remove the cartridge and inspect the inflator. If you don’t hear a hiss, tighten the cartridge all the way. Now, listen again for any leaks. This step is crucial for finding problems early.
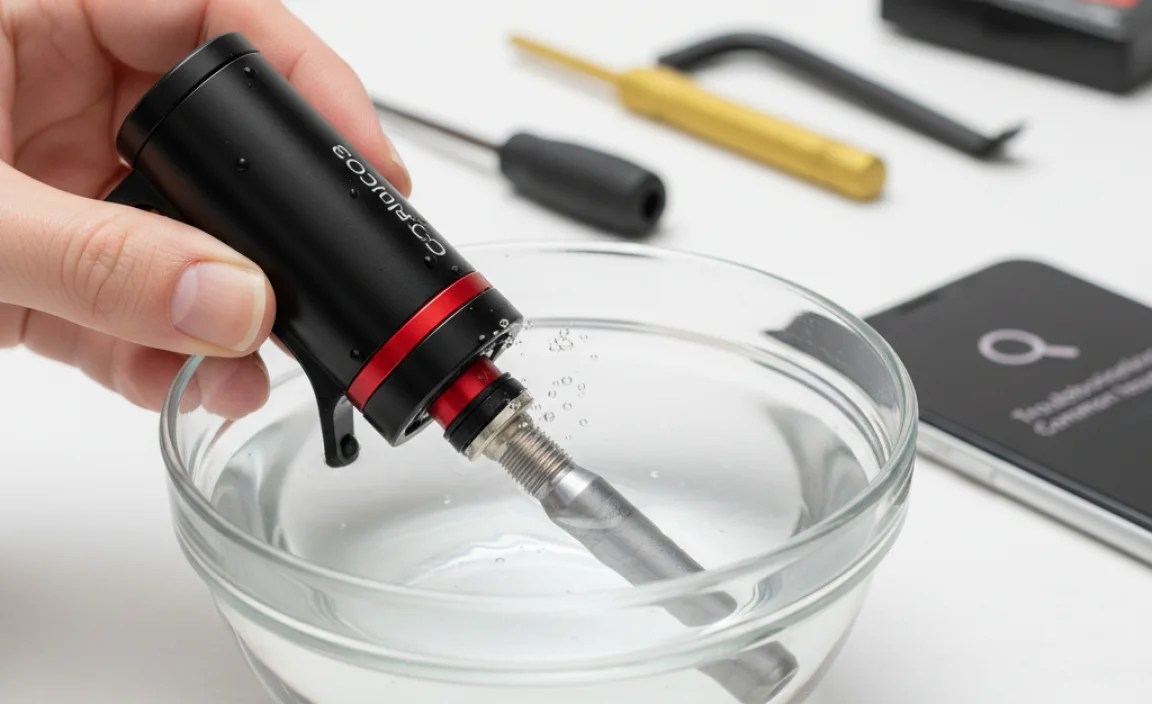
Apply Water to Check for Bubbles
If you don’t hear any hissing, it’s time for the water test. Take your cup of water. Gently pour a few drops around the connection. Watch closely to see if any bubbles form. Bubbles mean air is escaping. Even tiny bubbles indicate a leak. If you see bubbles, the head is not sealing properly. Remove the cartridge and check the inflator again. If there are no bubbles, your inflator is probably working well. This water test is a simple way to find hidden leaks.
Fun Fact or Stat: Using soapy water can make it easier to spot even the smallest leaks in your CO2 inflator!
Signs of a Leaking CO2 Inflator Head

What are the signs of a leaking CO2 inflator head? One sign is a hissing sound. This sound means air is escaping. Another sign is feeling air around the connection. You might feel a slight breeze on your finger. Also, look for frost forming on the inflator. This happens when CO2 escapes quickly. If you see any of these signs, the head is likely leaking. Don’t use the inflator until you fix or replace it. Ignoring these signs can leave you stranded with a flat tire. Always pay attention to these warning signs.
- Hissing sound near the inflator head.
- Feeling air escaping from the connection.
- Frost forming on the inflator during use.
- Rapidly emptying CO2 cartridge.
- Tire not inflating properly.
- Visible damage to the inflator head.
Knowing the signs of a leaking CO2 inflator head is important. It helps you catch problems early. By being aware, you can prevent issues on your bike ride. Always check your inflator for these signs before each ride. This simple step can save you time and frustration. If you notice any leaks, take action right away. Replace the inflator or get it repaired. Your safety and enjoyment depend on having reliable equipment. Stay alert and be prepared.
Fun Fact or Stat: Leaking CO2 inflators are more common in humid conditions due to corrosion of the seals!
Hissing Sounds Indicate Leak
Imagine you’re getting ready for a bike ride. You attach the CO2 cartridge to your inflator. Suddenly, you hear a hissing sound. What does this mean? A hissing sound is a clear sign of a leak. The CO2 is escaping from the head. This means the inflator will not work correctly. The tire won’t inflate fully. You might even empty the cartridge completely. Always listen carefully when attaching the cartridge. If you hear a hiss, stop and check the inflator. A small hiss can lead to a big problem on the road.
Frost Formation on Inflator
Have you ever seen frost on your CO2 inflator? This can happen when CO2 escapes quickly. The rapid escape of gas cools the inflator. This can cause frost to form. Frost is a sign of a significant leak. It means a lot of CO2 is escaping at once. If you see frost, the inflator is not working right. Stop using it immediately. Check the seals and connections. Replace any damaged parts. Frost is a clear warning sign that should not be ignored.
Rapid Cartridge Emptying
Imagine you are trying to inflate your tire. You attach the CO2 cartridge. But, the cartridge empties very quickly. Your tire is still flat! This is a sign that something is wrong. A rapid cartridge emptying often means a leak. The CO2 is escaping before it can fill the tire. This could be due to a problem with the head. Check the connections and seals. If the cartridge empties fast, don’t keep trying. You will just waste more CO2. Find the leak and fix it.
Fun Fact or Stat: A properly functioning CO2 inflator should inflate a road bike tire in about 2-3 seconds!
Tools Needed to Test CO2 Inflator
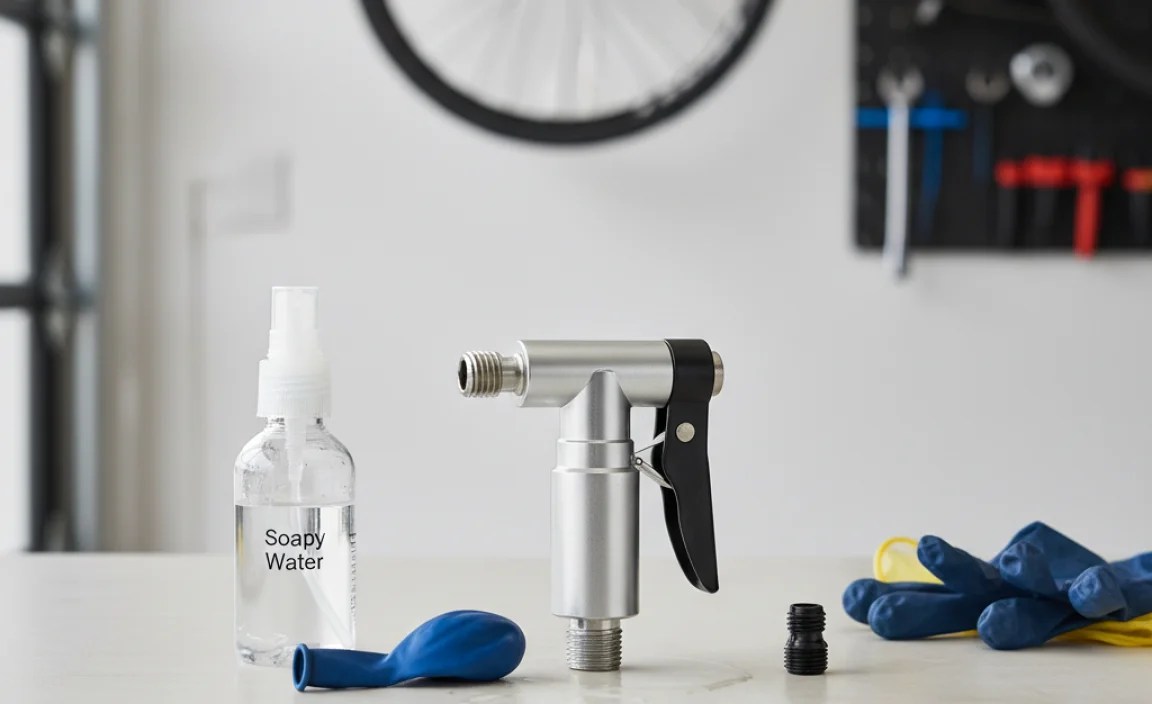
What tools do you need to test a CO2 inflator? The most important tool is the CO2 inflator itself. Make sure it is the one you plan to use on your ride. Next, you will need a CO2 cartridge. It should be full and ready to go. A small cup of water is also helpful. This will help you find any leaks. You might also want a cloth to wipe up any spills. Having these tools ready makes the testing process easier. You can quickly check your inflator and be confident it will work.
- CO2 inflator (the one you use).
- Full CO2 cartridge.
- Small cup of water.
- Clean cloth for wiping.
- Safety glasses (optional).
Testing your CO2 inflator doesn’t require many tools. This makes it easy to do before each ride. The water is especially useful. It helps you see even small leaks. The cloth keeps things clean and tidy. If you wear glasses, consider using safety glasses. This protects your eyes from any splashes. By having these simple tools, you can ensure your inflator is working properly. It’s a small effort that can save you a lot of trouble.
Fun Fact or Stat: Some cyclists carry a multi-tool that includes a small spray bottle for leak testing!
Gather the Inflator and Cartridge
The first step is to gather your CO2 inflator and cartridge. Make sure you have the right inflator. It should be the one you carry on your bike. Check the cartridge to make sure it is full. You don’t want to start with an empty cartridge. Having these two items ready is essential. It sets the stage for a successful test. Put them on a clean surface. This will help you keep everything organized. Taking a moment to prepare makes the process smoother.
Prepare the Water Cup
Next, you need to prepare the water cup. Find a small cup or container. Fill it with clean water. You don’t need a lot of water. Just enough to dip the inflator head in. The water will help you see any leaks. If air is escaping, it will create bubbles. This makes it easy to spot the problem. Keep the water cup close by. You will need it when you attach the cartridge. A little water can reveal a lot about your inflator.
Optional: Safety Glasses
While not always necessary, safety glasses are a good idea. When you attach the CO2 cartridge, things can sometimes go wrong. The cartridge could burst or leak unexpectedly. Safety glasses protect your eyes from any splashes or debris. They provide an extra layer of safety. If you have them, it’s worth wearing them. Even a small precaution can prevent an injury. Your safety is always the most important thing.
Fun Fact or Stat: Eye injuries from bicycle-related incidents account for over 30,000 emergency room visits each year!
Troubleshooting Common Issues
What if you find a leak? Don’t worry, there are ways to troubleshoot. First, check the CO2 cartridge. Is it screwed on tight enough? Sometimes, a loose cartridge can cause a leak. Try tightening it a bit more. If that doesn’t work, check the seals. Are they worn or damaged? If so, replace them. If the inflator head itself is cracked, you might need a new one. Always try the simple fixes first. If those don’t work, it might be time for a replacement.
| Issue | Possible Cause | Solution |
|---|---|---|
| Hissing sound | Loose cartridge | Tighten the cartridge |
| Bubbles in water | Damaged seals | Replace the seals |
| No inflation | Empty cartridge | Use a new cartridge |
| Cracked inflator head | Physical damage | Replace the inflator |
Troubleshooting your CO2 inflator can save you money. Instead of buying a new one right away, try to fix it. Often, the problem is a simple one. A loose cartridge or worn seals are easy to fix. If you are not sure how to fix it, ask a bike mechanic. They can help you diagnose the problem. They can also show you how to replace the seals. With a little effort, you can keep your inflator working well. This will give you peace of mind on your rides.
Fun Fact or Stat: Regularly cleaning your CO2 inflator can prevent corrosion and extend its lifespan!
Tighten the CO2 Cartridge
One of the first things to check is the CO2 cartridge. Make sure it is screwed on tightly. A loose cartridge can cause a leak. The CO2 will escape around the threads. This prevents the tire from inflating properly. Gently tighten the cartridge. Be careful not to overtighten it. You could damage the threads. Tighten it until it is snug. Then, check for leaks again. Sometimes, this simple step is all it takes.
Replace Worn Seals
Seals are small rubber rings inside the inflator head. They help create a tight seal. Over time, these seals can wear out. They can become cracked or brittle. This allows air to escape. If you suspect worn seals, replace them. You can buy replacement seals at most bike shops. The process is usually simple. Remove the old seals and put in the new ones. This can often fix a leaking inflator.
Check for Cracks in the Head
Sometimes, the inflator head itself can crack. This can happen if you drop it. Or, it could be due to wear and tear. Cracks can cause significant leaks. Inspect the head carefully. Look for any signs of damage. If you find cracks, the inflator needs to be replaced. There is no way to repair a cracked head. Using a cracked inflator is dangerous. It could fail when you need it most.
Fun Fact or Stat: Using Teflon tape on the threads of your CO2 cartridge can help create a tighter seal!
Maintaining Your CO2 Inflator
How can you keep your CO2 inflator in good shape? Regular maintenance is key. After each use, clean the inflator. Wipe off any dirt or moisture. Store it in a dry place. This prevents corrosion. Also, check the seals regularly. Replace them if they look worn. By taking care of your inflator, you can extend its life. This ensures it will be ready when you need it. A little maintenance goes a long way.
- Clean the inflator after each use.
- Store it in a dry place.
- Check the seals regularly.
- Replace worn seals as needed.
- Avoid dropping the inflator.
- Lubricate the threads occasionally.
Maintaining your CO2 inflator is easy. It doesn’t take much time or effort. But, it can make a big difference. Cleaning the inflator prevents dirt from building up. Storing it in a dry place prevents rust. Checking the seals ensures they are working correctly. By following these simple steps, you can keep your inflator in top condition. This will give you confidence on your rides. You’ll know your equipment is reliable.
Fun Fact or Stat: CO2 inflators used in professional cycling are often cleaned and inspected by team mechanics after every stage!
Clean After Each Use
After you use your CO2 inflator, take a moment to clean it. Wipe off any dirt, mud, or moisture. Use a clean cloth. Pay attention to the threads. These can get dirty easily. Cleaning the inflator prevents corrosion. It also keeps the seals in good condition. A clean inflator is a happy inflator. It will work better and last longer. Make cleaning a habit after every ride.
Store in a Dry Place
Where you store your CO2 inflator matters. Avoid storing it in damp or humid places. Moisture can cause corrosion. This can damage the inflator and the seals. Store it in a dry place, like a toolbox or a drawer. This will protect it from the elements. A dry inflator is less likely to leak or fail. Take care where you store it. It will make a difference.
Check Seals Regularly
The seals are important for a CO2 inflator. They create a tight seal that prevents leaks. Check the seals regularly for wear and tear. Look for cracks or damage. If the seals look worn, replace them. New seals will ensure a good seal. This will prevent leaks and ensure the inflator works well. Checking the seals is a simple way to maintain your inflator.
Fun Fact or Stat: Some cyclists use small brushes to clean the threads of their CO2 inflators for optimal performance!
Summary
Using a CO2 inflator is a quick way to fix a flat tire. However, it is important to make sure your inflator is working correctly. You should learn how to test if the CO2 inflator head is leaking before a ride. Always inspect the inflator head for damage. Listen for hissing sounds when you attach the cartridge. Feel for escaping air around the connection. If you find any leaks, troubleshoot the problem. Tighten the cartridge or replace the seals. Regular maintenance can help prevent leaks. Cleaning the inflator and storing it in a dry place are important.
By following these steps, you can ensure your CO2 inflator is ready to use. This will give you peace of mind on your bike rides. You won’t have to worry about getting stranded with a flat tire. A little preparation can save you a lot of trouble. So, take a few minutes to check your inflator before you ride. It’s a small investment in your safety and enjoyment.
Conclusion
A CO2 inflator is a handy tool for cyclists. It helps you fix flat tires quickly. But, it’s important to make sure your inflator is working properly. Check for leaks before each ride. Listen for hissing sounds and feel for escaping air. Regular maintenance will keep your inflator in good condition. Knowing how to test if the CO2 inflator head is leaking before a ride can save you from being stranded. So, take the time to check your inflator. Enjoy your bike rides with confidence!
Frequently Asked Questions
Question No 1: How often should I test my CO2 inflator for leaks?
Answer: You should test your CO2 inflator for leaks before every bike ride. This only takes a few seconds. It can save you from a lot of trouble. Attach a CO2 cartridge and listen for hissing. Feel around the connection for escaping air. If you find any leaks, fix them before you ride. Regular testing ensures your inflator is ready when you need it. It’s a simple habit that can prevent problems on the road.
Question No 2: What does a hissing sound mean when I attach the CO2 cartridge?
Answer: A hissing sound usually means there is a leak. The CO2 is escaping from the head. This could be due to a loose cartridge. It could also be from worn seals. Stop tightening the cartridge if you hear a hiss. Check the seals and connections. If the hissing continues, replace the seals or the inflator. A hissing sound is a clear warning sign. Don’t ignore it. Address the problem before you ride.
Question No 3: Can I fix a leaking CO2 inflator head myself?
Answer: Sometimes, you can fix a leaking CO2 inflator head. First, try tightening the CO2 cartridge. If that doesn’t work, check the seals. If they are worn or damaged, replace them. You can buy replacement seals at most bike shops. If the head itself is cracked, you will need a new inflator. Always try the simple fixes first. If you are not comfortable fixing it yourself, ask a bike mechanic for help.
Question No 4: What should I do if my CO2 cartridge empties too quickly?
Answer: If your CO2 cartridge empties too quickly, there is likely a leak. This could be in the inflator head or at the connection. Check the head and the seals. Make sure the cartridge is screwed on tightly. If you can’t find the leak, the inflator might be faulty. Replace it with a new one. Don’t keep using leaky inflators. They are unreliable. Always address the problem to ensure your inflator works when you need it.
Question No 5: How do I know if the seals on my CO2 inflator are worn out?
Answer: You can tell if the seals are worn out by looking at them. Check for cracks or damage. If the seals look brittle or dry, they need to be replaced. Also, if you hear hissing sounds or feel air escaping, the seals might be the problem. Replacing the seals is a simple and inexpensive fix. It can prevent leaks and ensure your inflator works properly. You should learn how to test if the CO2 inflator head is leaking before a ride.
Question No 6: Is it safe to carry a CO2 cartridge on my bike?
Answer: Yes, it is generally safe to carry a CO2 cartridge on your bike. However, you should store it properly. Keep it in a secure place where it won’t get damaged. Avoid storing it in direct sunlight or extreme heat. This could cause the cartridge to rupture. Also, be careful when handling the cartridge. Don’t puncture it or expose it to sharp objects. By following these precautions, you can safely carry a CO2 cartridge on your rides.


