
How to Fix Mount That Restricts Handlebar Rotation? Easy Fix
Have you ever tried to turn your bike, but the handlebars wouldn’t move? It can be scary! Sometimes, a part called the mount stops the handlebars from turning freely. This can make it hard to steer your bike. Knowing how to fix mount that restricts handlebar rotation is important for bike safety. Let’s learn how to keep your bike riding smoothly.
Key Takeaways
- Always check your bike’s handlebar movement before you ride it.
- A restricted handlebar can make it hard to steer and cause accidents.
- Knowing how to fix mount that restricts handlebar rotation improves safety.
- Sometimes, the mount is just too tight and needs a little loosening.
- Regular bike checks help prevent problems with the handlebar mount.
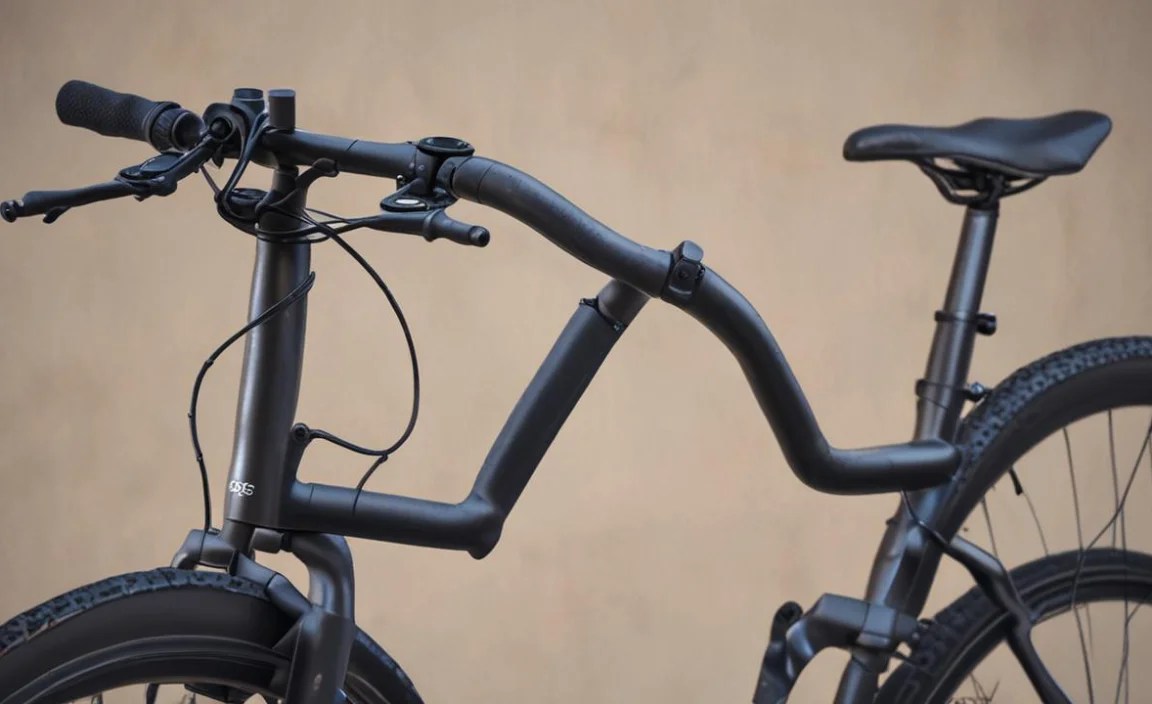
How to Identify a Restricting Mount

Have you ever felt like your bike was fighting you when you tried to turn? A restricting mount can make it feel like your handlebars are stuck. This often happens when the mount, which holds the handlebars to the bike, is too tight or misaligned. You might notice that turning the handlebars takes more effort than usual. It could also feel jerky or uneven. Sometimes, you might even hear a creaking or clicking sound when you turn. A restricting mount makes it harder to control your bike. This can be especially dangerous when you need to make quick turns or avoid obstacles. Always check your handlebars before riding. Make sure they turn smoothly and easily. If you feel any resistance, it’s important to find out what’s wrong and fix it before you hit the road.
- Check if the handlebars turn smoothly.
- Listen for any unusual noises.
- Feel for any resistance when turning.
- Look at the mount for signs of damage.
- Make sure the handlebars are aligned straight.
Imagine you’re trying to ride your bike through a busy park. Suddenly, a dog runs in front of you! You need to turn quickly to avoid it. But if your handlebar mount is restricting, you might not be able to turn fast enough. This is why it’s so important to make sure your handlebars are working properly. Regularly checking your bike and knowing how to identify a restricting mount can help keep you safe. It also makes riding more fun because you can steer easily and confidently. Always remember, a smooth-turning handlebar is a happy handlebar!
Why Handlebars Get Stuck
Why do handlebars sometimes get stuck? There are a few reasons. One common reason is that the mount, the part that holds the handlebars, is too tight. Over time, dirt and rust can build up inside the mount. This can make it hard for the handlebars to turn. Sometimes, the mount can get bent or damaged if the bike falls over. This can also cause the handlebars to stick. Another reason could be that the cables for your brakes or gears are tangled. These cables can get in the way and stop the handlebars from turning freely. It’s important to check all these things to find out why your handlebars are stuck. Fixing the problem will make your bike much safer and easier to ride.
Signs of a Bad Mount
What are the signs of a bad mount? One sign is that the handlebars are hard to turn. You might have to use a lot of force to move them. Another sign is that the handlebars feel loose or wobbly. This means the mount isn’t holding them tightly enough. You might also hear creaking or clicking noises when you turn the handlebars. This could mean that the mount is damaged or worn out. Look closely at the mount itself. Are there any cracks or bends? If you see any of these signs, it’s important to get the mount checked by a bike mechanic. A bad mount can be dangerous, so it’s best to fix it right away.
How to Check for Damage
How can you check for damage to the handlebar mount? First, look closely at the mount itself. Check for any cracks, bends, or rust. These are all signs of damage. Next, try to wiggle the handlebars. If they feel loose or wobbly, the mount might be damaged. You can also try turning the handlebars slowly. Listen for any creaking or clicking noises. These noises could mean that the mount is worn out or broken. If you see any signs of damage, it’s important to get the mount checked by a bike mechanic. They can help you decide if it needs to be repaired or replaced. Checking for damage regularly will help keep your bike safe.
Fun Fact or Stat: Did you know that most bike accidents involving handlebar issues are due to poor maintenance? Regular checks can prevent up to 80% of these accidents!
Loosening a Tight Handlebar Mount

Sometimes, the simplest fix is the best. A tight handlebar mount can restrict movement. To fix it, you’ll need a few tools. First, grab a wrench that fits the bolts on your handlebar mount. Gently loosen the bolts a little bit at a time. Don’t loosen them too much, or the handlebars will be wobbly. After loosening the bolts, try turning the handlebars. Do they move more freely now? If not, loosen the bolts just a little bit more. Keep checking until the handlebars turn smoothly. Once they turn easily, tighten the bolts again, but not too tight. You want them snug, but not so tight that they restrict movement. This simple adjustment can make a big difference in how your bike handles.
- Find the right size wrench for the bolts.
- Loosen the bolts a little at a time.
- Test the handlebar movement after each adjustment.
- Tighten the bolts snugly, but not too tight.
- Make sure the handlebars are aligned straight.
Imagine your bike is like a toy car. If the wheels on the toy car are screwed on too tight, it won’t roll very well. It’s the same with your bike’s handlebars. If the mount is too tight, the handlebars won’t turn smoothly. This can make it hard to steer and control your bike. By carefully loosening the bolts on the mount, you can give the handlebars the freedom to move. This makes riding your bike much easier and more fun. Just remember to be gentle and patient when making adjustments. A little bit of loosening can go a long way!
Tools Needed for Loosening
What tools do you need to loosen a tight handlebar mount? The most important tool is a wrench. You’ll need a wrench that fits the bolts on your handlebar mount. The size of the wrench will depend on the type of bike you have. You might also need a set of Allen wrenches. These are small, L-shaped tools that fit into the bolts on some handlebar mounts. A clean rag can also be helpful for wiping away any dirt or grease. And don’t forget a little bit of patience! Loosening a tight mount can take a little time and effort. Having the right tools will make the job much easier and safer.
Step-by-Step Loosening Guide
Here’s a step-by-step guide to loosening a tight handlebar mount. First, find the bolts on your handlebar mount. These are usually located where the handlebars attach to the frame of the bike. Next, choose the right size wrench for the bolts. Insert the wrench into the bolt and turn it gently to the left. Loosen each bolt a little bit at a time. After loosening the bolts, try turning the handlebars. If they still feel tight, loosen the bolts a little more. Keep testing until the handlebars turn smoothly. Once they turn easily, tighten the bolts again, but not too tight. Make sure they are snug, but not restricting.
Safety Precautions
What safety precautions should you take when loosening a handlebar mount? First, make sure your bike is stable. You can do this by putting it on a bike stand or leaning it against a wall. Next, be careful not to overtighten the bolts when you tighten them again. Overtightening can damage the mount or the bolts. It can also make the handlebars too stiff. Always use the right size wrench for the bolts. Using the wrong size can strip the bolts and make them harder to loosen. If you’re not comfortable working on your bike yourself, it’s always best to take it to a bike mechanic. They have the tools and experience to do the job safely and correctly.
Fun Fact or Stat: Studies show that properly adjusted handlebars can improve your cycling efficiency by up to 15%! That means less effort for the same speed.
Realigning Misaligned Handlebars
Sometimes, the problem isn’t just that the mount is too tight. Your handlebars might be misaligned. This means they’re not straight or even. To fix this, you’ll need to loosen the bolts on the handlebar mount. Just like before, loosen them a little bit at a time. Once the bolts are loose enough, you can gently adjust the handlebars. Make sure they’re straight and even. Use your eyes to check that they line up with the front wheel. Once the handlebars are aligned correctly, tighten the bolts again. Make sure they’re snug, but not too tight. Test the handlebars by turning them. They should turn smoothly and easily. Realigning your handlebars can make a big difference in how your bike feels and handles.
- Loosen the handlebar mount bolts slightly.
- Adjust the handlebars until they are straight.
- Line up the handlebars with the front wheel.
- Tighten the bolts snugly and evenly.
- Test the handlebar movement after adjusting.
Imagine you’re building a tower out of blocks. If the blocks at the bottom are not lined up straight, the whole tower will be crooked. It’s the same with your bike’s handlebars. If they’re not aligned correctly, your bike will feel awkward and hard to control. By carefully realigning the handlebars, you can make your bike feel much more stable and balanced. This makes riding more comfortable and enjoyable. Just take your time and be patient. A little bit of adjustment can make a big difference in how your bike feels!
How to Spot Misalignment
How can you tell if your handlebars are misaligned? One way is to look at them from the front of the bike. Do they look straight and even? Or do they look crooked or tilted to one side? Another way is to ride your bike and see how it feels. Does the bike pull to one side? Do you have to work harder to keep it going straight? These are all signs that your handlebars might be misaligned. You can also compare the position of the handlebars to the front wheel. Are they lined up straight? If not, they probably need to be adjusted.
Steps for Correct Alignment
Here are the steps for correcting misaligned handlebars. First, loosen the bolts on the handlebar mount. Loosen them just enough so that you can move the handlebars. Next, adjust the handlebars until they are straight. Use your eyes to check that they are lined up with the front wheel. You can also use a ruler or a straight edge to help you align them. Once the handlebars are straight, tighten the bolts again. Make sure they are snug, but not too tight. Test the handlebars by turning them. They should turn smoothly and easily.
Why Alignment Matters
Why does handlebar alignment matter? When your handlebars are aligned correctly, your bike will handle much better. It will be easier to steer and control. You’ll be able to ride in a straight line without having to work so hard. Misaligned handlebars can make your bike feel unstable and wobbly. This can be dangerous, especially when you’re riding fast or turning corners. Correct alignment also makes riding more comfortable. You won’t have to strain your arms or shoulders to keep the bike going straight. Taking the time to align your handlebars properly is a simple way to improve your riding experience.
| Issue | Solution | Benefit |
|---|---|---|
| Handlebars crooked | Realign with front wheel | Improved balance |
| Bike pulls to one side | Adjust handlebar position | Easier steering |
| Uneven handlebar height | Adjust each side separately | Comfortable ride |
| Handlebars feel loose | Tighten bolts evenly | Increased safety |
Fun Fact or Stat: Professional cyclists spend hours perfecting their handlebar alignment for optimal performance! Even small adjustments can make a big difference.
Checking Cables for Obstructions
Sometimes, the problem isn’t the mount itself. The cables for your brakes and gears can get in the way. These cables can rub against the handlebars or the frame. This can stop the handlebars from turning freely. To check for obstructions, look closely at the cables. Make sure they’re not tangled or pinched. Make sure they’re not rubbing against anything. If you see any problems, try to gently move the cables. Make sure they’re out of the way of the handlebars. You might need to loosen the cable ties that hold the cables in place. This will give you more room to move them. Once the cables are clear, try turning the handlebars again. They should turn smoothly and easily.
- Inspect brake and gear cables.
- Make sure cables aren’t tangled.
- Check for rubbing against the frame.
- Adjust cable ties if needed.
- Ensure cables don’t restrict movement.
Imagine your bike’s cables are like the strings on a puppet. If the strings get tangled, the puppet won’t move properly. It’s the same with your bike’s cables. If they get in the way of the handlebars, they can stop them from turning. By carefully checking the cables and making sure they’re out of the way, you can help your handlebars move freely. This makes steering easier and more fun. Just remember to be gentle when moving the cables. You don’t want to damage them or disconnect them.
Identifying Cable Issues
How can you identify cable issues that restrict handlebar movement? First, look closely at the cables. Are they tangled up? Are they bent or kinked? Are they rubbing against the frame or the handlebars? These are all signs that the cables might be causing a problem. You can also try turning the handlebars slowly and watch the cables. Do they move freely? Or do they get caught on something? If you see any of these issues, it’s important to address them. Fixing the cable problems can make a big difference in how your bike handles.
Adjusting Cable Ties
How can you adjust cable ties to improve handlebar movement? Cable ties are small plastic straps that hold the cables in place. If the cable ties are too tight, they can restrict the movement of the cables. To adjust them, you’ll need a pair of scissors or wire cutters. Carefully cut the cable tie, being careful not to cut the cables themselves. Once the cable tie is cut, you can reposition the cables. Make sure they’re not rubbing against anything and that they have enough slack to move freely. Then, replace the cable tie with a new one. Don’t tighten the new cable tie too much. You want it to hold the cables in place, but not restrict their movement.
When to Replace Cables
When should you replace your bike cables? Over time, cables can wear out or become damaged. They can get frayed, rusted, or kinked. If you see any of these signs, it’s time to replace the cables. Old or damaged cables can affect your bike’s performance. They can make it harder to brake or shift gears. They can also snap or break, which can be dangerous. Replacing your cables is a relatively simple and inexpensive way to keep your bike in good working order. If you’re not comfortable replacing the cables yourself, you can take your bike to a mechanic.
Fun Fact or Stat: Properly lubricated cables can reduce friction by up to 50%, making shifting and braking smoother and easier!
Lubricating the Handlebar Mount

Sometimes, the handlebar mount just needs a little bit of lubrication. This means adding a slippery substance to help the parts move smoothly. You can use a special bike grease or a light oil. First, clean the handlebar mount with a clean rag. This will remove any dirt or grime. Then, apply a small amount of grease or oil to the moving parts of the mount. Be careful not to get any grease or oil on the brake pads or the tires. This could make them slippery and dangerous. After applying the lubricant, turn the handlebars back and forth. This will help spread the lubricant around. The handlebars should now turn more smoothly and easily.
- Clean the handlebar mount thoroughly.
- Apply a small amount of bike grease.
- Use light oil if grease isn’t available.
- Avoid getting lubricant on brake pads.
- Turn handlebars to spread lubricant.
Imagine your bike is like a door. If the hinges on the door are rusty and dry, the door will be hard to open and close. But if you add a little bit of oil to the hinges, the door will swing open and closed smoothly. It’s the same with your bike’s handlebar mount. If the parts are dry and rubbing against each other, the handlebars will be hard to turn. But if you add a little bit of lubricant, the handlebars will turn smoothly and easily. This makes steering easier and more fun!
Choosing the Right Lubricant
How do you choose the right lubricant for your handlebar mount? There are two main types of lubricants you can use: grease and oil. Grease is a thicker lubricant that stays in place longer. It’s good for parts that need long-lasting lubrication. Oil is a thinner lubricant that penetrates into small spaces. It’s good for parts that need quick and easy lubrication. For a handlebar mount, either grease or oil will work. If you want long-lasting lubrication, choose grease. If you want a quick and easy solution, choose oil. Just make sure to use a lubricant that is specifically designed for bikes.
Applying Lubricant Correctly
How do you apply lubricant correctly to your handlebar mount? First, clean the mount with a clean rag. This will remove any dirt or grime. Then, apply a small amount of lubricant to the moving parts of the mount. Be careful not to use too much lubricant. Too much lubricant can attract dirt and grime. It can also make the parts slippery. After applying the lubricant, turn the handlebars back and forth. This will help spread the lubricant around. The handlebars should now turn more smoothly and easily. If you get any lubricant on the brake pads or the tires, wipe it off immediately with a clean rag.
Benefits of Lubrication
What are the benefits of lubricating your handlebar mount? Lubrication helps the parts move smoothly and easily. This makes steering easier and more fun. It also reduces wear and tear on the parts. This can help extend the life of your handlebar mount. Lubrication can also prevent rust and corrosion. This is especially important if you live in a wet or humid climate. Regularly lubricating your handlebar mount is a simple way to keep your bike in good working order. It can also improve your riding experience.
Fun Fact or Stat: A well-lubricated bike can save you up to 10% of your energy! That’s like getting a free boost on every ride.
Checking for Damage to the Mount
Sometimes, the mount itself is damaged. This can happen if the bike falls over or is involved in an accident. To check for damage, look closely at the mount. Are there any cracks, bends, or dents? Are any of the parts loose or broken? If you see any damage, the mount might need to be repaired or replaced. A damaged mount can be dangerous. It can cause the handlebars to come loose or break while you’re riding. If you suspect that your mount is damaged, it’s important to get it checked by a bike mechanic. They can help you decide if it needs to be repaired or replaced.
- Inspect the mount for cracks.
- Check for bends or dents.
- Look for loose or broken parts.
- Ensure the mount is securely attached.
- Consider professional inspection.
Imagine your bike’s mount is like the foundation of a house. If the foundation is cracked or damaged, the whole house could collapse. It’s the same with your bike’s mount. If it’s damaged, the handlebars could come loose or break. This could cause you to lose control of your bike and crash. That’s why it’s so important to check the mount regularly for damage. If you see any signs of damage, don’t ride your bike until it’s been repaired or replaced. Your safety is the most important thing!
Types of Mount Damage
What are the different types of damage that can occur to a handlebar mount? One common type of damage is cracking. Cracks can weaken the mount and make it more likely to break. Another type of damage is bending. Bends can cause the handlebars to be misaligned or difficult to turn. Dents can also weaken the mount. Loose or broken parts can also cause problems. For example, a loose bolt can cause the handlebars to wobble. A broken clamp can cause the handlebars to come loose. If you see any of these types of damage, it’s important to get the mount checked by a bike mechanic.
How to Assess Damage
How can you assess the extent of the damage to your handlebar mount? First, look closely at the mount and identify any areas that are cracked, bent, or dented. Next, try to wiggle the handlebars. If they feel loose or wobbly, the mount is likely damaged. You can also try turning the handlebars slowly and listen for any creaking or clicking noises. These noises could indicate that the mount is damaged. If you’re not sure whether the mount is damaged, it’s best to take it to a bike mechanic for inspection. They have the expertise to assess the damage and recommend the appropriate repairs.
Repair vs. Replacement
When should you repair a damaged handlebar mount, and when should you replace it? It depends on the extent of the damage. If the damage is minor, such as a small crack or a loose bolt, it might be possible to repair the mount. However, if the damage is severe, such as a large crack or a bent clamp, it’s usually best to replace the mount. A repaired mount might not be as strong or reliable as a new mount. It’s also important to consider the cost of repair versus the cost of replacement. In some cases, it might be cheaper to replace the mount than to repair it. Your bike mechanic can help you decide whether to repair or replace your damaged handlebar mount.
Fun Fact or Stat: Replacing a damaged handlebar mount can increase your bike’s resale value! A well-maintained bike is always worth more.
Seeking Professional Help
If you’re not comfortable working on your bike yourself, it’s always a good idea to seek professional help. A bike mechanic has the tools and experience to diagnose and fix problems with your bike. They can also help you choose the right parts and accessories. Taking your bike to a mechanic can give you peace of mind knowing that it’s in good hands. They can also help you learn more about bike maintenance and repair. This can help you keep your bike in good working order for years to come. Don’t be afraid to ask for help when you need it!
- Find a trusted bike mechanic.
- Explain the handlebar issue clearly.
- Ask about repair or replacement options.
- Get a cost estimate before work begins.
- Follow the mechanic’s advice.
Imagine your bike is like a car. If your car breaks down, you wouldn’t try to fix it yourself unless you were a mechanic. You would take it to a professional. It’s the same with your bike. If you’re not sure how to fix a problem, it’s best to take it to a bike mechanic. They can diagnose the problem and fix it correctly. This can save you time, money, and frustration. It can also help you avoid making the problem worse. A good bike mechanic is a valuable resource for any cyclist!
Finding a Reliable Mechanic
How can you find a reliable bike mechanic? One way is to ask your friends or family for recommendations. If they know a good mechanic, they can give you their contact information. Another way is to search online for bike shops in your area. Read the reviews and see what other customers have to say about the mechanics. You can also visit a few different bike shops and talk to the mechanics in person. Ask them about their experience and qualifications. See if they seem knowledgeable and trustworthy. Choosing a reliable mechanic is an important step in keeping your bike in good working order.
Questions to Ask a Mechanic
What questions should you ask a bike mechanic before hiring them? First, ask about their experience and qualifications. How long have they been working as a mechanic? What kind of training have they received? Next, ask about their rates. How much do they charge per hour? Do they offer free estimates? You should also ask about their warranty policy. Do they guarantee their work? If something goes wrong after they fix your bike, will they fix it again for free? Finally, ask for references. Can they provide you with the contact information of satisfied customers? Asking these questions will help you choose a qualified and trustworthy mechanic.
Benefits of Professional Service
What are the benefits of getting professional bike service? A professional mechanic has the knowledge and tools to diagnose and fix problems quickly and efficiently. They can also identify potential problems before they become serious. This can save you money in the long run. A professional mechanic can also perform routine maintenance, such as cleaning and lubricating your bike. This can help extend the life of your bike and keep it running smoothly. Getting professional bike service is an investment in your bike’s health and performance.
Fun Fact or Stat: Regular professional bike service can extend the lifespan of your bike by up to 30%! That’s like getting years of extra riding.
Summary
In short, how to fix mount that restricts handlebar rotation involves a few key steps. First, identify the problem by checking for tightness, misalignment, or cable obstructions. Then, try loosening the mount, realigning the handlebars, or adjusting the cables. Lubrication can also help. If you’re not comfortable doing these things yourself, seek professional help from a bike mechanic. Regular bike maintenance is key to preventing handlebar problems and ensuring a safe and enjoyable ride. Remember to always check your handlebars before riding.
By following these steps, you can keep your handlebars turning smoothly and avoid accidents. Fixing a restricted handlebar mount might seem difficult. However, with a little patience and the right tools, you can do it yourself. If not, a bike mechanic can help.
Conclusion
Keeping your bike in good shape is important. This includes knowing how to fix mount that restricts handlebar rotation. By following the steps in this article, you can keep your handlebars turning smoothly. This will help you stay safe and have fun on your rides. Always remember to check your bike regularly and seek professional help when needed. A well-maintained bike is a happy bike!
Frequently Asked Questions
Question No 1: Why are my handlebars hard to turn?
Answer: Your handlebars might be hard to turn for several reasons. The handlebar mount could be too tight, restricting movement. The handlebars might be misaligned, causing friction. The cables for your brakes or gears could be obstructing the turning motion. Dirt and grime can also build up in the mount, making it difficult to turn. Checking each of these areas can help you find the problem and fix it. Also, knowing how to fix mount that restricts handlebar rotation is very important.
Question No 2: What tools do I need to fix a restricting handlebar mount?
Answer: To fix a restricting handlebar mount, you’ll need a few basic tools. A wrench that fits the bolts on your handlebar mount is essential. You might also need a set of Allen wrenches for certain types of mounts. A clean rag is helpful for wiping away dirt and grease. Bike grease or light oil can be used for lubrication. Depending on the issue, you might need scissors or wire cutters to adjust cable ties. Having these tools on hand will make the job much easier and safer. Remember to always use the right tool for the job to avoid damaging any parts. Also, knowing how to fix mount that restricts handlebar rotation keeps you riding.
Question No 3: How do I know if my handlebars are misaligned?
Answer: There are several ways to tell if your handlebars are misaligned. Look at the handlebars from the front of the bike. Do they appear straight and even? Or do they look crooked or tilted to one side? Ride your bike and pay attention to how it feels. Does the bike pull to one side? Do you have to work harder to keep it going straight? Compare the position of the handlebars to the front wheel. Are they lined up properly? If you notice any of these signs, your handlebars are likely misaligned and need adjustment. This directly relates to how to fix mount that restricts handlebar rotation, as alignment is key.
Question No 4: Can I use any type of lubricant on my handlebar mount?
Answer: No, you shouldn’t use just any type of lubricant on your handlebar mount. It’s important to use a lubricant that is specifically designed for bikes. Bike grease is a good option for long-lasting lubrication. Light oil can be used for quick and easy lubrication. Avoid using household lubricants like WD-40, as they can attract dirt and grime. Also, be careful not to get any lubricant on the brake pads or tires. This could make them slippery and dangerous. Using the right lubricant will help your handlebars turn smoothly and prevent damage. This is an important part of how to fix mount that restricts handlebar rotation.
Question No 5: What should I do if I see damage to my handlebar mount?
Answer: If you see any damage to your handlebar mount, it’s important to take action immediately. Do not ride your bike until the mount has been inspected and repaired or replaced. Cracks, bends, dents, and loose parts can all compromise the safety of the mount. Take your bike to a bike mechanic for a professional assessment. They can determine the extent of the damage and recommend the appropriate course of action. Riding with a damaged handlebar mount can be dangerous and could lead to an accident. Knowing how to fix mount that restricts handlebar rotation starts with identifying damage.
Question No 6: How often should I check my handlebar mount?
Answer: You should check your handlebar mount regularly, especially before long rides. A quick visual inspection can help you identify any potential problems. Look for cracks, bends, loose parts, and cable obstructions. Also, pay attention to how the handlebars feel when you turn them. Do they turn smoothly and easily? Or do they feel tight or restricted? Performing regular checks can help you catch problems early and prevent them from becoming more serious. This routine is vital to prevent needing to know how to fix mount that restricts handlebar rotation frequently.


